 I learned quite a bit about Shimano Di2 when I installed one of the first available Time Trial/Triathlon groupsets on my Cervelo P2. I’ve subsequently answered a lot of questions on forums and article comments, and elsewhere. In doing so, I realized that people have a lot of questions about Di2 and the answers are difficult to find. This lead me to create this article, to consolidate everything I know and have been asked into one location so people can find answers. If you can’t find what you’re looking for below, please leave a comment and I’ll do my best to help.
Index: There’s lots of info in this post, so here’s an Index to help you find specific sections:
- Di2 General Overview
- Compatibility: Between 6770 10-speed, 6780 11-speed, 9070 11-speed, first-gen 7970
- How to Check Battery Level
- How to Adjust Rear Derailleur Trim
- How to Adjust Front Derailleur Trim
- Dealer Installation Manuals
- Shimano E-tube Project Software – Change Settings and Update Firmware
- Chargers, PC USB Interfaces/Programmers
- Component Overviews
- Shift/Brake Levers
- Dedicated Shift Buttons
- Front Derailleurs
- Rear Derailleurs
- Display Units and ANT Bluetooth Wireless Communication Modules
- Batteries and Battery Mounts (Internal and External)
- Front Cable Connection A Junctions (with charger ports and LED status lights)
- Rear Cable Connect B Junctions
- Cables, Grommets, Cable Install Tools
- List of Components Needed to Build Your Own Di2 System
- Technical Details of the Di2 CANBUS protocol and signaling
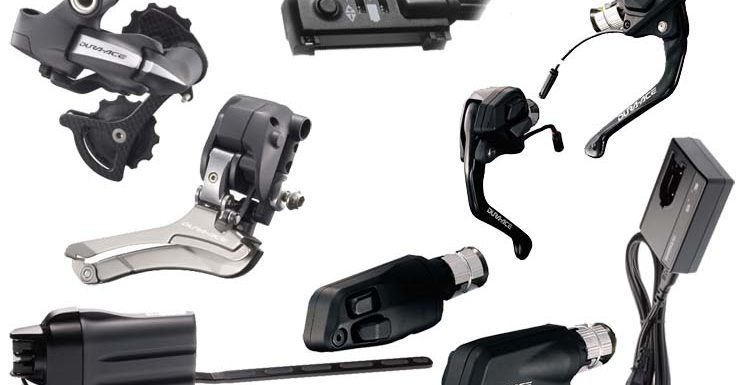
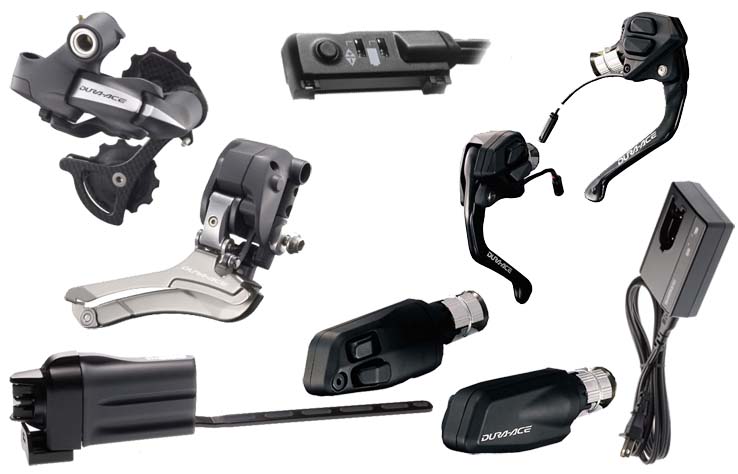
System Overview: Shimano Di2 Dura-Ace 9150 and 9070 and Ultegra 6770 and 6870
The second generation Shimano Ultegra 6770/6870 and Dura-Ace 9070 “E-Tube” electronic bicycle shifting systems consist of battery-powered electric derailleurs activated by handlebar mounted push buttons. Power and shift commands are sent via a 2-wire CAN (Controller Area Network) datalink contained within a single cable housing. This design has several advantages over conventional mechanical shifting systems, the most notable of which are:
- Extremely low shifting effort, which generally results in more frequent shifts and therefore better gear ratio selection.
- Greatly improved shift quality, especially for the front derailleur chainrings, allowing shifting under full power with almost no chance of a dropped chain.
- Shifting is available at multiple positions on the handlebars, for example, at the end of the time trial aero bars, on the brake levers, up to in climbing position, and down low the sprint position.
- Automatic trimming of the front derailleur position as the rear derailleur moves back and forth between the smaller and bigger gears. This eliminates unintended contact (and noise) between the front derailleur and the chain.
- Lighter weight vs. equivalent mechanical system. The Shimano Dura-Ace Di2 9070 electronic groupset with internal battery weighs 2047 grams; the Shimano Dura-Ace 9000 mechanical groupset weighs 2074 grams (27 grams more than Di2.)
- Multi-Shift: Pressing and holding a rear derailleur shift button results in shifts through multiple gears. The rate of shifts can be configured using the PC computer interface cable and the free Shimano E-tube Project software.
- Synchronized Shifting: Starting with Dura-Ace 9150, automated Synchronized Sifting of the front derailleur is an option. Two SHIMANO Synchronized Shift modes will be available:
- Full SHIMANO Synchronized Shift: the front derailleur reacts based on the rear derailleur’s shift action. This essentially means that, when activated, there is no need for two separate shifters to control front and rear derailleurs, the two buttons on one shifter will control both derailleurs.
- Semi SHIMANO Synchronized Shift mode: the rear derailleur reacts based on the front derailleur’s shift action, shifting to the next most appropriate rear gear when the rider makes a front shift.
- R9120, R9170 – syncroshift enabled with firmware 3.2.0 or newer
- 6870, 9070 – syncroshift enabled with firmware 3.2.1 or newer
- 6770 – no syncroshift firmware update will be offered
 Historic Info on the older first generation 5-wire Shimano Dura-Ace Di2 DA-7970 system and how it compares to the new E-tube 2-wire system:
Released in 2009, the 7970 operated using a very basic 5-wire electronic system. Each shift button was connected to a different wire; shorting the specific wires together controlled the derailleur upshifts and downshifts. Because the first generation 7970 used completely different technologies than the newer 2-wire systems, none of the components are cross-compatible. At this point, Shimano is not expected to offer any updates or new components using the first generation 7970 architecture; everything from now on will be based on the newer 2-wire E-tube design. The second generation design offers several advantages, which include: 1) smaller wire size, smaller connector size, waterproof connectors; 2) all switches can be reconfigured in software to send upshift or downshift commands to either the front or rear derailleur; 3) firmware updates can add new features (such as multi-shift) and compatibility with new components.
Compatibility: Dura-Ace 9070 and Ultegra 6770 / 6870 (and old 5-conducter 7970)
The confusing naming system used by Shimano makes it difficult to figure out what each component is, much less what is compatible between systems. Here are some compatibility guidelines:
- Nothing from the first generation (4-conductor / 5-conductor) Dura-Ace Di2 7970 system is compatible with any other newer system. It was replaced by the (2-conductor) E-tube systems. No parts are inter-operable between 7970 and any other Di2 System.
- In general, every electronic Di2 component is compatible between the Ultegra 6770, 6870, and Dura-Ace 9070 systems (see exceptions below.) This means that all of the road bike Ultegra/Dura-Ace dual control brake levers/shifts, time trial shifters, and climbing shifters can be used with either Ultegra 6770/6870 or Dura-Ace 9070 front and rear derailleurs. Any of the Ultegra/Dura-Ace controllers (A Junctions) can be used with either system. All components use the same cables and connectors.
- Firmware Update Required to Make Older Components Compatible with Newer Components: If you add a new component and it doesn’t work, update the firmware using the PC USB adapter and the Shimano E-tube Project Software for Windows.
- Synchronized Shifting and Bluetooth Wireless Units can be added to all E-tube Ultegra and Dura-Ace systems but the battery has to be upgraded to the BT-DN110 Internal Battery or BM-DN100 External Battery Mount. To add Bluetooth capability, a EW-WU101 or EW-WU111 inline transmitter must be added to road bikes and for mountain bikes, the SC-MT800 or SC-M9051 display/transmitter unit must be added.
- Compatibility Exceptions:
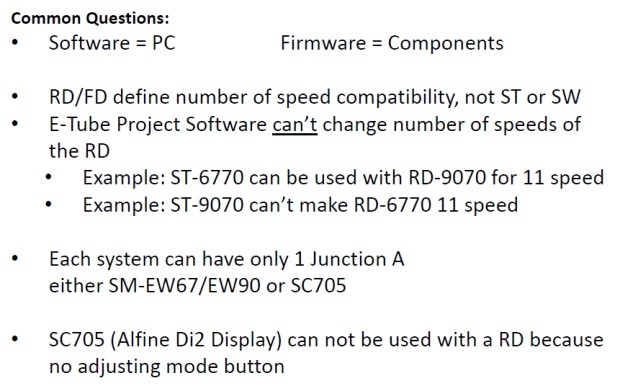
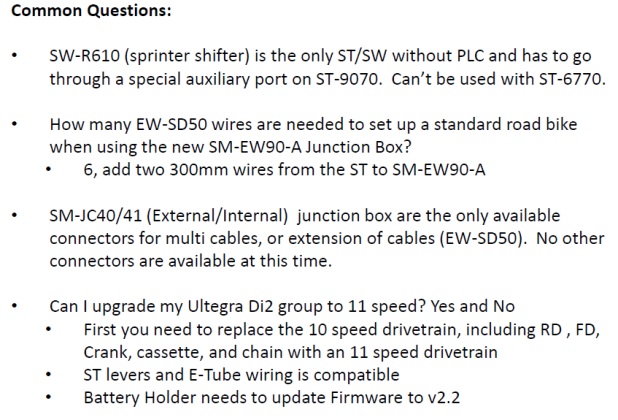
- Note 1 – Sprint Shifter Exception: The Sprint Shifter is the only exception for shifter incompatibility. It has a different wiring connector (and internal components) that can only plug into a unique/dedicated third port on the Dura-Ace ST-9070 Dual Control Brake Levers/Shifters and also the ST-6870 Levers. There is no sprint shifter port on the ST-R785 Hydraulic Levers.
- Note 2 – Can’t mix 10-speed/11-speed front/rear Derailleurs: It is no longer possible to use a 10-speed front derailleur with an 11-speed rear derailleur (and 11-speed front with 10-speed rear.) See note farther below to read the history on this if you want all the messy details.
- Note 3 – Front A junction and Internal Battery: Since the February 2015 firmware update, the older SM-EW67-A-E Front Junction A is no longer compatible with the BTR2 Internal Battery because it does not have the charging port to charge the internal battery. The SM-EW90 Front Junction (with integrated charging port) should be used instead. The SM-EW67 still works with the external battery.
- Note 4 – Update the Firmware to make components compatible: If the firmware on all components is not updated to the latest version, some components may be not operate correctly with one another. So download the latest E-tube software and update everything and it should work.
- Note 5 – All Shifters work with all 10-speed and/or 11-speed Rear Derailleurs: All of the shifters are compatible with either the 10-speed Ultegra 6770 or 11-speed Ultegra 6870/Dura-Ace 9070 systems as long as they all have the latest firmware. The rear derailleur is the only component that “knows” or “cares” how many rear gears are available. The shifters only send upshift/downshift commands and do not “know” or “care” which gear is currently selected and how many total gears there are.
- Note 6 – SM-BTR1 External Battery and SM-BMR1 Mount firmware updates: The more expensive dedicate service tool (SM-PCE1 PC Interface) must be used to upgrade the firmware on the external battery/mount.The external battery and battery mount can not receive firmware upgrades via the SM-EW90 Front Junction A and the SM-BCR2 PC Interface/Battery Charger. (The SM-EW90 will work in a system with an external battery, but a firmware update can cause them to become incompatible until both are updated independently using the appropriate PC Interface and the Shimano E-Tube Project software.)
- See the Shimano E-tube compatibility chart version 3.4.3 for more details
Compatibility: 11-Speed Rear Derailleur and 10-speed sprockets/wheels
The 11-speed Dura-Ace 9070 and Ultegra 6870 rear derailleurs are designed exclusively for 11-speed rear sprockets and 11-speed Front Derailleurs. Shimano does not provide a way to recalibrate/reprogram them for a 10-speed setup. The sprocket spacing is slightly smaller and the overall range of travel slightly longer on 11-speed systems. If you have 10-speed wheels and 10-speed sprockets, you should use the 10-speed RD-6770 rear derailleur and a 10-speed FD-6770 front derailleur.
Similarly, a 10-speed RD-6770 rear derailleur should not be used with 11-speed sprockets. There will be chatter in some gears, and there might be slow-shifts or self-shifts.
It doesn’t matter which shifters are used; the shifters send upshift/downshift commands regardless of which derailleur config is being used. Shifters do not “know” or “care” which gear is currently selected and how many total gears there are.
Front Chain Rings: In general, most any front chain rings will work, rigid forged rings work best with Di2 due to high front derailleur shift forces. Shimano chain rings tend to be the best, but most others work as well. A 10-speed specific or 11-speed specific chain should be used, but the differences between them are minimal and can generally be mixed/matched without issue.
How to convert “non-upgradeable 10-speed only” wheels such as Zipp 900/Sub9 Disc Wheels to 11-speed: “the spacing between a Campy 11 and Shimano 11 is close enough that you can use the cassettes interchangeably. If you get a Campy free hub body, the 2 shims (part# is on the Zipp website, just search for Campagnolo 11) and a Campy cassette and you’re ready to ride with all 11 cogs available to use.” via slowtwitch.com
But it’s an emergency and I need to use a 10-speed wheel. . . In emergency situations, 11-speed rear derailleurs can be used with 10-speed sprockets. There will probably be chatter in some gears, and there might be slow-shifts or self-shifts. To setup an 11-speed rear derailleur for a 10-speed sprocket setup, adjust the mechanical limit screw so that it can’t shift into the missing 11th sprocket position, then follow the rear derailleur adjustment procedures listed below.
Included for very motivated individuals only: 10-speed front derailleurs can be used with 11-speed rear derailleurs if the shifters and battery have firmware installed from E-tube software version 2.5.2 or earlier. Shimano disabled support for this 11-speed and 10-speed cross-matching with later firmware updates. For informational purposes only, the details of how to regain compatibility are detailed below.
- Important Notice 2014-07-14: There is a compatibility issue with Shimano e-Tube software/firmware versions v2.6.0 and later that prevents 10-speed front derailleurs (FD-6770) from working with 11-speed rear derailleurs (RD-6870) and 11-speed front derailleurs (FD-6870) from working with 10-speed rear derailleurs (RD-6770). DO NOT UPDATE FIRMWARE using Shimano e-Tube software v2.6.0 or later if you are mixing an FD-6770 front derailleur and a RD-6870 11-speed rear derailleur, or a FD-6870 with a RD-6770.
- The problem component is the battery (external battery mounts SM-BMR1 and SM-BMR2, internal seat post battery SM-BTR2.) If you keep battery firmware at v2.0.6 or earlier, the system will continue to function properly. Shimano e-Tube Software v2.6.0 will update battery firmware to v3.0.5, and will not allow the RD-6870 to work with a FD-6770 setup.
- If the battery firmware is updated to 3.0.5, it CAN NOT be rewritten back to the older version. You will need to need to replace a derailleur so that both are 6770 10-speed or so that that both are 6870 11-speed. (The other option is to get get a battery with the older firmware and never update it.)
- Here’s a link to the “last known good version” of the Shimano e-Tube software to work with a mixed 10-speed/11-speed system: E-tube_Proj_V_2_5_2.zip Use this version and do not connect to the internet when using it so that E-tube can’t check for updates when open.
- To roll-back newer versions of battery and shifter firmware, install E-tube version 2.5.2 and made a copy of “C:\ProgramData\E-tube Project\FW” which has all the firmwares packaged in that version of E-tube. Next, install the latest version of E-tube. Then copy all the firmwares from the the 2.2.3 version back to the same location “C:\ProgramData\E-tube Project\FW” for the latest version (note: ProgramData is a hidden directory, click here for details on how to view it.). Next, the trick is to find the firmware you want to downgrade (pretty easy from the name and version in the file name), and then rename it to the same name as the latest version, but increment the last version digit by one. Then connect to the bike with E-tube (without an internet connection) and it will identify that a firmware upgrade is available for that component and allow you to do the firmware “upgrade” to the older version of firmware. Now exit E-tube and then rename the firmware file back to original to prevent the issue in future. E-tube will then try to upgrade again but just don’t let it do that. This should get a bike that did nothing (not even enter adjustment mode) to a fully working state by reverting the battery and shifters. Running latest firmware in derailleurs seems to be fine. (thanks to commenter vosadrain)
- It will not be possible to charge the BTR2 internal battery using the BCR2 USB charger unless you also downgrade the firmware of the BCR2 USB charger as well.
- Note however that latest E-tube software will say the setup is unsupported and will not allow programming. To do programming, disconnect the internal battery and connect a spare external battery. This allows making settings changes. To program the BTR2 itself, I just connect to the BTR2 by itself (no other components) and the E-tube software will allow firmware changes to it. Or try using the 2.5.2 version of E-tube.
- Alternatively, buy a Di2DIY internal seat post battery kit and you will not have to go through the firmware downgrading. The kit makes it possible to run all components with the latest E-tube firmware. Also worth noting some firmware updates were done to fix power distribution errors in the FPGA’s that would allow the batteries to drain down when the bike was just sitting.
Checking Battery Charge Level:
A single battery charge should give at least 1500 miles of riding. Most riders will not need to charge the battery more than twice a year.
To check the battery charge remaining, press and hold any shifting switch for 0.5 seconds or more. The amount of battery charge remaining will be indicated by the light on Front Controller A Junction.
- 100% remaining: Illuminates green (for 2 seconds)
- 50% remaining: Flashes green (5 times)
- 25% remaining: Illuminates red (for 2 seconds)
- 0% remaining: Flashes red (5 times)
When the battery charge is low, first the front derailleur will stop operating, and then the rear derailleur will stop operating. When the battery charge has been fully spent, the derailleurs will be fixed at the last gear shifting position. If the battery indicator is illuminated red, it is recommended that you recharge the battery as soon as possible.
Adjusting the Rear Derailleur Trim:
If you switch between multiple rear wheels, it’s very likely that the sprockets on different wheels won’t be in exactly the same relative position to the rear derailleur, resulting in that annoying clicking sound as the chain makes contact with an adjacent sprocket. Follow the steps below to properly align the rear derailleur with the rear sprockets.
- Shift the rear derailleur to the 5th sprocket position. Press the button at the junction (A) of the SM-EW67-A-E until the red LED illuminates in order to switch to rear derailleur adjustment mode. Note that if you keep pressing the button after the red LED has illuminated, protection recovery operation will begin.
- If shifting switch is pressed once while the initial setting condition is active, the guide pulley will move one step toward the inside. If shifting switch (Y) is pressed once, the guide pulley will move one step toward the outside.
- Note: The guide pulley can move 15 steps inward and 15 steps outward from the initial position, for a total of 31 positions.
- Note: When adjusting, the guide pulley will overrun slightly and then move back in an exaggerated movement so that you can check the adjustment direction. When checking the positions of the guide pulley and the sprocket, check at the position where the guide pulley finally stops.
- While turning the front chainwheel, operate shifting switch to move the guide pulley toward the inside until the chain touches the 4th sprocket and makes a slight noise.
- Next, operate shifting switch 4 times to move the guide pulley toward the outside by 4 steps to the target position.
- Press the button at junction (A) until the red LED turns off in order to switch from rear derailleur adjustment mode to gear shifting mode. Shift to each gear and check that no noise is generated at any gear position. If fine adjustment is needed, switch back to adjustment mode and readjust the rear derailleur.
- Note: if you have customized your shifters and swapped buttons, this will change which shifter and buttons control the micro-adjustments. Also, if you hit the wrong buttons while trying to set the FD trim, you can actually alter the setup of your RD. Be certain that you’re hitting the correct adjustment buttons.
- If you have a Garmin or similar head unit and a SM-EWW01 ANT module, the display will automatically switch into derailleur trim display when you activate that mode (i.e. by pressing the button at the junction (A) of the SM-EW67-A-E.) It will give you the trim position in either + or – 12 positions. When switching wheels, simply take note which position suits which wheel/sprocket/trainer, and trim to that level each time you change. This removes the guesswork and makes changing from wheel to trainer simple.
Note on FD-6870 Front Derailleur Trim:
The FD-6870 trim adjustment effects the auto-trim positions. The adjustment feature is accessible via either the A-Junction box, or the “Front derailleur adjustment setting” in the e-tube software, and should be used only after you have already set the physical inner/outer limit screws. So for example, if the FD outer plate rubs the chain when using the 6th largest cog, you would want to adjust the FD trim outward a couple ticks. However, you can only perform this adjustment while in the big-ring/big-cog combination. Etube forces the derailleurs into this maximum cross-chained position, whereas during the manual method you must shift to these positions yourself. (Thanks to commenter Bryan B for the info.)
Dealer Manuals:
The dealer’s manuals contain the most detailed information available from Shimano. If you’re looking for detailed installation instructions, check here:
- Shimano Ultegra 6770 Dealer’s Manual: http://techdocs.shimano.com/media/techdocs/content/cycle/SI/Ultegra/UltegraDi2/6770Di2_DM_EN_v1_m56577569830773882.pdf
- Shimano Ultegra 6870 Dealer’s Manual: http://si.shimano.com/php/download.php?file=pdf/dm/DM-UL0001-00-ENG.pdf
- Shimano Dura-Ace 9070 Dealer’s Manual: http://si.shimano.com/pdf/dm/DM-DA0001-00-ENG.pdf
- Shimano Alfine Di2: http://si.shimano.com/php/download.php?file=pdf/dm/DM-AL0001-03-ENG.pdf
Shimano E-tube Project Configuration and Firmware Update Software for Windows:
Shimano E-tube Project Wireless for iOS and Android: Announced on April 15, 2016 but as of yet unreleased, these apps will allow configuration of shift profiles (multi-shift on/off, multi-shift delay between shifts, shifter button assignments) and firmware updates over Bluetooth. To function, a Shimano Di2 Bluetooth Adapter, such as the MT800 digital display, is required.
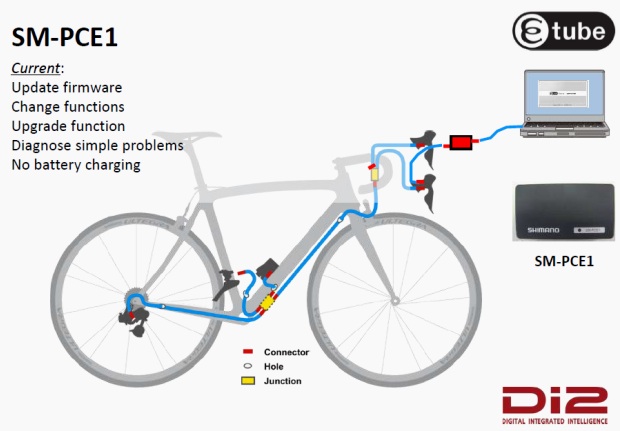
Shimano E-tube Project Windows PC Software: This free software is used to update the firmware of all components. It works with the SM-BCR2 Charger + USB Adapter and the SM-PCE1 Diagnostic Adapter. The software is used to change the configuration of each shift button / lever (any can be programmed to upshift or downshift either the front or the rear derailleur.) It can also be used to enable multi-shift (multi-shift is where the shifter is held and the rear derailleur shifts through multiple gears until the shifter is released.) The delay between of the gear changes during multi-shifting can also be adjusted. The software is available from http://e-tubeproject.shimano.com/
Older versions of the e-tube software are available from these links: 2.5.2
PC & Mobile Interfaces, Chargers, and Software:
SM-BCR1 Battery Charger: This is used to charge the external battery. The part number for the battery charger wall cord is SM-BCC1.
SM-BCR2 Charging and PC Connection: for SM-EW90-A 3-port and SM-EW90-B 5-port A Junctions. This plugs into a special port on the side of the A junctions (which is covered by a rubber flap.) This adapter charges the internal battery when first plugged into the A junction; it must be powered by a standard USB Wall charger (such as that used for an Apple iPhone) or a PC that is powered-on. If the Shimano E-Tube Project Software is launched on the Windows PC with the SM-BCR2 attached, the SM-BCR2 will switch from charging mode to configuration mode. It must be detached from the computer and reattached to switch back to charging mode.
- It takes about 2 hours to charge the internal battery.
- Amber light=charging.
- Light turns off when done.
- If the Amber light does not come on when plugged in, this indicates battery is not discharged enough to charge.
- Light flashing indicates something is wrong, like trying to charge a external battery through a BMR.


Hacking the SM-BCR2 to have a standard Di2 cable connector: If your 3-port or 5-port junction is inaccessible for charging, there is an alternative hack method to connect it to the system through a standard Di2 port. With basic soldering skills you can hack the BCR2 to be used with any setup. Buy any length EW-SD50 wire, cut off one end. Cut the wire on the output side of the BCR2. Splice the two wires together, so that the output wire of the BCR2 is now a standard Di2 connector. The charger has an inner (white) and outer (shield) wire; connect the inner white wire to the SD50 red wire; connect the charger outer shield wire to the SD50 black wire. You will then be able to plug the BCR2 into any Di2 port. Or use a SM-JC40 junction B and another length of EW-SD50 wire and go through the RD (by using the SM-JC40 to connect the rear derailleur, new output wire of the EW-SD50, and the wire that ordinarily connect the rest of the system to the rear derailleur.) Thanks to @Di2diy for the info.
SM-PCE1: This PC Configuration and Diagnostics adapter will not charge the internal battery. It offers the same configuration options as the SM-BCR2, but also add some advanced diagnostic and troubleshooting features that the SM-BCR2 does not have. It attaches to via the standard E-tube wire (just like the EW-SD50 cables) rather than to a dedicated port on the side of the front A junction.
Bluetooth and E-tube Apps for Apple iOS and Android: Bluetooth wireless modules are available to allow system settings to be adjusted via the mobile applications that connect via Bluetooth Adapters.
Component Overview:
The confusing naming system used by Shimano makes it difficult to figure out what each component is, much less what it does and how it fits into an a complete Di2 system. Here’s an overview of all the major Ultegra and Dura-Ace Di2 components.
Dual Control Brake Levers/Shifters (a.k.a. Brifters):
ST-6770 Ultegra Road Dual Control Brake Levers/Shifters: The Ultegra version can be used with the climbing shifters. They are sold in in left/right pairs and are also available separately.

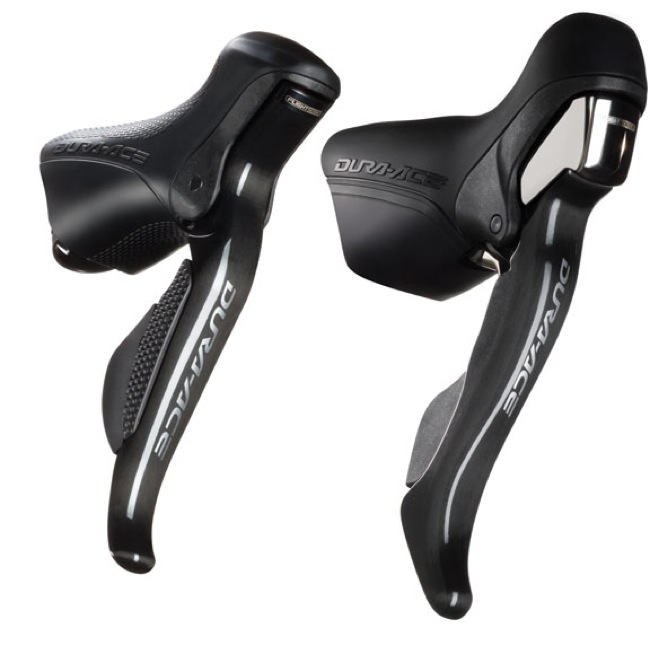
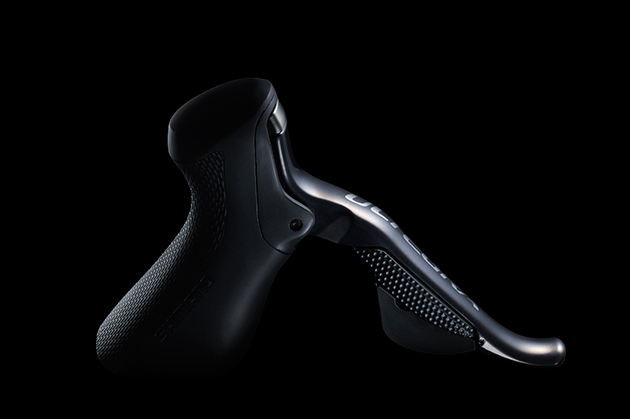
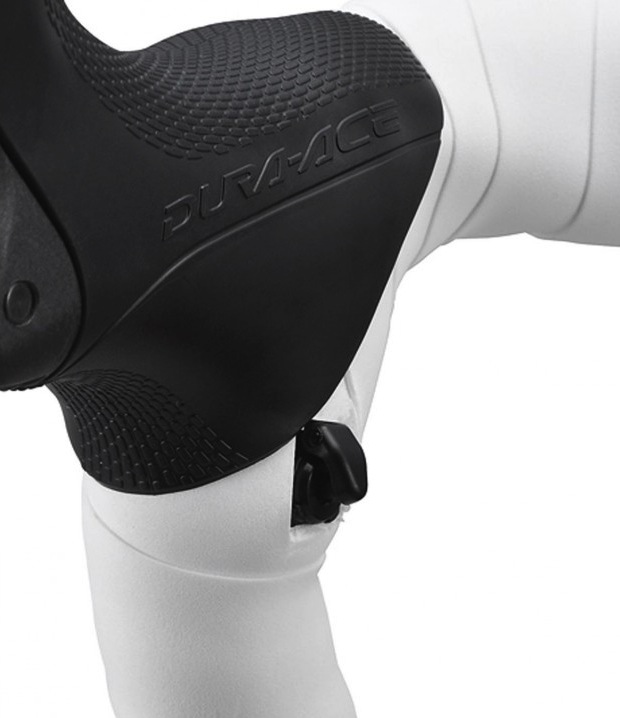
ST-9070 Dura-Ace Road Dual Control Brake Levers/Shifters: The main advantages these have over the ST-6770 version is slightly lighter weight and compatibility with the low-mount sprint shifters. As like the Ultegra version, they are compatible with the climbing shifters. They also have hidden button under the rubber hoods that can activate screen changes on cycling computers from Garmin, Magellan, Pioneer, and Shimano (Shimano SM-EWW01 ANT Wireless Broadcast Module required.)
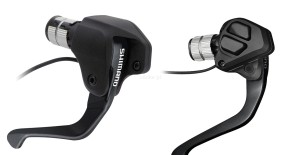
ST-9071 Dura-Ace Time Trial/Triathlon Dual Control Brake Levers/Shifters: These levers provide shifting from the pursuit bar position on time trial bikes. There is no Ultegra option offered at this time. These are available as left/right pairs, or can be ordered separately. These do have a permanently attached wire with a male end for connection the the SM-EW90 front “A” junction. Combined weight both levers: 117 grams.
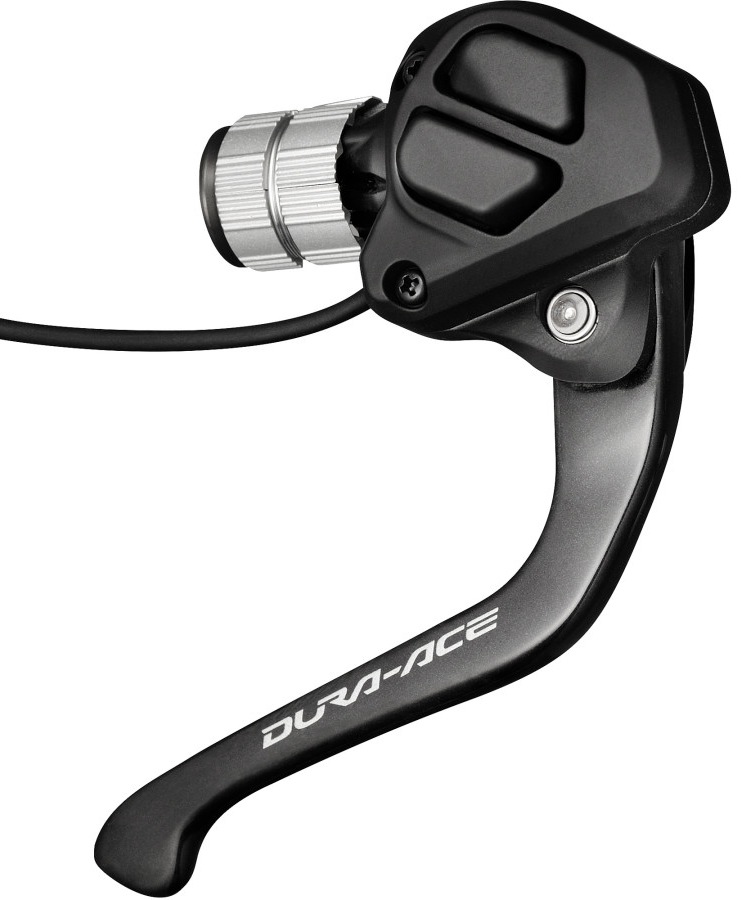
ST-R9160 (standard cable brakes) and ST-R9180 (hydraulic brakes) Time Trial Dual Control Brake Levels/Shifters: These are the lower-profile shifters offered with the newer Dura-Ace R9150 groupset.
ST-6871 Ultegra Time Trial/Triathlon Dual Control Brake Levers/Shifters: Ultegra version of the ST-9071 Dura-Ace shifters. Slightly heavier and much less expensive than the Dura-Ace version. Combined weight both levers: 142 grams.
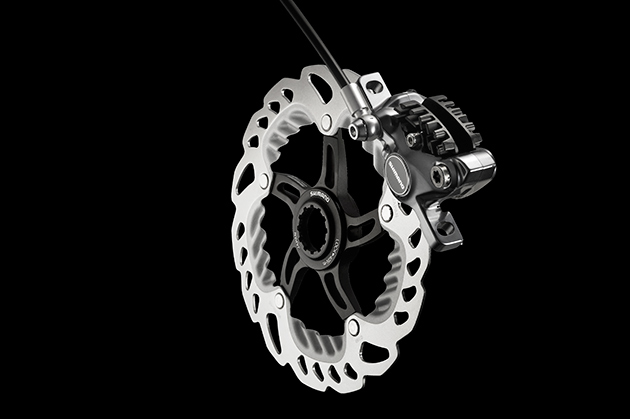
ST-R785 Hydraulic Road Dual Control Brake Levers/Shifters: These hydraulic road shifters are compatible with both the climbing and sprint shifters. These are compatible with the SM-RT99 centerlock 140mm and 160mm rotors and WH-RX31 wheelset (which as no standard rim brake track.) These require the BR-785 dual piston hydraulic disc calipers. They do not have the special wiring port required for the SW-R610 Sprint Shifters and a SM-EW90-B 5-port junction A is required to use the SW-R600 climbing shifter.

ST-6870 Ultegra Road Dual Control Brake Levers/Shifters: These road shifters are compatible with both the climbing and sprint shifters.
Dedicated Shifters:
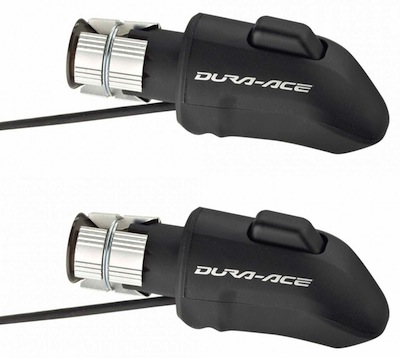
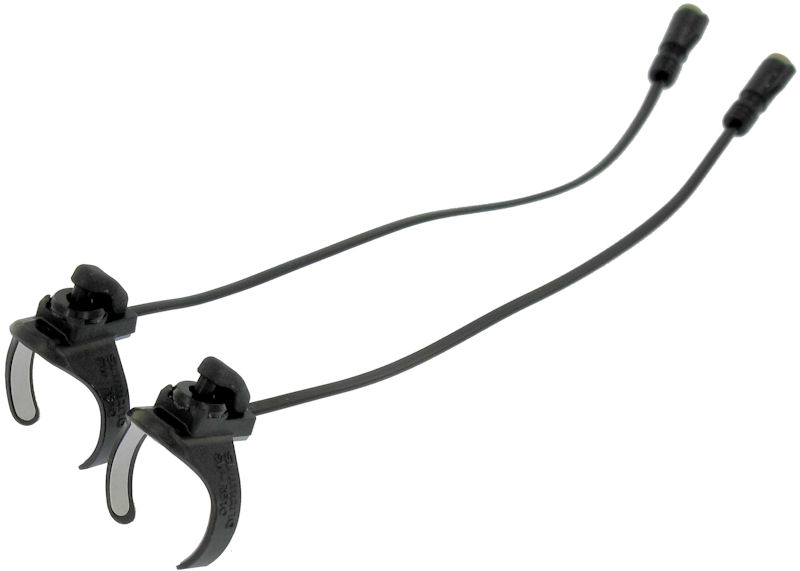
SW-R671 Dura-Ace 2-Button Time Trial/Triathlon Bar End Shifters: These shifters are installed on the end of time trial aero bars. By default, the left shifter upshifts/downshifts the front derailleur; the right controls the rear derailleur. For both, the lower button upshifts into a harder gear and the upper button downshifts to an easier gear. This can be changed using the Shimano E-tube Project software; the functions of the left and right sifters can be switched with one another as well. These are available in pairs or separately.
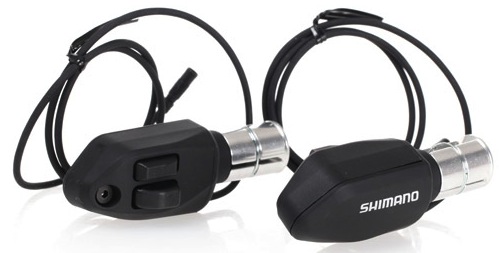
SW-9071 Dura-Ace 1-Button Time Trial/Triathlon Bar End Shifters: These shifters have only one button each and are intended to control only the rear derailleur, with one sending the upshift command and the other the downshift command. (I personally think this version is absolutely worthless. Why have 2 SW-9071 shifters at twice the price and twice the weight, when you can just buy a single SW-R671 Right shifter instead.)
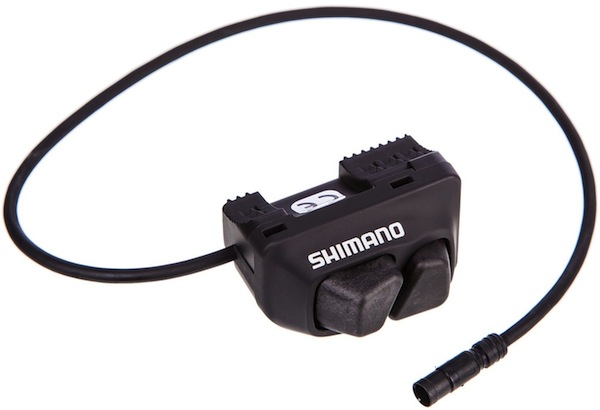
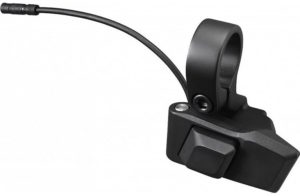
SW-R600 Climbing/PAVE Shifter: This shifter is for road bikes and is mounted on the upper horizontal portion of the handlebar, or any other location comfortable for the rider. They can be used in addition to the Dual Control Brake Lever/Shifter, or can be used on their own by plugging directly into a SM-EW90-A 3-Port Junction or SM-EW90-B Dura-Ace 5-Port Junction.
SW-R610 Dura-Ace Sprint Shifter: This is the only component using a unique wiring connector; it is only compatible with the ST-9070 Dura-Ace and Ultegra ST-6870 Road Dual Control Brake Levers/Shifters. Unlike all of the other shifters, the sprint shifters do not contain a circuit board; they do not show up as components on the CAN bus network. Instead, the sprint shifters are simple momentary switches that activate the circuit board on the host Dual Control Brake Lever/Shifter. The host dual control lever is what sends the shift command. (Note: Any momentary switch can be attached to the sprint shifter port on the Dual Control Levers by splicing into a standard EW-SD50 wire to act as remote shifters.)
Alfine SW-S705 Right Flat-Bar Shifter: Reported to work with other non-Alfine setups.
SW-R9160 Time Trial bar-end shifters (pair): These are-end shifters directly control the rear derailleur, with one for the upshfit and one for the downshift. The front derailleur is controlled automatically via automatic Synchronized Shifting. These shifters require the BT-DN110 Internal Battery for synchronized shifting.

SW-R9150 Climbing shifters (pair): These tiny climbing shifters are about as small as the sprint shifters, but can be directly connected to a junction box and do not have to be connected as slave buttons to a brake/shift lever special port. They come with plastic mounts to make it easier to attach to bars beneath bar tape. They are ideal for synchronized shifting, with one controlling the upshifts and the other downshifts. These shifters require the BT-DN110 Internal Battery for synchronized shifting.
![]()
![]()
Front Derailleurs:
FD-6770: Ultegra Front Derailleur
FD-6870: Ultegra Front Derailleur, pretty much identical to the FD-6770 but with a slightly larger diameter adjusting screw (to better dissipate the shifting forces).

FD-9070: Dura-Ace Front Derailleur
FD-R9150: Dura-Ace Front Derailleur for 9150 systems; features slightly reduced weight vs. 9070.
Rear Derailleurs:
RD-6770: Ultegra 10-Speed Rear Derailleur, compatible with gears up to 28 teeth.
RD-6870: Ultegra 11-Speed Rear Derailleur, compatible with gears up to 32 teeth (for the GS version).
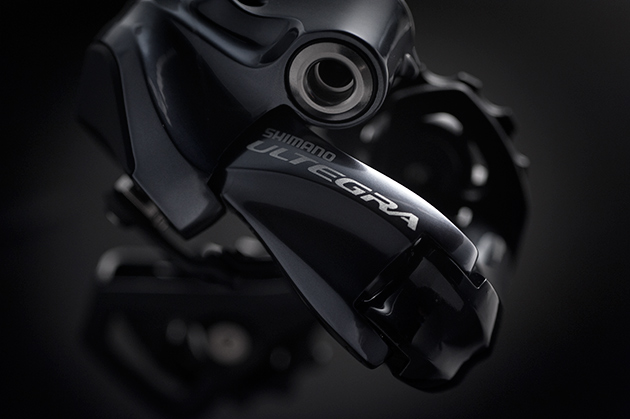
RD-9070: Dura-Ace 11-Speed Rear Derailleur, lighter weight version on which the RD-6870 is based.
RD-R9150: Dura-Ace 11-Speed Rear Derailleur with 30-tooth sprocket compatibility and modified “Shadow RD” geometry to keep the mechanism close to the rear wheel to help avoid damage in the event of an accident.
Alfine SG-S505 and SG-S705: The Shimano series targets comfort and urban bikes. It uses an 8-speed (505) or 11-speed (705) internal epicyclic rear hub. It is believed to be compatible with other Di2 ETube components but this has not been verified.

Display / Wireless Communication:
SM-EWW01 ANT Wireless Broadcast Module: This module wirelessly broadcasts Di2 data (front and rear gear selection details, gear ratio, battery life) to a cycling computer using the ANT protocol. It is compatible with Dura-Ace 9070, Ultegra 6870 Di2 and Ultegra 6770 E-tube road shifting systems. SM-EWW01 plugs into the E-tube wiring system between existing components. It has an 2 wiring ports, so it can be connected between a front shifter and the Front Junction A, or at the rear derailleur (between rear derailleur and Etube wire.) It transmits through a proprietary private ANT wireless protocol, which may eventually become a standard public ANT+ protocol. It is powered by the same Di2 system battery. It is currently compatible with the Garmin Edge 1000, Mio 505, and the PRO SCIO cycling computers (with more to come.) The hidden buttons under the hoods of the 9070 shifter levers will switch screens on the cycling computer when paired with this module. It does not currently allow for shifting control from a cycling computer/device and it is not clear that this functionality will ever be offered. The SM-EWW01 is 38mm long, 25mm wide, 12.5mm high, and weighs less than 5 grams. It does not come with any wires; 1 wire would have to be added if adding this module to an existing Di2 system.
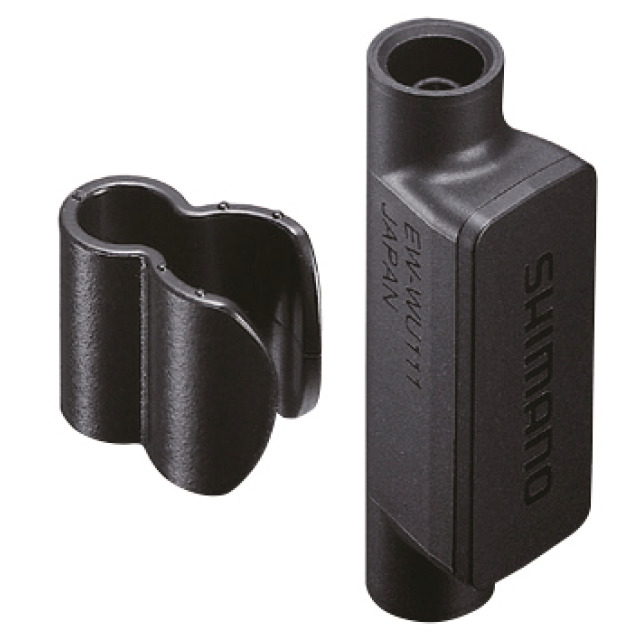
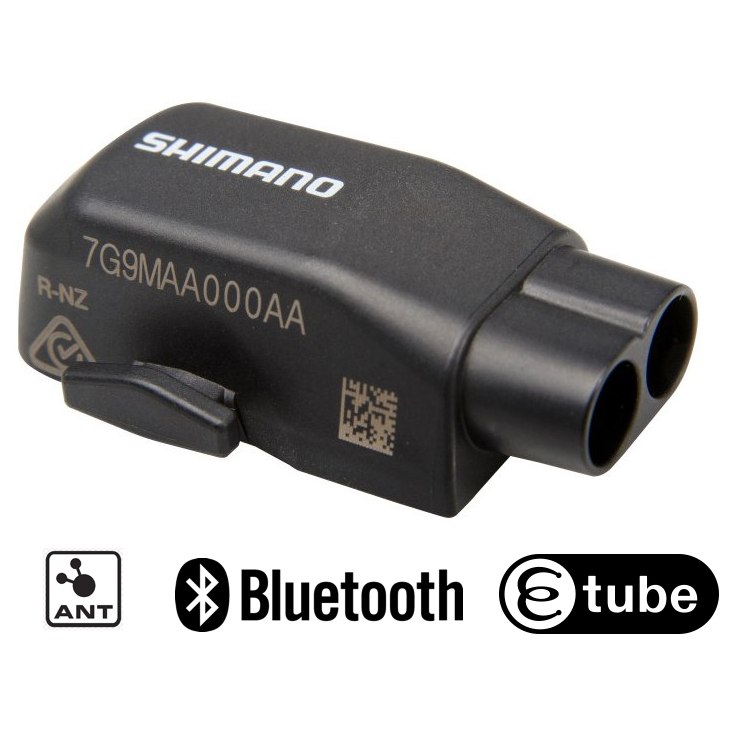
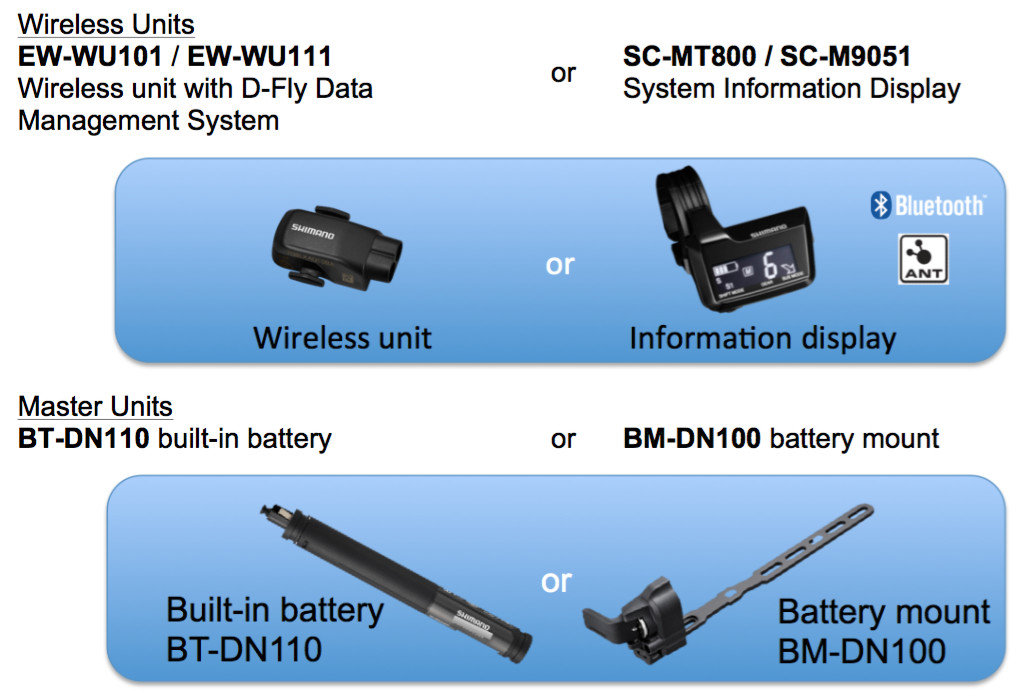
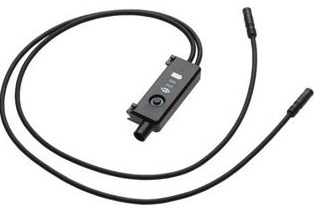
EW-WU101 and EW-WU111 ANT and Bluetooth Wireless Broadcast Modules: These modules are similar to the SM-WEE01 but also include Bluetooth capabilities in addition to ANT capabilities. They require the BT-DN110 battery or the BM-DN100 Battery Mount and cannot be used with the SM-EW67 Front A Junction.
SC705 Alfine Display Unit: This unit displays the battery level and the rear derailleur gear selection. It is powered by the system battery and has a port for the SM-BCR2 internal battery charger / USB diagnostic tool. It is primarily designed for Alfine systems (both 8 505-series and 11 speed 705-series). It is compatible with Ultegra and Dura-Ace Di2.

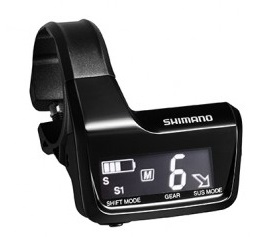
MT800 Digital Display with Bluetooth: Primarily aimed at XT mountain bike applications, this display allows toggling between the 3 synchronized shift modes (where both derailleurs are intelligently coordinated in unison by one pair of buttons, so no need for discrete shifting of the front derailleur.) It also shows battery level, gear position, shift mode and FOX iRD suspension position. The Digital Display required the new BT-DN110 battery. Existing Di2 XT systems are upgradable to be compatible with the new digital display after battery upgrade and firmware upgrade. This display has 3-port Di2 Cable junction and charging port integrated into the back and serves as a Front A Junction.
Batteries and Battery Mounts:
The batteries contain the main controllers for the system. It is therefore required to upgrade the battery to get features released in new versions of Di2 (such as Synchronized Shifting that automatically controls the front derailleur based on rear derailleur shifting.)
SM-BTR1 External Battery: This external battery must be used with the SM-BMR1 battery mount. It is removed from the mount and charged using a dedicated charger.
SM-BMR1 and SM-BMR2 External Battery Mount: This mount attached to bottle cage mount points or other dedicated frame mounts. It is available in 3 different mount lengths: -I (intermediate length), -S (short length), -L (long length). The SM-BMR2 is an updated version of the SM-BMR1.
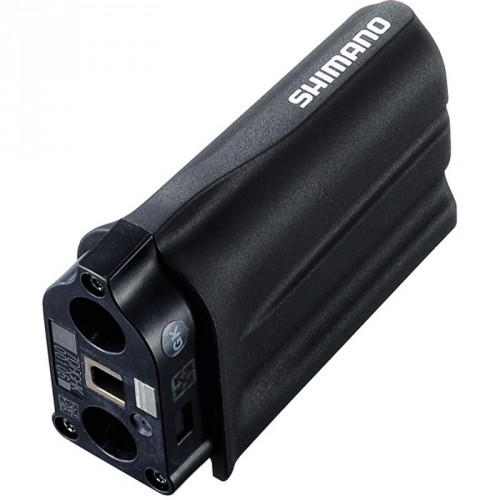
SM-BTR2 Internal Battery: This battery is typically mounted in the seat post or seat tube of the frame. It is charged by plugging the SM-BCR2 Charging Cable/PC Adapter into the SM-EW90-A or SM-EW90-B Front A junctions.

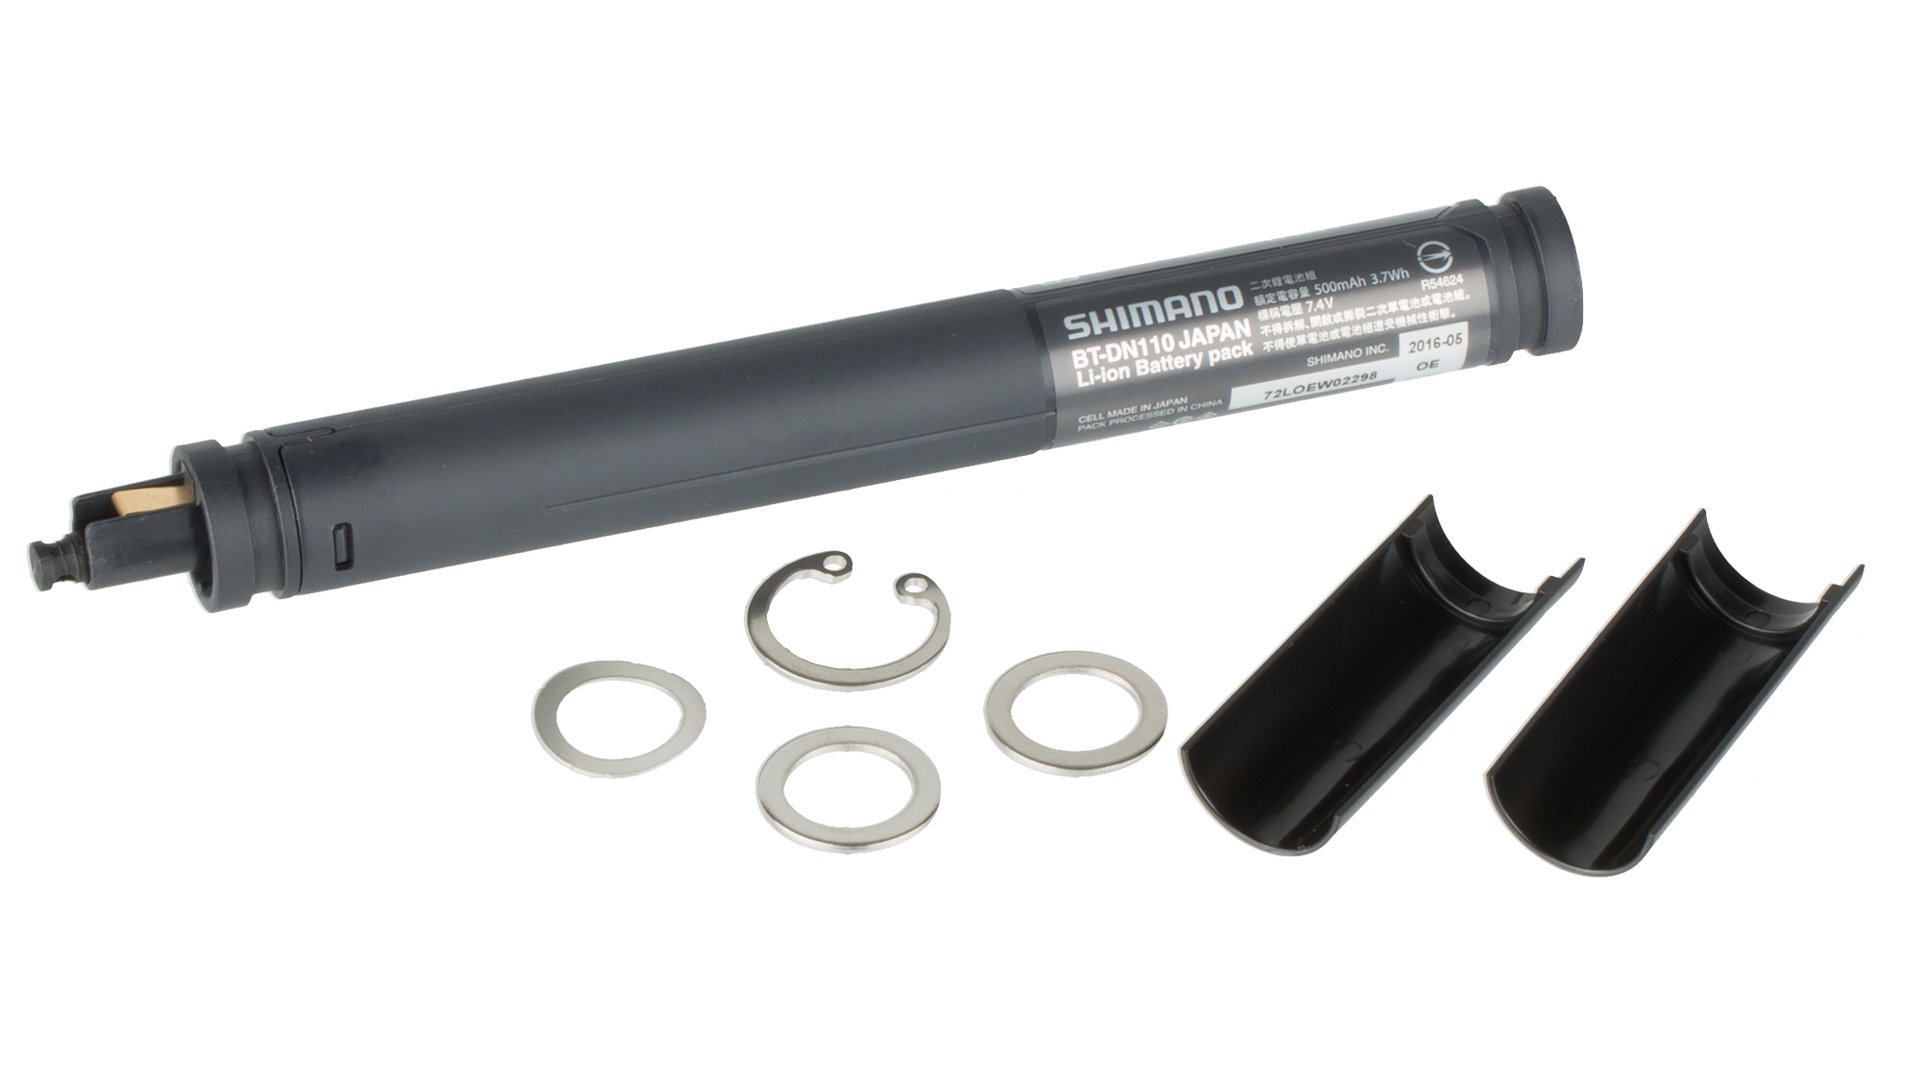
BT-DN110 Internal Battery: This battery is required for Bluetooth wireless units and road groupset Synchronized Shifting functionality.
BM-DN100 External Battery Mount: This battery is required for Bluetooth wireless units and road groupset Synchronized Shifting functionality.
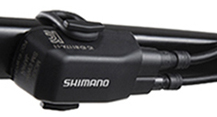
Front A Junctions:
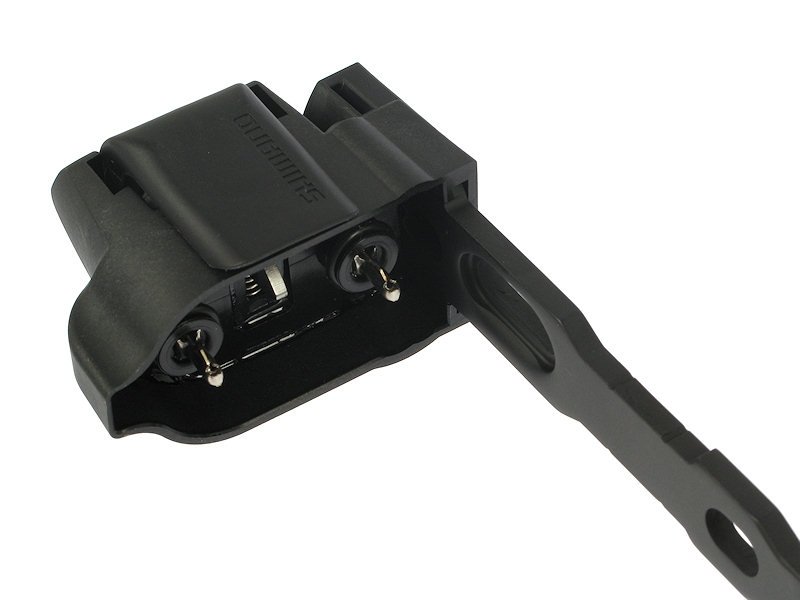
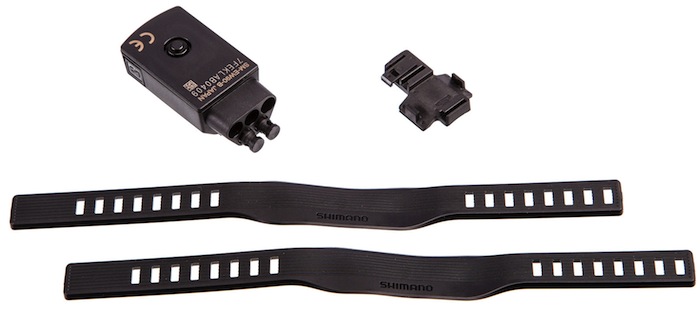
SM-EW67-A-E Ultegra 3-Cable Junction: This is the original front junction with 2 integrated cables to connect to the dual control brake lever/shifters. The male cable ends on this Front A Junction will not mate directly to the male cable ends on any of the Time Trial/Triathlon dual control brake shift levers or shifters; SM-JC41 Rear B Junctions can be used to connect this front A junction to TT/Triathlon shifters. This Junction works only with External Batteries, not Internal Batteries.
SM-EW90-A Dura-Ace 3-Port Junction: This front “A” junction is most commonly used in road bike setups. 2 ports connect to the dual control brake / shift levers; the third port is for the cable that leads to the bottom bracket junction.
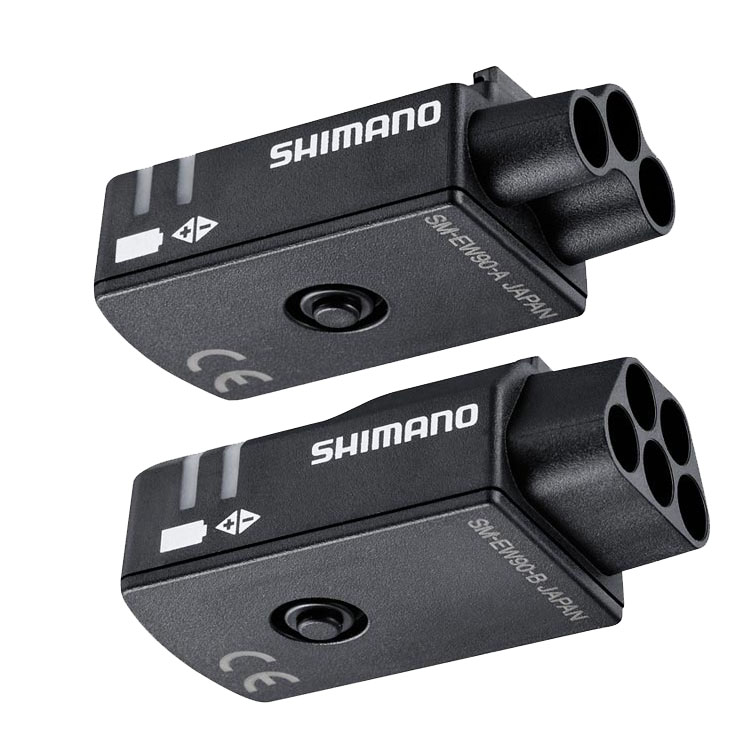
SM-EW90-B Dura-Ace 5-Port Junction: This front “A” junction is primarily used in the Time Trial / Triathlon setups. 2 of the port are for the brake/shifter dual control levers, 2 of the ports are for the aer0 bar bar-end shifters, and the 5th port is for the cable that runs to the bottom bracket (where the B junction joins the wires from the front A junction, front derailleur, rear derailleur, and battery.)


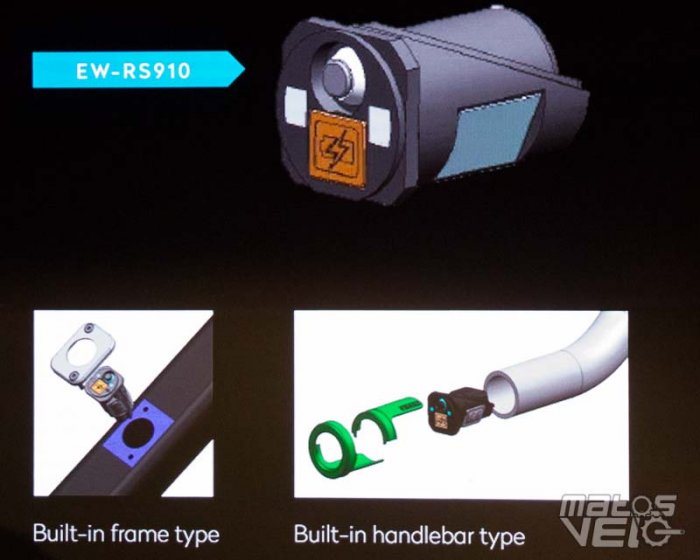
EW-RS910 Internal Bar-end Junction: This junction is installed into the end of a bar or in a dedicated frame port. It facilitates internal cable routing.
B Junctions:
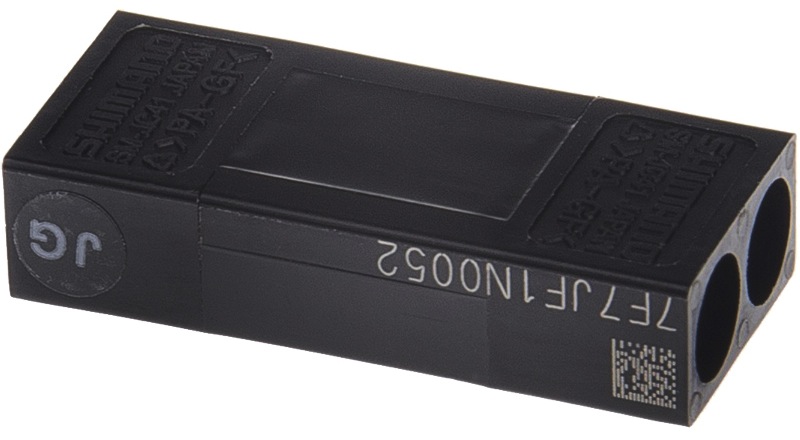
SM-JC41 Internal Junction: This version has the exact functionality as the SM-JC40 external version, but doesn’t have the mounting tab for being bolted to the bottom bracket or wrapping the extra cable lengths. It has 2 ports on one end and 2 on the other, making it more compact. In addition to being located at the bottom bracket to connect the A junction, battery, front derailleur, and rear derailleur, it can be used at the handle bars to join multiple shifters prior to being connected to the A Junction.
SM-JC40 External Junction: This version is intended to be attached to the frame using the bolt that is commonly located underneath the bottom bracket housing. This junction contains no electronics; it’s sole purpose is to join 4 connectors together, which are usually the wire from the front A junction, the battery, the front derailleur, and the rear derailleur. There are wire holders above the housing to capture the extra wire length by wrapping it back-and-forth.

Cables, Grommets, and Cable Remove/Install Tool:
EW-SD50 Cables: These cables connect the front A junction, the battery, the front derailleur, and the rear derailleur to the rear B junction, which is typically located near the bottom bracket (near the cranks.) These are available in lengths of 300mm, 350mm, 400mm, 500mm, 550mm, 600mm, 700mm, 750mm, 950mm, 1000mm, 1200mm, 1400mm.
SM-GM01 Grommet: These round grommets are used when drilling round holes for internal cable routing, or with existing round holes. The required hole diameter is 6mm (6mm = .236 inches. Use a 7/32-inch drill bit and then “wallow-out” the hole to make it a little bigger; a 1/4-inch drill bit will work but is just slightly larger than necessary.)
SM-GM02 Grommet: These 7mm x 8mm oval shape grommets are used in some situations / frame designs.
Shimano TL-EW02 Ultegra DI2 E-Tube Tool: This tool is used to connect and disconnect the Etube wires. They are extremely difficult to connect/disconnect by hand, and pliers or other tools can damage the wires. Don’t get this confused with the TL-EW01 tool, which is for the older 5-wire 7970 cables. (My Dura-Ace TT Dual Control Levers came with one of these tools, but no other components did.)

Common Questions (via Shimano):
Note: it is not necessary to replace the FD from upgrading from 10-speed to 11-speed.
What Components do I need to put together my own Di2 system?
Because of the huge number and variety of components, it’s very difficult to figure out what is actually necessary and what is optional. So here is a list, for the setup I recommend: Ultegra 6870. It starts from the handlebars and works backwards. (This assumes both front and rear derailleurs, but you actually don’t have to have both; you can pick one or the other and only the corresponding front shifter to go along with it.)
- Any Type of Shifters / Shift Buttons. The Dual Control Brake Levers/Shifters are not required. You can get the just the climbing shifters or Triathlon/TT bar-end shifters, and then potentially add the Dual Control Levers/Shifters at a later point. (The only exception is the Sprint shifters, which require specific Dual Control Levers/Shifters with special ports as noted elsewhere in this article.) Amazon.com link
- EW-SD50 Wires 1 and 2 between the front shifters and the Front Junction A (0nly for some shifters). This is a bit confusing, because some of the front shifters come with wiring attached to them and some of them require purchasing separate wires. In general, most of the stand-alone shifters come with wiring, as do the TT/Triathlon dual control shifters/levers, but the road dual control levers do not. Amazon.com link
- Front Junction A. I recommend the SM-EW90-B 5-port front junction A as it provides the most upgrade flexibility; get the 3-port option only if you’re positive you’re never going to add more shifting components. The older SM-EW67-A-E has 2 wires built-in to connect with each of the dual control shift/brake levers; it doesn’t offer much flexibility or compatibility with a TT/Triathlon setup or adding additional shifters. Amazon.com link
- EW-SD50 Wire 3 between the Front Junction A and the 4-port Rear Junction B connector. Amazon.com link
- EW-SD50 Wire 4 between the Rear Junction B and the Front Derailleur. Amazon.com link
- EW-SD50 Wire 5 between the Rear Junction B and the Battery. Amazon.com link
- EW-SD50 Wire 6 between the Rear Junction B and the Rear Derailleur. Amazon.com link
- Rear Junction B: This is where the wire from the front of the bike is connected to 3 output wires leading to the front derailleur, rear derailleur, and battery. SM-JC40 is for external wiring, SM-JC41 is for internal. Amazon.com link
- Grommets for any place where the wire goes into the frame through a drilled hole. Amazon.com link
- Front Derailleur. I recommend the Ultegra FD-6870 for 11-speed builds or the FD-6770 for 10-speed builds. The Dura-Ace FD-9070 is pretty much identical, just slightly (41g) lighter and 11-speed only. (I do not recommend the Ultegra FD-6770 unless you have a 10-speed setup, because of firmware compatibility issues with 11-speed rear derailleurs. Also, it is an older design than the FD-6870, so it is larger and offers slightly less shifting force.) Amazon.com link
- Battery and Charger. Internal or external, depending on the build. If you have to skill/time/money-to-pay-someone to get everything internal, I highly recommend that option. The SM-BTR2 internal battery has more advanced integrated electronics and is better for firmware upgrades with the SM-BCR2 internal battery charger/PC tool. If you go with the SM-BTR1 external battery, you will need the SM-BMR1 external battery mount and SM-BCR1 external battery charger. Amazon.com link
- Rear Derailleur. I recommend the Ultegra RD-6870 for a new build if you have 11-speed compatible wheels with 11-speed sprockets, or the Ultegra RD-6770 if you have 10-speed wheels/sprockets. The system must be match front and rear derailleurs (both 6870 11-speed or both 6770 10-speed.) Amazon.com link
- TL-EW02 Etube Wire Remove/Install Tool: It takes quite a bit of force to snap the wires in/out. You may think you can get it seated properly with just your fingers, only to then have the wire come loose because it wasn’t fully seated. It’s a good idea to keep one in your saddle bag. Amazon.com link
What wire lengths do I need? This question is impossible to answer correctly, as it’s highly dependent on the frame size and configuration. What I recommend is running string between the component mounting locations to measure the lengths. Be sure to add some extra length, as I find that wires seem to come up short pretty frequently, even when “adding a little extra” to start with. Nothing is more frustrating that having a wire that is 25mm too short. I recommend ordering a few extra wires of multiple lengths and then returning the unneeded/unused wires. As noted above, the standard wire lengths are 300mm, 350mm, 400mm, 500mm, 550mm, 600mm, 700mm, 750mm, 950mm, 1000mm, 1200mm, 1400mm. Do not cut/splice these wires; the connectors on the end of the wires are very small in diameter to start with and you’ll end up with a splice that is larger and less waterproof than you started with.
Acknowledgements: Special thanks to Di2diy for his continued help in the comments. Check out his Ebay store for custom Di2 batteries, harnesses, and components.
Technical Details of the Di2 CANBUS protocol and signaling
Thanks to commenter Ghislain for the details: “I reversed engineered the signal going to the RD. Since I did not have a special tap connector, I could only look at the actual signals in open loop (RD wire disconnected) on the wire going to the RD using an oscilloscope. First, I found that shift up and down are multiplexed on the same wire. A shift down would generate a positive 100 msec clean 8 volt pulse (varies between 50 msec to 500 msec depending on how long you hold the shifter). On the same wire, a shift up would generate a series of 2 msec pulses that would last the same time of a shift down pulse. Therefore, the RD has enough intelligence to discriminate between the 2 types of pulses. When you hold the button on junction A, a 140 msec pulse is generated. But since my RD wire was disconnected, the RD would not go in adjust mode.”
I have my fav c34 wheels which are 10 speed, I just got hold of a RD-6770 shifter (10 speed).. I assume I can operate that shiter with my Dura ace 11 speed levers? (ST-7970)
Or will I run into some firmware issues (I tried to read a bit in the other comment fields, but unfortunately got lost)
Thanks for a great article here
Nothing from the first generation (4-conductor / 5-conductor) Dura-Ace Di2 7970 system is compatible with any other newer system. It was replaced by the (2-conductor) E-tube systems. No parts are inter-operable between 7970 and any other Di2 System. The wires are completely different.
My mistake here! I’m mixing up two of my projects.. im trying again!
Will 11speed levers (ST-9070!) fit an 10speed RD 6770 – they do both run on e-tube.. but not sure if it will work..
In short i have a fully working 11 speed di2 setup, and I want to replace my 11 speed rear dereailuer with the 10 speed RD-6770, due to my wheels…
Will that work?
The levers will work with the 10-speed rear derailleur. However, a 10-speed rear derailleur will not work with a 9070 (11-speed compatible) front derailleur. The front and rear derailleurs must both be 11-speed or must both be 10-speed compatible. This limitation is built into the Shimano firmware.
Great thanks for your answer, do you know if they will work automatically or do I need to program something in the e-tupe app/software?
It should work automatically. If it does not, you will need to update firmware via the Shimano eTube app (Windows + USB adapter or Mobile + Bluetooth component.)
Some (many?) 10 speed wheels can have 11 sprockets put on them and that might be the easiest solution. In some cases using the wheel as the lathe and a dremel to grind the freehub body works. This does not work well with actual Shimano freehub bodies because the spline slots are not well-formed inside of the original mounting face. In some cases new freehub bodies are available and a bit of redishing the wheel works; this is true for some Shimano 10 speed wheels. In some cases machining the inside of the inner rear sprocket cluster works, noting that the same money to buy a 10 speed electronic system could purchase a harbor freight mini-lathe to do such work. And there are probably still a few commercially available 11 speed casssettes that fit 10 speed rear wheels, for example I believe the Shimano 11-34 mountain 11 speed cassette, and I believe Recon still makes one that may be in a hidden menu somewhere. In the case of Mavic no extra work is needed. And in some cases there is not enough room and there is no easy way to make the room.
Thanks for good comments here, I agree there are some solutions which can make it work-ish… dremel through those beautiful DA hubs is not an option. I have had succes of simply remove a sprocet from the 11speed cassette and space my way out of it…
Hi,
What a wonderful resource this is. Thank you.
I have a simple question you may be able to help me with.
I have an Pinarello F12 which I wired myself using the 9150 wiring and the in-frame charging point on the down tube in the normal way.
I want to change the frame to the new F (F14) which does not have the in-frame charging point and is designed for the new 9250 wiring with the charging point located on the rear derailleur.
I remember the 9150 coming with connectors that allowed the installation of the charging point to be located at the bar ends, which I still have and might offer me an alternative if I move to the F (F14).
As I don’t really want to go to the expense of buying the new 9250 rear derailleur, would it be possible to convert my existing 9150 in-frame wiring set up to the bar end type?
I can’t remember exactly what length cables I used nor what all the connections looked like.
Presumably there were two connectors from each of the shifters that ran through the integrated handlebar and stem and then connected to a junction box which I positioned below the stem in or near the head tube.
This was then connnected to the in-frame charging point half way down the down tube. I also think that I connected the EW-WU111 somewhere around there, as well.
This was then in turn connected to the front derailleur, rear derailleur and seat-tube battery via one cable.
Any help or simply a positive acknowledgement of the feasibility of what I’m trying to do and what extra parts (cables) I might need (if any) would be gratefully received.
Hi Carlos, you can definitely switch to the bar-end charging port. Worst case, if you don’t have an extra unused port, you can add extra ports. To do this, you will use the 4-port SM-JC41 Internal Junction. You will also need 2 additional e-tube wires (one from the front junction to the SM-JC41, and the other from the SM-JC41 to the bar-end charger. And if you do already have an open port, you only need one e-tube wire and the bar-end charger. Good luck with your bike swap!
Thanks for that information. I won’t be sure how many free ports I have until I strip the bike but even if I have to buy one cable, it doesn’t seem too much of a task.
I’ll let you know, for other people’s benefit how I get on.
Best wishes,
How did you get on? 🙂
Reverse engineering the Di2 protocol isn’t as hard as that last entry makes out.
The whole E-tube bus is in parallel – you just need to cut a spare wire and stick it in a spare port to read all the signals with a scope.
Have you tried that? I did not understand what I was seeing on the scope, and did not pursue the project further.
I have an entire Ultegra di2 6770 group/kit, do I need to buy only the Ultegra di2 6780 11v rear and front derailleur, to transform my kit into 11v? would that be it?
Correct, that’s all you need. Plus maybe a firmware update. And a new chain and rear sprocket.
Hi,Can you take a question on the new 12 speed DI2
I’ll do my best to help!
Have you tried bettershifting.com ?
Looks like a very good resource.
Hello Mr Bale,
Happened to my rd6770 firmware. Whist after the update, the Rear derailleur was being written a fd6770 firmware into the rear derailleur. Now the rear derailleur do not respond to the right hand trigger. It could be controlled by connecting to the left hand and shift only 1 gear up or down at present.
I tried to tweak the firmware files by changing the name of 2rd6770.dat to 2fd6770.dat and rd6770.dat to fd6770.dat. But the E-TUBE software gave a file corrupted warning, failed to rewrite the firmware.
Could help to figure out what can I try? Regards
I’m sorry to hear you are having this problem. Unfortunately, this is beyond my level of expertise. I’m familiar with renaming the firmware file to get a different version to load, but I didn’t know it was possible to load front derailleur firmware in a rear derailleur. I’m not sure what needs to be done to undo that. I’m assuming you tried renaming the rear derailleur firmware file to that of a front derailleur firmware file to see if the updater will take it?
Yes, have tried the rename method, on the 2 firmware files exchanging between FD and RD. But the etube project gave a warning message that the files is corrupted, ending failed to update.
Awesome articles, thank you.
question:
I have Ksyrium SL WS on a 2014 Cervelo S5, after identifying the WS with Mavic, the freehub is HG. currently in a 10 speed configuration Di2 6770, when FD is in largest CR and RD is shifted to largest cog, it will not go into largest cog, but…if FD is on smaller CR then RD will, is this normal to stop cross chain damage for this Integra setup??
#2 looks like a upgrade to 11 speed would be possible with just a cassette change?? 12 speed would need entirely new Di2 setup correct?
You should be able to shift into all gear combinations. Your rear derailleur trim is probably off a tiny amount, or there is an actual physical alignment issue.
You are correct about conversions. Switching to 11 speed is simpler and you can get away with changing fewer components. Switching to 12 speed requires all new hardware. Shimano recommends all new hardware either regardless, as they are very conservative on recommendations.