Overview:
This page describes the most accurate way I know to extract and preserve the data from an Audio CD (compact disc). Two steps are necessary to get the best possible audio quality:
- Bit-perfect audio extraction from the CD
- Lossless compression of the extracted audio
This 2-step process involves a lot of steps that most people would consider unnecessary. However, if you want to preserve and archive CDs by the most accurate means possible, this may be the page for you.
NOTE: If you are not an audiophile and just want to use a lossless format, you probably will not be able to tell the difference from the method I describe below. If this describes you, it is much easier to simply use a commercial music management program to extract / rip the songs to your computer using a lossless format. For this simplified method, possibilities include:
- Yahoo! Music Engine to extract the files to FLAC format. Can be played around your home by devices such as the Sonos Zone Player and the SlimDevices SlimBox2 and in your car by the PhatNoise PhatBox players.
- Windows Media Player (versions 9 or later) to extract files to the WMA Lossless format. Can be played by home devices such as Roku SoundBridge, Windows Media Center PC, and possibly Windows Media Extenders (untested).
- Apple iTunes to extract to Apple Lossless format. Can be played around your home by the Apple Airport Express and the Apple Airport Extreme.
However, none of the methods above guarantee bit-perfect extraction from the original CD. To get bit-perfect extraction and insure maximum fidelity, look to the methods outlined below.
Step 1: Choosing a Lossless Audio Format (codec)
There are multiple lossless codecs from which to choose, including FLAC, WMA Lossless, Apple Lossless, Shorten (SHN), Real lossless, Monkey’s Audio, OptimFrog, WavePack, etc. For a detailed comparison of lossless formats, check out the HydrogenAudio Lossless Comparison page. I highly recommend the free, open-source FLAC codec as it is widely supported, freely implemented, and full-featured. There is no reason for any device manufacturer to not support FLAC unless they are trying to push their own format. FLAC is the format used for these instructions.
Step 2: What You Will Need
Programs on your computer to Rip CDs:
- Exact Audio Copy – To rip CDs to the hard disk drive
- FLAC Codec – To losslessly compress the extracted audio – Version 1.1.4 or later is required. (This is not required as of Exact Audio Copy version 0.99 prebeta 5 – it includes FLAC files)
Other Programs:
- Media Monkey – Plays FLAC, Edits Tags, Downloads cover art, converts between formats, great all-around program.
- Mp3tag – A great tag editor
- TagScanner – A great tag editor
- Album Cover Art Downloader – The best program for downloading coverart
FYI: Programs that will play FLAC-encoded music: Media Monkey Yahoo! Music Engine DB Power Amp Winamp with FLAC plugin Foobar2000 with fooFLAC plugin See a complete list on the FLAC website
FYI: Audio hardware devices that support FLAC:Sonos Music System PhatNoise PhatBox Auto/Home systems SlimDevices SqueezeBox See a complete list on the FLAC website
Step 3: Install EAC and FLAC
For EAC, I recommend downloading the latest beta release; all of the beta versions I’ve tried have been very stable. There are several variations of each release; I use the installer version that comes without CDRDAO. I use the default installation location (C:Program FilesExact Audio Copy)
Installation is straight-forward for FLAC, I recommend the default installation directory location (C:Program FilesFLAC)
Step 4: Setup the CD Drive for Bit-Perfect Ripping
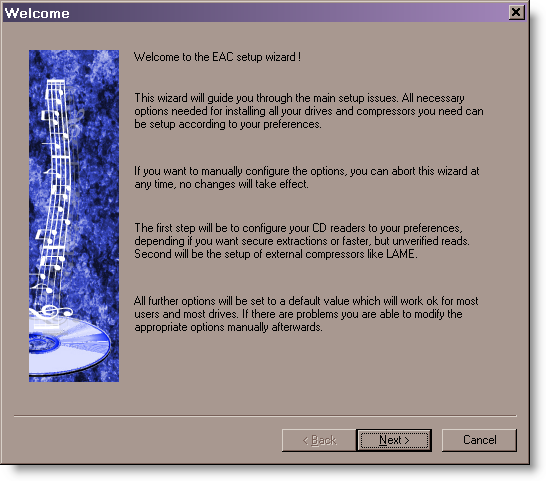
Go through the EAC Setup Wizard, use the settings shown below.
Use the detected settings:
Step 5: Configure Accurate Rip
Before using AccurateRip, it is necessary to determine the read offset for your CD / DVD drive. According the the AccurateRip website: every CD drive has a slight reading offset, this value tends to be fixed for each type of drive and is constant. If the drive does not support AccurateStream, (i.e. it has a varying offset each time a track is read) then AccurateRip cannot be used because it will never be able to configure itself. AccurateRip will find the drive offset by using keydiscs (a disc someone else has previously accurately ripped and added to the AccurateRip disc database). The key disc must have more than 5 tracks of a certain length. To configure AccurateRip, insert known keydiscs into your CD drive; a list of keydiscs is available on the AccurateRip Website. If the disc is recognized, AccurateRip will automatically offer to find the drive offset. Some discs listed in the keydisc database may be from a different pressing than the disc you test, so don’t give up if the first couple of key discs are not recognized.
When an offset has been found for a drive using the first keydisc, it has to match the offset already stored in the AccurateRip drive database. If it does not match, AccurateRip will require 3 keydiscs that give the same offset as the first keydisc.
Step 6: Configure EAC Program Options
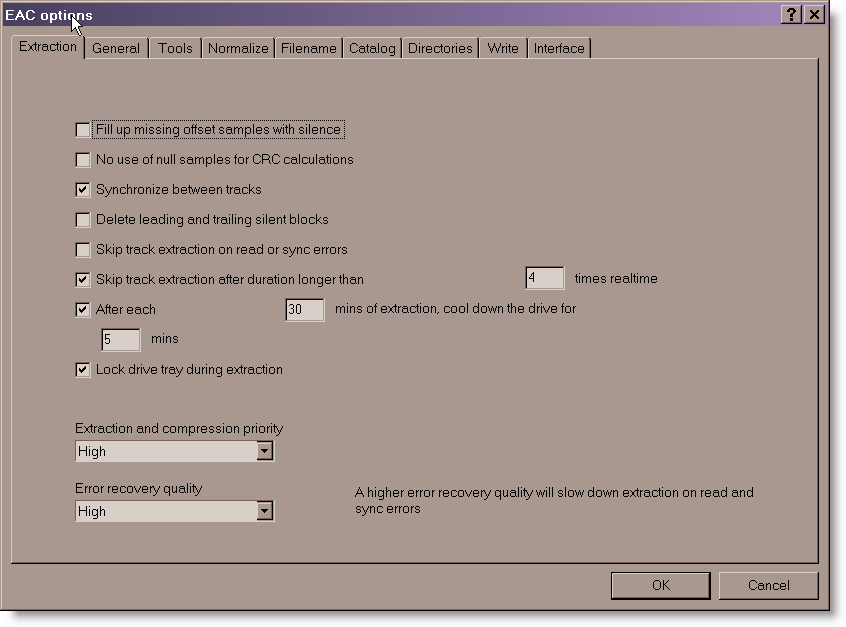
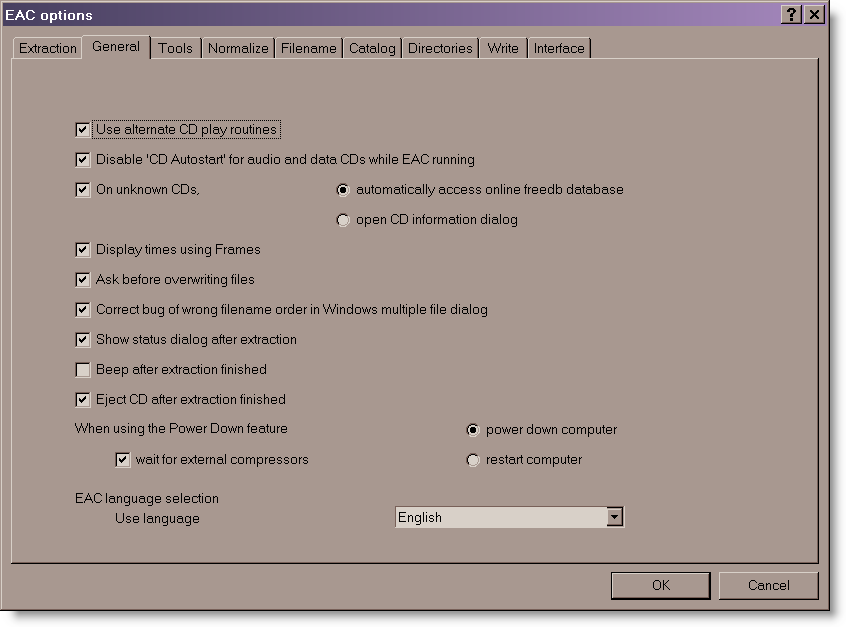
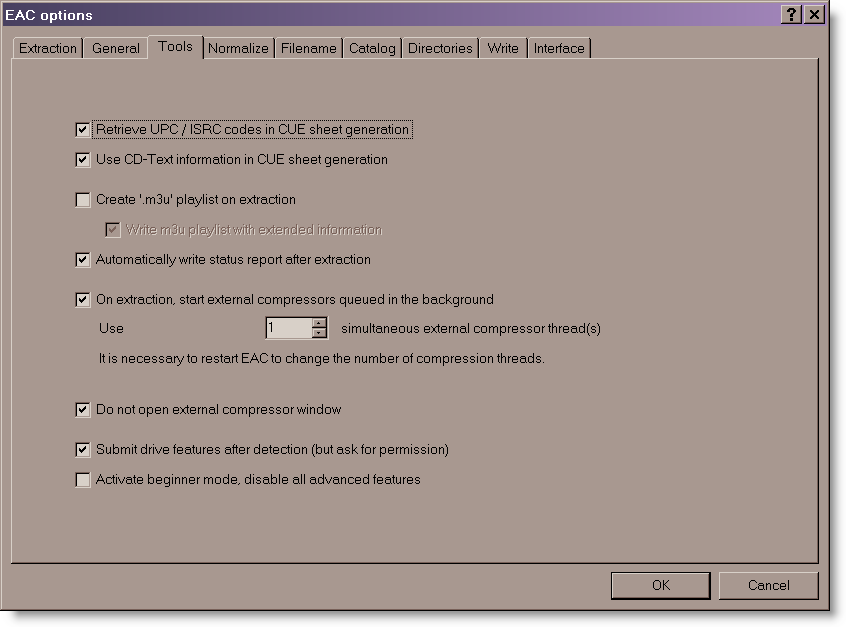
EAC has a ton of configuration options, which is one of the reasons I’ve put this page together. Below is the setup that I’ve found that gives the best quality, most accurate ripping. However, you’ll probably want to change some of the options to suit your needs. Hint: To see what a specific option does, hover your mouse over the feature and a pop-up box describing the option will appear. Go to the EAC -> EAC Options. . . menu (or press F9) and make the following settings:
Do not use normalization! It will change modify the extracted audio. You will want to apply ReplayGain compensation instead, which is described later. 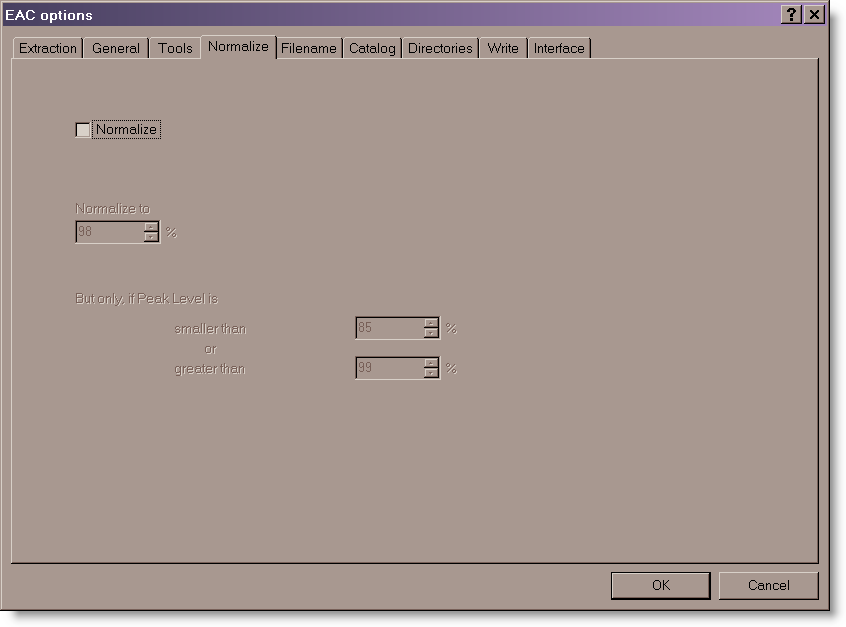
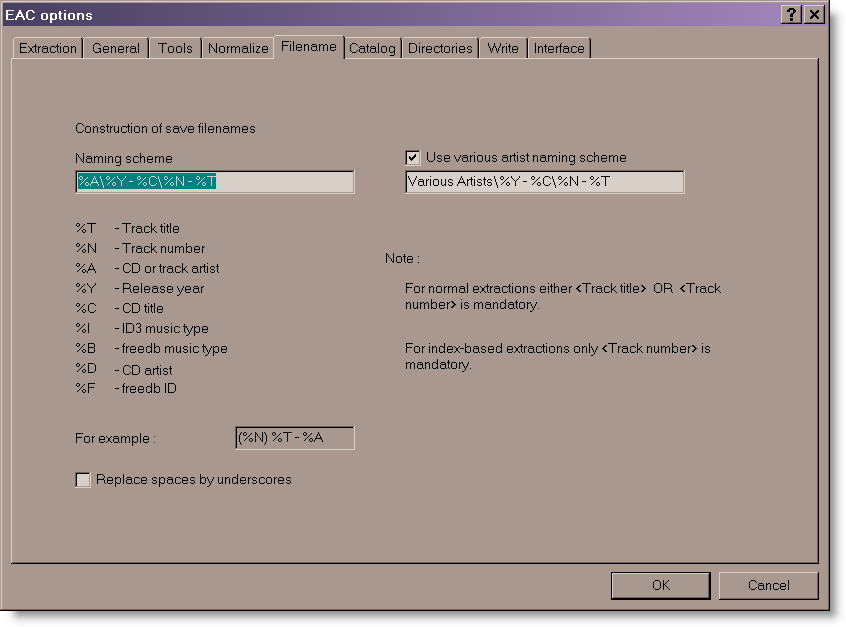
For the track name, you can automatically create folders and sub-folders. The naming scheme below will give the following folder and song name: AlbumYear – Album NameTrack# – Song Name
Naming Scheme: %A%Y – %C%N – %T Various Artists: Various Artists%Y – %C%N – %T
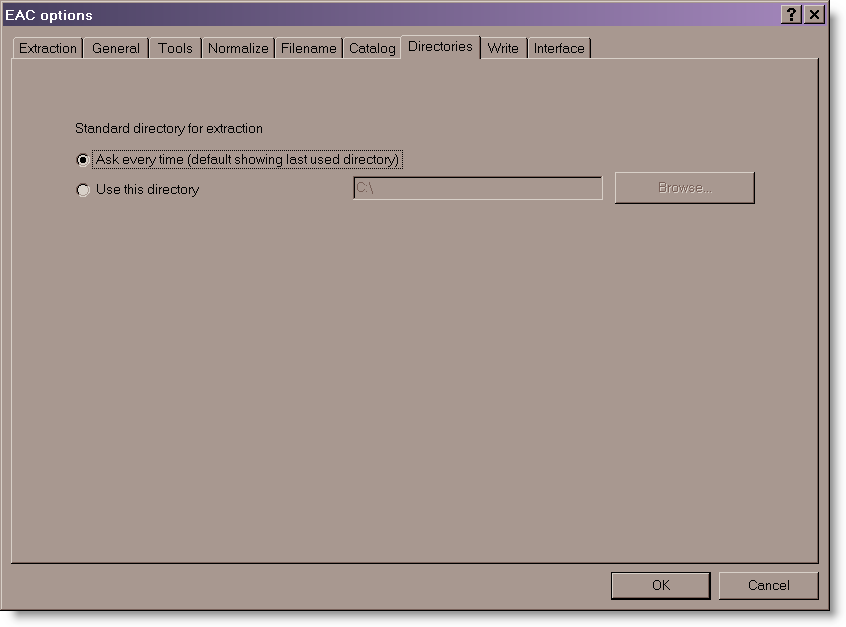
I have it prompt me for the target directory each time, but you can just specify a default directory such as D:Music.
These really aren’t important for ripping.
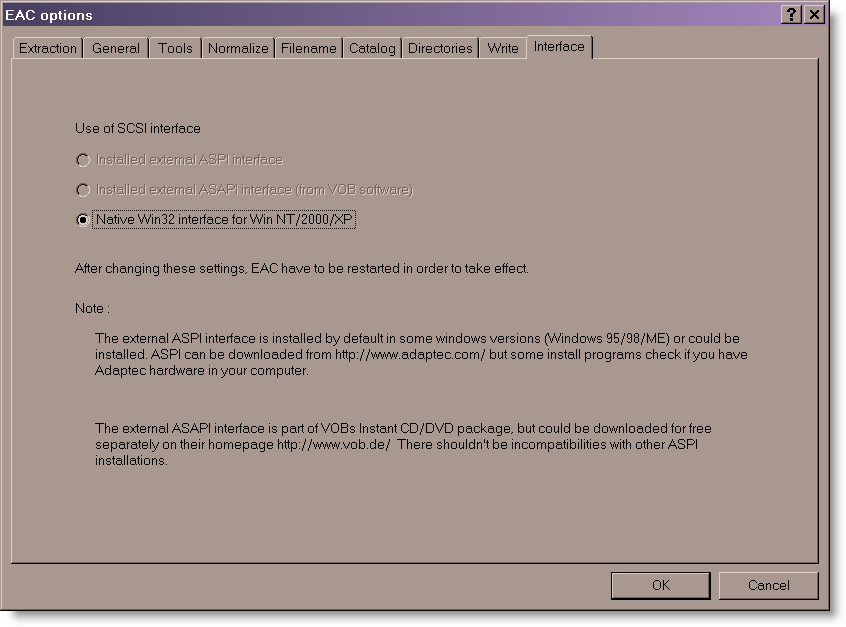
If you are using WinXP / Win200 / Win2003 Server, the following setting should work fine. If you have problems, you may want to download the CDRDAO version of EAC or download the Ataptec ASPI interface. The EAC website can give you more information if you have troubles.
Step 7: Configure EAC Drive Options
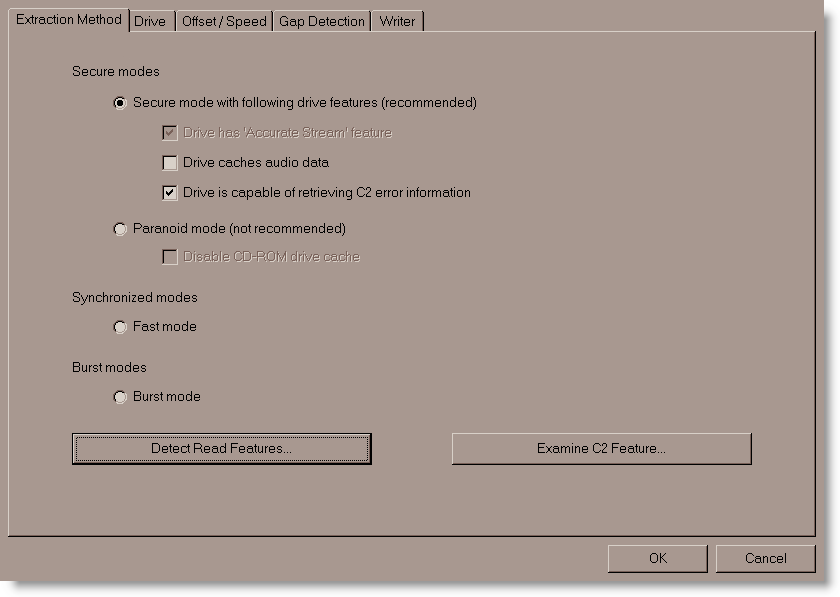
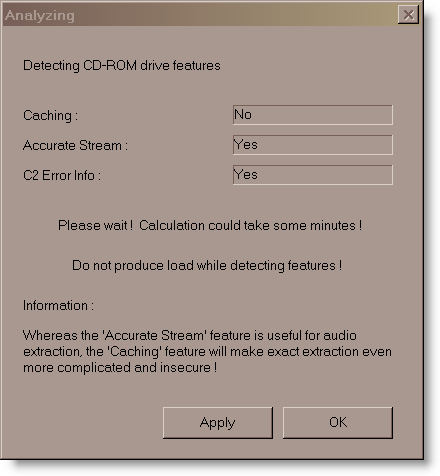
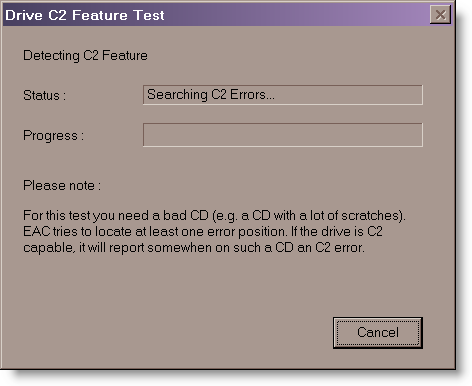
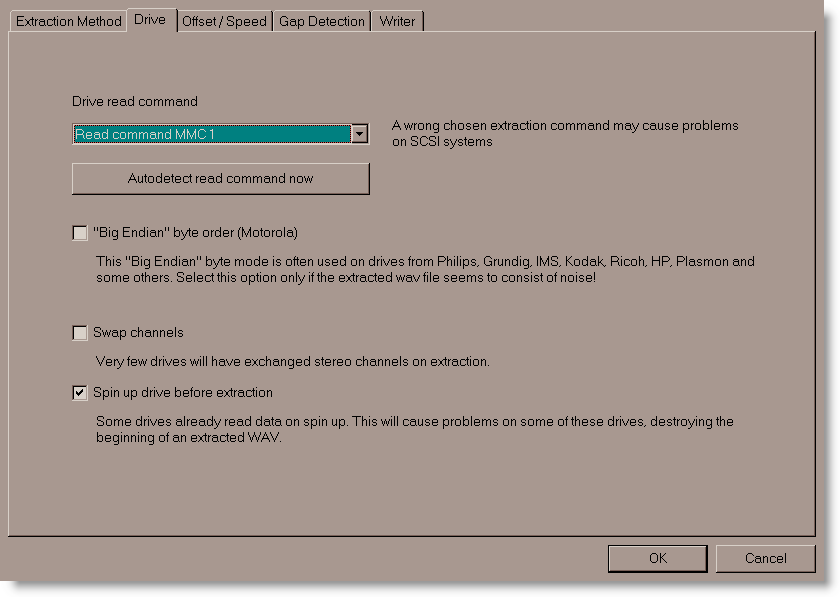
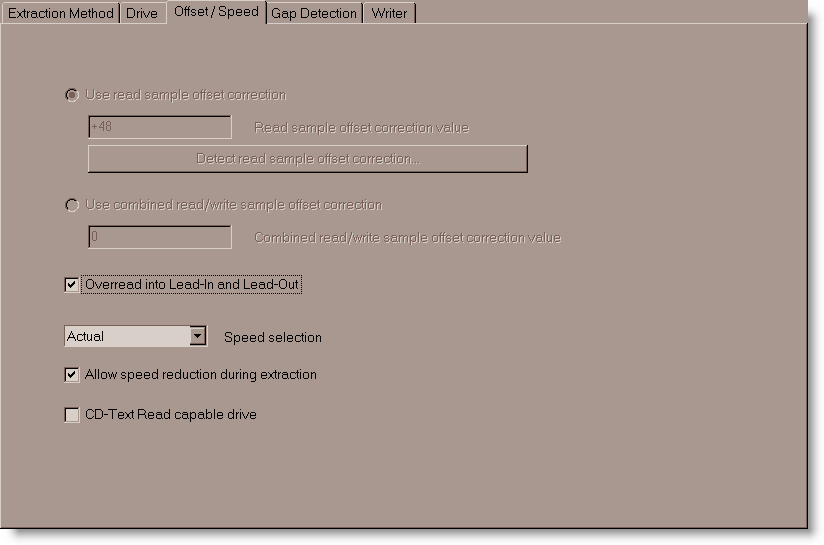
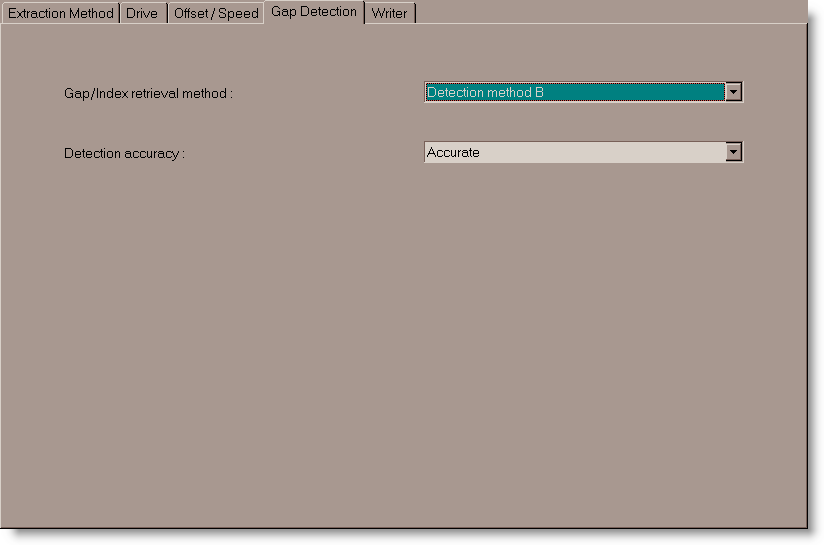
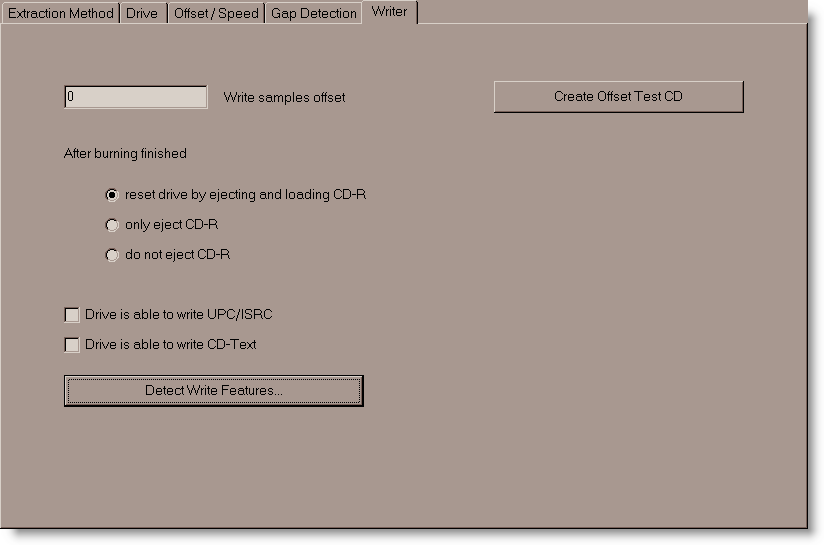
Go to the EAC -> Drive Options. . . menu (or press F10) and make the following settings: Put a new CD in the drive and run the Detect Read Features test. Put a scratched CD in the drive and run the Examine C2 Feature test.
The Detect Read Features test:
The Examine C2 Feature test:
Autodetect the read command:
Experiment with the Overread into Lead-in and Lead-out feature if you get read errors at the beginning of the first track or end of the last track.
Use the default / detected Gap/Index retrieval method. I set Detection accurate method to Accurate; Secure and Inaccurate are the other options. Accurate and Secure both perform multiple reads, just Secure makes even more re-reads and this causes the ripping process take even longer. Use Secure on if you’re willing to take several hours or more to rip a slightly scratched disc.
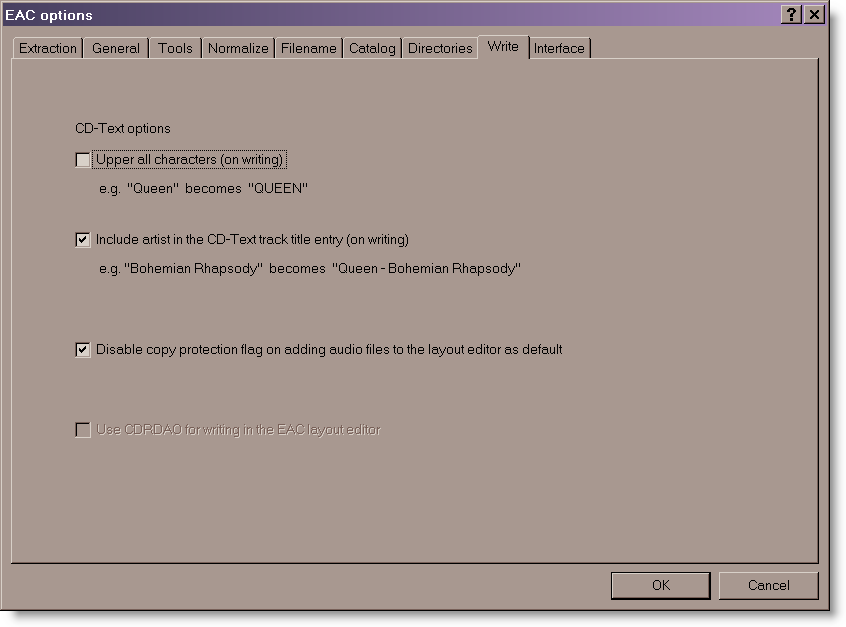
Since this is for writing, the settings are not that important.
Step 8: Configure EAC Compression Options
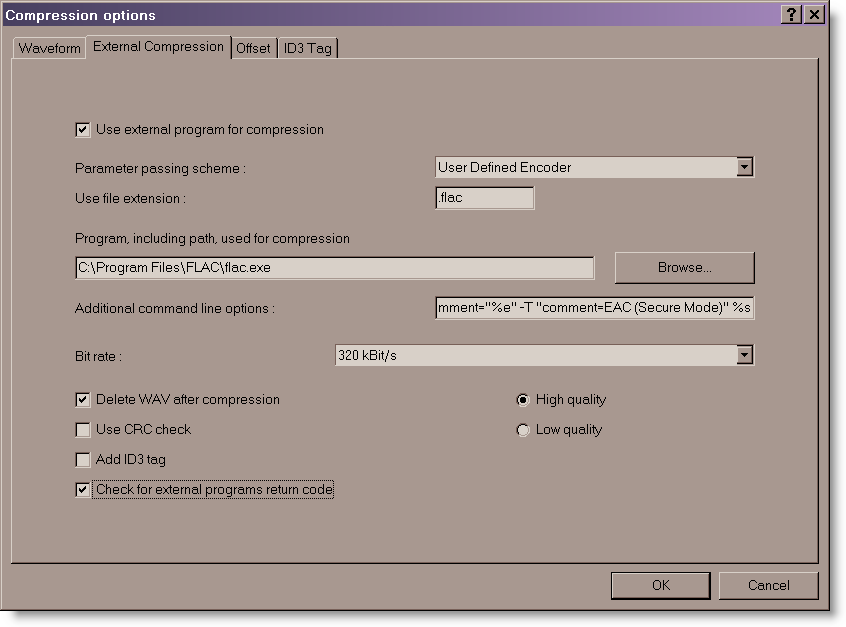
Go to the EAC -> Compression Options. . . menu (or press F11) and make the following settings: The External Compression tab is the only one that needs to be configured; other tabs will be ignored. Set the command line and options as shown below:
(Note: Exact Audio Copy V0.99 prebeta 5 and later includes FLAC as an internal cncoder, so some settings may be slightly different than what is show below.)
For the Additional command line options, use the following. The -8 setting will give maximum compression. If you have a very slow computer, you may want to try -7 or -6. See this page for a complete list of FLAC command line options.
Step 9: Configure EAC freedb Optons
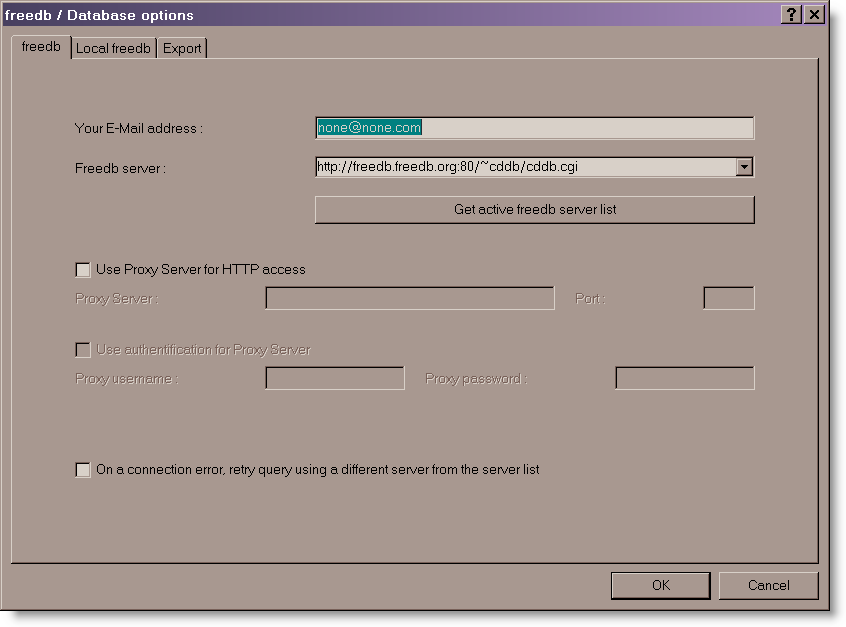
Go to the EAC -> freedb / Database Options. . . menu (or press F12) and make the following settings: These settings were probably already entered during the setup wizard, but just in case:
Step 10: Rip the Music to your PC
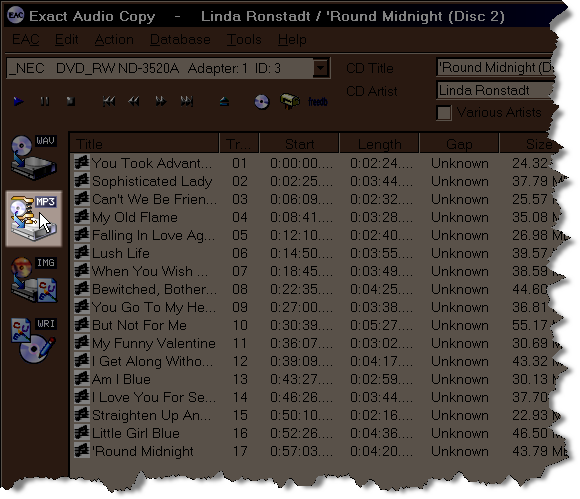
You are now ready to rip CDs to FLAC files! Just click the MP3 button to rip to a compressed file. This will not result in an MP3 being created; the MP3 button should really be called “the external file compression program” button. After making the configuration changes above, clicking the mp3 button will result in a FLAC file being created.
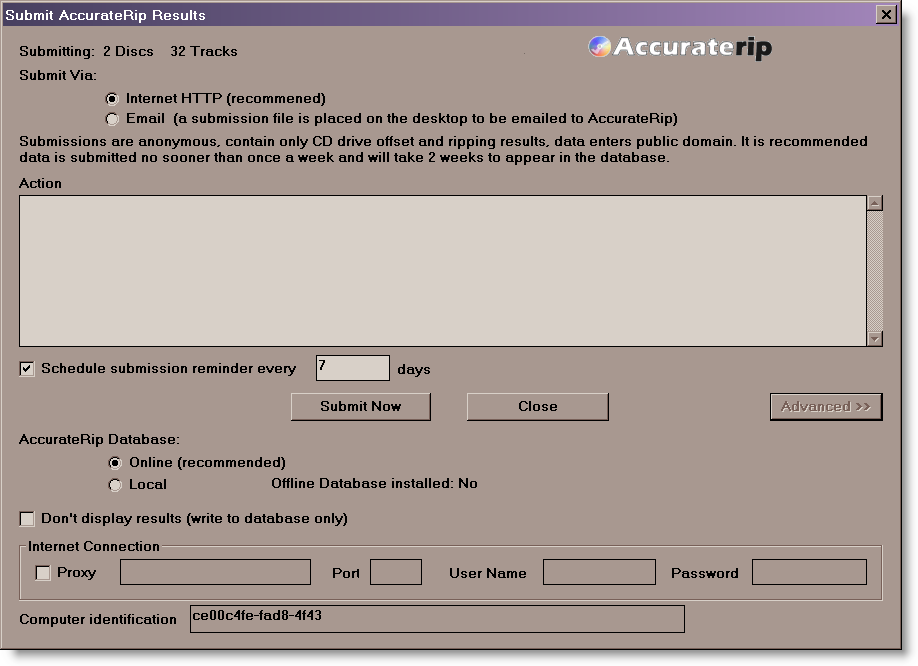
Go to the Database menu and select Send AccurateRip Results…. Make the following Scheduled Submission settings to add results to the AccurateRip disc database. This, in part, helps create more keydiscs.
Step 11: Edit the Tags
You’ll eventually find songs not taggeg properly when ripped and these are the best way to correct that. The tag editors are generally pretty straight-forward to use. The two best editors I’ve found are Mp3tag and TagScanner. These free programs can lookup tag info from the freedb database to retag files. They can also rename files based on the tags or retag songs based on the file name. Media Monkey is a great alternative, all-around app that can edit tags and do about everything else you’d want.
Step 12: Download the Cover Art
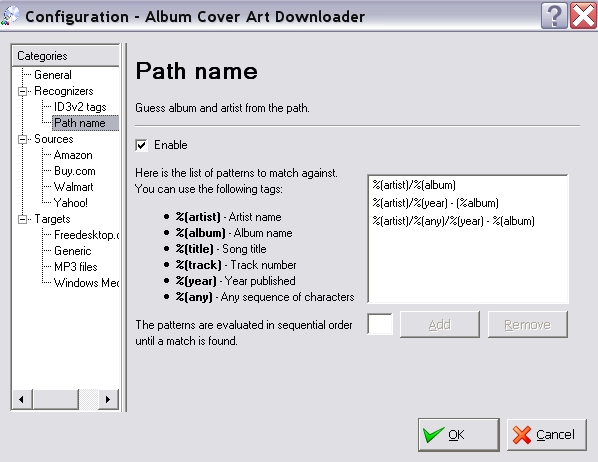
Many music players will display cover art. Album Cover Art Downloader is an app completely dedicated to getting the pictures into your music directories. This program can’t read the tags for FLAC/OGG files (only ID3 tags are recognized), but it can be configured to identify albums based on folder naming. Even with this setup, it still can get the album name wrong, so I have to manually delete the date before clicking “download covers”. Anyway, here is how I have Album Cover Art Downloader configured to identify albums based on folder/sub-folder naming.
Media Monkey is a great all-around program that does album art and also plays FLAC, Edits Tags, converts formats, etc. It will ready the tag info for about every format you can imagine, so it can be useful to modify any titles/folders that Album Cover Art Downloader doesn’t recognize.
Step 13: ReplayGain Volume Normalization
This is complicated enough for a separate explanation, so I won’t go into details here. ReplayGain will analyze and calculate the peak volume level for an entire album or each individual song and write a tag in the header of the file. It does not actually change the audio data within the file but rather give a “volume offset” that the audio player uses to pre-adjust the song to the proper playback level (independent of the player volume setting).
Links and References
This guide would not be possible without the information given in these excellent guides:
- EAC Configuration for Musepack
- HydrogenAudio Forum: EAC+FLAC image, Best way to create a lossless back-ups
- EAC Configuration for WMA9 and WMA Lossless


Thanks you for your efforts and guide whic is very easy to follow and best on web with pics and explanations. I am converting my wife’s cd to digital and followed your instructions by compying and pasting to prevent mistakes. My cd drive does not cache and was “cleared” by eac and accuraterip verified my first 2 reference cds with no problem, yet upon ripping flac copies every tract reported an error which required an ok button to be checked.Eac log said all were copied ok and they sound ok. But 2 more cd copy-rips have done the same thing. I did download the eac with flac and ccdrdoa v.99 prebeta 3 from july,2007.The same thing happened on another computer so it must either be all 3 cds are bad or the operator who loaded something wrong. Your help is appreciated. ph
I have a Sony VGP-XL1B3 200-CD ripper, which connects by Firewire to my Vista machine. Unfortunately, the only software that I know of that supports batch ripping (200 CDs sequentially, without the need for user input) is Microsoft’s Media Center, which appears to offer no control over the ripping process. I cannot choose the format of the files or edit the metadata, apparently, and I have no idea how accurately it rips.
Is there any way to get this mega-ripper to work with a respectable program such as EAC or J. River’s Media Center? It is a standard Vista media-changer device.
Thanks for your help.
Excellent instruction for Audio Extraction.
Thank you.
Andrew: I know of no program that would automate the ripping process with this changer. There may be some way to manually load each CD, rip it using EAC, and then manually switch to the next disc and repeat, but I’m not sure. If you want accurate, lossless rips, a stand-alone drive is probably your best bet.
Reply to #29 & #32. (EAC and options for Apple formats)
—
No need to encode FLAC then convert to ALAC if your running Mac (although that is one way to do it).
iTunesencode.exe is a command-line iTunes encoder. You can set EAC to use this as its compressor. It basically engages the iTunes program to do the encoding, using whatever settings iTunes has set.
Get it here: http://www.hydrogenaudio.org/forums/index.php?showtopic=35242
I did my whole library in this way, and it worked absolutely perfectly.
I also often convert from FLAC to ALAC with dbpoweramp when someone gives me files already encoded as FLAC. This works great, but make sure you have the latest version of app + codecs. There was a problem that caused tracks to sporadically not get compressed. It only just got fixed.
Carlton, a new question about C2 error detection
—
So, I’m setting up accurate ripping on a MAC running winXP via parallels. Unfortunately, the built in Matsushita drive doesn’t have C2 Error detection capability. Does this mean that I can’t perform accurate rips because the drive can’t detect read errors? If so, there’s nothing I can really do about that is there?
Cheers, -Jon.
For auto ripping with Sony Media Changer using MCE, you can set the file type to wma lossless and switch on error correction for the device in WMP. This will give lossless files with some attempt at error correction.
You can also set the file type to WAV and then compress later.
Like many others, I got a neat SONOS Digital Music System and went ahead and ripped my entire CD collection to MP3 320Kbps using Windows Media Player because I did not know any better. Then I find out later this was not the best option as it does not sound as good as it should. So I start re-ripping in WAV lossless this time. A few hundred discs into it and then I stumble across EAC and FLAC.
So my question is: Is WAV going to be good or should I start again using FLAC which looks like a lot of work. Drive space is not an issue. I don’t care if it is bit perfect, as long as it does not sound noticeably different to playing the original CD’s. I did all the EAC settings and tried ripping one CD and gave up after 2 tracks because it took so long.
Hi-
FLAC (lossless compression) and WAV (uncompressed) sound the same. Since FLAC is a lossless compression format, the only real reason to use it is to save drive space. (It has a few other minor advantages, such as tagging, that are of minor importance in most cases).
So if you don’t have a need to save drive space, you can stick with WAV.
I thing tagging is one of the most important reasons to choose FLAC over WAV. I want to have access to all of the song details when I’m searching or listening.
It’s very easy to convert between FLAC and WAV. dbPowerAmp Music Converter can batch-convert very eaily. It also has a CD Ripper that can do bit-perfect extactions. I think it’s better than EAC because it easier to setup, can automatically download cover art, and has more feature. But it does cost about $30 to register it. I now use it instead of EAC.
Thanks Danny
That is a relief. Yeah space is not an issue so I will continue with WAV.
Thanks Carlton
Good to know I can convert WAV into FLAC or whatever if needed later.
As long as I don’t have to rip them all again!
Cheers J
I have some old CDs with pre-emphasis. How do you deal with this issue?
So far I’ve been using Adobe Audition FFT filter with corners at 3180 and 10600 hz -10dB.
I’d really like to have an absolute indicator of the pre-emphasis bit status rather than comparing the original disc in an audio player vs the ripped audio in the computer – in other words, trusting my ears.
Thanks
By design (after a ‘manual TOC detection’ feature was removed), EAC can only read pre-emphasis flags from the disc’s TOC, not the subcode, so on some discs it will erroneously report no pre-emphasis (certain very old Pink Floyd CDs, for example, only have the flags in subcode). However, even when the flags are set in the TOC, EAC only uses this info to know whether to put PRE flags in a cue sheet, if you choose to generate one. The extracted audio is not modified in any way. As for how to apply de-emphasis, you can use EQ or filters, but in my experience, even the good ones can be noisy and/or inaccurate. Convolution with the proper impulse works better, as does software specially written to apply de-emphasis to the extracted WAVs. The pre-emphasis article in the Hydrogenaudio Wiki will get you going in the right direction.
After reading lots on the web about FLAC and then this article I still am left with one (possibly naive) question, that I want to ask before I embark.
Is there a solution (commercial or otherwise, Mac or Win) that automates this so that I can simply insert a disc, wait for the disc to be done and ejected and then insert another?
In between the program would perform an exact copy, encode to FLAC, encode a copy to mp3, tag it from CDDB, download cover art and put the FLAC and mp3 files into different but organized folders.
Yours Hopefully,
~>Bill
I know of hardware/software combi solutions that do this, but they’re pricey, b/c you have to buy the hardware that’s setup to work with the software.
The only “free” software solution I know of is Vortexbox, http://vortexbox.org/about/
It can be loaded on an existing computer. See if it’s what you need.
One comment: My experience is that best sound and performance in a music server is obtained when you have a dedicated computer just for music serving. It can by anything – netbook, Old PC, etc.
Good Luck!
dbPowerAmp Music Converter has a CD Ripper component can rip to FLAC, tag the files, and download the cover art all at once. It costs about $30 for the non-freeware version, and it is well worth it my opinion.
I don’t know that it can rip to FLAC and MP3 at the same time, but it can to a batch-convert of entire directory trees. So you can rip everything to FLAC and then do a batch convert and create the MP3s in a different directory. If you’re converting to MP3 for compatibility with a portable device, dbPowerAmp has a program called Sveta Portable Audio that can do on-the-fly conversion from/to any format. So there would no reason to create the mp3s and store them — just create them on-the-fly when you sync your device.
Thanks Carlton, I’ll definitely check it out. Late last night I also came across RipStation Micro. Have you ever heard of / used that?
Another thing that I thought of this morning truly puzzled me. I’ve read a number of threads on message boards about the “bit perfect” copy, and have come to an understanding that doing this is a non-trivial task, but how can this be?
If I make an analogy where instead of “songs” I use the word “documents” or “Photoshop files” then the idea of not getting a bit perfect copy seems absurd. If you can’t get back exactly the bits you stored onto the disk then Word or Photoshop won’t be able to read the file, and suddenly the CD becomes a pretty bad storage mechanism.
So what is it about the way that music is stored on a CD that makes getting back what the artist / label put down at all a challenge or issue? Why isn’t bit perfect copying trivially easy? Just as getting the same word doc you burned to CD back without corruption is.
Best,
~>Bill
Bill, all optical drives are different, so they’ll extract a different amount of data (the read offsets play a factor in this). In a perfect reality, everyone would use the same drive to extract audio data. That would ensure that they’d be getting as close as possible a copy of what they wanted with no noticed margin of difference.
The same can’t be said for creating a document in Word/Photoshop. It’s easier to replicate the same data there, so assuming the file is never altered, it could be replicated at the same size by anyone either from scratch or by numerous copy methods.
Thank you very much for this guide. I have had tag problems for two days and was on the verge of giving up on EAC, untill you made clear that ‘MP3’ stands for ‘external etc.’ NOW I can create my archiving project for all my Audio CD’s.
Repay Gain is still sompewhat unclear, as you do not state where I can find this option in EAC, unless it is another program, or perhaps I should use EAC in playback mode first. I will find out. Meanwhile I am allready copying my CD’s to a 1.5 Tb disk. It will take weeks, possibly months.
Thanks a mil. Would’nt have worked without you.
Kurt
Kurt, the ReplayGain calculated value created and added as a tag during Step 8. It’s part of the FLAC command line for the encoder.
Dear Carlton, Thank you for your reply. The ReplayGain value had escaped my attention. So far I have archived 30 GB of audio. I have just come to “B”, long way to go to “Z”…
I have added the ReplayGain in the Flac Command line just now. (B.t.w.: copying and pasting your command sample does not work as certain caracters turn out different at this end -Belgian keyboard-, that is why I ‘adjusted’ the command line allready present in EAC. This is how I missed the ReplayGain. Probably I was too scared initially to put it in, and then later, I could not make the link between the command and your little piece on ‘ReplayGain’.)
Just so you know, perhaps you can make this fabulous piece of info even better yet, making it idiot proof. So that even people like me can pretend to be a pro. 😉
I’m all set now and very grateful for your input.
Best wishes, Kurt
Kurt:
OK, I’m new at ripping CD’s to a hard drive but wanted to test the waters a bit before I purchased a NAS for my hundreds of CD’s I plan to get ripped to storage. To help with your answer(s) this is what I have & my objectives:
-Windows Vista machine to do the work
-Installing a Sonos system next week along with an upgraded movie/sound system & it will be all internet connected.
-I plan to install a NAS device soon once I get comfortable on what/how I plan to rip & organize things
-Currently I only have one DVD/CD player/writer which came with my HP PC. I will be getting another reader/writer soon.
I’m trying to follow what needs to be done in your tutorial above. I have already installed EAC. If I understand your procedure above I need to install “AccurateRip”. When I click on this word/link it bring me to a page that says:
“Install an AccurateRip compatible program, currently:
dBpoweramp,
Exact Audio Copy
Rip (Apple MAC),
XLD (Apple MAC), ”
Does this mean I only need one of these programs for windows or do I also need to install dBpoweramp?
In step 3 you write “Install EAC, Accurate Rip, and FLAC”. I clicked on your link in step 2 ” FLAC Codec” and it brings me to http://sourceforge.net/projects/flac/files/flac-win/flac-1.2.1-win/flac-1.2.1b.exe/download which is a program that does Software Configuration Management. Is this correct?
I have a background in computers and using software so I am “hoping” once I get the right software & plug-in’s installed I will pick this up pretty quickly. Famous last words!
Thanks,
Pat
Hi-
1. You only need to install one of the programs (e.g., EAC).
2. FLAC link – the page you have the link for brings you to the download page for FLAC – it’s in the small print at the top of the page. The rest of the page is basically an ad to try and get you to download the other software.
If you want try these alternate pages to download FLAC:
http://flac.sourceforge.net/
http://flac.en.softonic.com/
Basically, install EAC; install the FLAC codec (I think there’s a place in EAC you need to fill in the location of the unzipped FLAC codec); and install Accurate Rip.
You’re good to go.
Danny
Danny:
Thanks for the reply. OK, I believe I have EAC & FLAC (labeled “FLAC frontend” on my desktop) installed.
I am still confused as to “Accurate Rip”. When I click on the link you have in the tutorial, http://accuraterip.com/software.htm, there is not a piece of code/software/link to download that says “Accurate Rip”.
On this page it says:
“Install an AccurateRip compatible program, currently:”
Than it lists three things one could download; “dBpoweramp”, “Exact Audio Copy”, “Rip(Apple MAC)”. Do you see my confusion? I’m looking for something called “Accurate Rip” to install per the tutorial above.
Since I already have EAC installed am I to assume I alreay have “Accurate Rip” installed? Do I also need to install “dBpoweramp”, or does this do the same thing as EAC?
If “Accurate Rip” is a seperate download (like EAC, FLAC, Excel, Word, …) there is no link to download it on the url for “Accurate Rip”.
Thanks,
Pat
Pat,
It appears that EAC now includes the AccurateRip DLLs and they no longer have to be downloaded separately.
There have been some changes with AccurateRip. The original owner sold the site to the company behind DBPowerAmp, which is a good thing. I think part of the agreement was that everything be free and open, and it appears EAC has internalized the accuraterip code now.
Hi,
EAC indeed comes with Accurate RIP included these days. The confusionn between FLAC and FLAC Frontend,is that FLAC Frontend is a little stand-alone programm, as where FLAC, is just the driver. It does not matter which you install, both will work within EAC.
For playback, I found a gem called ‘MediaMonkey’ (Free download). It Is the very best audio player I ever came across. It comes with FLAC included. So one can rip straight onto a harddisk using Mediamonkey. Note that ripping with MediaMonkey will be a lot faster than with EAC, but of course at a potential loss of quality, as no programm rips like EAC does.
Is anyone having problems with noise at the end of their songs when they append the gaps to the previous song? It seems a small amount of music from the subsequent song is being lumped in with the gap that is then being attached to the previous song. The result is a tiny bit of noise at the end of my tracks. Gap detection is returning the same result regardless of method / secure or accurate. I confirmed my drive offset as well. Any ideas?
Thanks,
Erik
Can you help me? I have a cd music, files are CDA format, all the songs sound fine except one that sounds as if it is damaged, music is audible but with some extra sounds, like noise. When CD was new it sounded well. Is there a software to repair these Rename Files?
Thanks
I would first like to thank you for this wonderful informative web site. Please excuse my lack of knowledge on Flac and thanks for your informative tutorial. I just have a few questions I am setting up a Sonos system in my house with a NAS haed drive and since I want the best quality i want to rip to flac, and after reading thru this page I am curios if I could just use dbpowerAmp music converter and get the same results as going thru the process you describe or will I be missing out on something like song tagging etc. Since I am new to this I was looking for the simpliest way to start off. Thanks for any insite you can provide.
Yes, you can use the dbPowerAmp CD Ripper as well. That’s actually the program I use now. But you do need to enable Secure Ripping and AccurateRip in the options window to get the best possible sound quality.
Thanks Carlton for your reply I quess the referance edition would be the version to order? and will it automatically list song name and album art on my sonos? Finally any other settings that i should know about and do you have a tutorial anywhere on your site? So sorry for all the lame questions and thank you again for guiding me in the right direction. Greatly appreciated
Yes, order the reference version. Yes,it will automatically tag and find album art if you check that option. It also has the batch conversion option, which is useful if you ever want copies of your music in another format (say for mp3 player or ipod).
Again, make sure to setup accurate rip and secure ripping. Also, make sure you have it set up the offset time for your disc drives.
Tip: when you load a CD for ripping, check the tags and album art in the window. It almost always works for popular music, but sometimes makes mistakes with classical or compilation albums.
You can have it search again at just one specific database and see if it comes up with the right album version. Otherwise, you can almost always find album covers and info at either Amazon or allmusic.com and copy them. Name the covers acc’d to Sonos recommended default name.
Tip 2: make sure your tags are setup to write “album artist” as well as “band” or “artist”.
I also recommend to have “album artist” and “artist” say the same thing (e.g.”The Beatles”). In my experience, this leads to a more consistent classification process with programs like Sonos or Squeezebox.
The reason for this is that “album artist” doesn’t have an agreed definition among the various programs, and you never know how they are going to classify your CD if you don’t tag this way. Just my 2 cents.
This is all very helpful and is consistent with my experience. I have a Ready NAS NV, Sonos and used dbpoweramp with power pack to rip to FLAC. I happen to use tag and rename for cleaning up tags.
I do want to point out one caveat to the idea that “artist” and “album artist” should always be the same.
If you have compilation albums, you will get what is often referred to as “one hit clutter” in your artist list in sonos or other players. Every artist, even if they have one song in your collection, will show up in your artist list making it hard to find what you want. SONOS has a great feature that allow you to view your artists by looking at the artist tag or the album artist tag and to choose whether you want to see these so called contributing artists in a list.
If you want to keep down the clutter, for compilations, such as a blues collection where every song is by a different artist, you mark the album as a compilation in the ripper, keep each song artist in the artist tag, and then name the “album artist” tag “various blues”, for example. With this approach in sonos you have the option of seeing all the artists names or a narrower list. By setting compilation albums to (use album artists),in the artist view, you will have an artist called “various blues.” Under that artist you will find album names and then see individual artist names associated with the individual tracks. In the contributing artist view, you’ll see all the artists. I also had a lot of kids cds too and some of them were compilations. Making them findable w/o clutter was a trick.
You need to play around to see how it works for you. There is also some good advice on the SONOS forums.
Thanks Marty. Great point about compilations and the confusion that can cause. That is something I need to fix as I have way too many one-song-wonders showing up in my artist list. I didn’t realize Sonos had added the feature to display either album artist or artist – nice feature and I’ll definitely be using it.
Thanks very much for the followup firedog I appreciate your advice and help. I’m gonna dowmload the program today with the option to use on several computers so I can rip while I’m at a differant computer to a external NAS hardrive. When you say to have it set up the offset time for my disc drives I take it there will be an option for it to do this on its own? and what is the offset time of a disc drive?
Thanks again
Keith
Sorry for the confusion, the program will do the offset itself,I think it does it when you check the various options.
Every disc player has its own unique bit of delay, that’s what setting the offset is. It allows rips from different machines to be compared.
Thanks again firedog I hope I don’t drive you guys crazy with questions once I get up and running but it’s great to know that thers a place for answers where people are knowledgable and patient Will let you know how I make out
Thanks again
Keith
Hi firedog I have a followup question before embarking on this task as a newbie Any thoughts on media monkey as a way to an easier interface for me as I’m new to this or even Easy cd-da coverter or am i gonna miss out on something. Only asking cos media monkey seems like an easy solution without the knowledge curve BUT if you feel dbpoweramp is the way to go I will spend the time for a superior product
Thanks for your impuit on this and tomorrow I will imbark on whatever you think is a better and secuirer way to go
only asking cos Media Monkey seems like a easier interface being new to this but if poweramp is the most accurate then thats the way to go
Thank you so much
Keith
If you want the most accurate rips possible, you need a program that supports AccurateRip and lossless codecs. Your only two options are Exact Audio Copy and dBpoweramp Music Converter. Of the two, dBMC is the easiest to use. I use the PowerPack version, which supports secure ripping (go to options and enable Secure Ripping and AccurateRip – it takes care of the rest.) There is also the Reference Version with Ultra Secure ripping, which is better at recovering from heavily damaged CDs.
If you are more concerned about ease-of-use, MediaMonkey is a great all-in-one program and will give high quality rips using lossless codes, but will not be bit-perfect to the original CD as AccurateRip is not supported.
Thanks very much for the input. dbpoweramp is the way I’m gonna go so that I end up with the most accurate rips. I apoligize in advance for what I know will be several more questions Will try to keep it to a miniumum Thanks very much again
Keith
Okay guy’s i am trying to keep questions to a minimum but I’m stuck on one of the options in dbpoweramp and that is should I have Replay gain checked as both calculate track gain and album gain when ripping to flac I don’t seem to understand the differance so I’m wondering if I should have both checked if using on a Sonos system I apoligize for the newbie questions Just want to get it right
Thanks again for your patience
Keith
Keith, Sonos only uses Track Gain for Replay Gain, but it won’t hurt to select both. Track Gain sets the volume offset based on the peak sound level within a single track; album gain sets it for all songs on the album based on the peak sound level for the loudest track on album. Typically, there is not much difference between the two.
Thanks very much Carlton and thanks for your advice on dbpoweramp I am learning my way around it but am already enjoying the product alot Gonna spend the weekend going thru my CD’s and ripping.
Thanks this site is great
Keith
Hi Keith,
Concerning the choice of software: I use Exact Audio Copy to put CD’s on hard disk. EAC incoporates FLAC, so the compression in done within EAC. For Playback, I find MediaMonkey truly wonderful, and it will also handle the Flac files made by EAC. Quality wise, there is no loss here.
Greetings, Kurt
Hi Kurt
Thanks for your input .I already got started with DbPoweramp and am pretty happy with the results and ease of use. I will take a look into EAC and check it out.
Thanks
Keith
Hi Carlton
Ran into snall proplem and was hoping for some guidance. I have been using DbPoweamp and ripping in flac format to a western digital external harddrive just as a temp situation till I had set up my ReadyNas Duo for networking thru the house. I set up the ReadyNas and it come with some presetup folders one of which was Media, which had pictures Etc as a sub folders.I set up a folder under Media called music and was able to drag and drop my ripped files to it from my other hard drive and also able to access them from my Sonos music system. The problem is when I try to rip directly to Nas clicking on the file music under the Nas directory and setting it as the file destination I get an error message on DpPoweramp saying failed because path Music cannot be found. Any insight you might have would be really appreciated,
Thanks Again
Keith
Not sure this is a dBpoweramp issue, probably has something to do with the NAS and network shares. Your best best is to map a drive letter to that shared folder and see if that works.
Thanks again Carlton for your help. I think it is an issue wuth the NAS or Sonos because I did as you said and mapped a drive but am still getting error message,so I’m just burning to computer and then drag and dropping in NAS till I sort it out . I will let you know what the end result is BTY Thanks for the excellant DbPoweramp tutorial
Keith
I just installed EACh V0.99 prebeta 5
and walked through your very informative
tutorial. Everything more or less made
sense except the bit rate setting on
the EAC –> Compression options –> External compression
page. Your tutorial shows setting this to 320 kBit/s
when as much as 1024 kBit/s is available. A prompt
says only that 128 kBit/s is recommended.
Is it better to use the higher setting? Or is 320 kBit/s
optimal?
For what it’s worth, my goal is make very accurate
rips.
Thanks for answering what may well be a dumb
question.
Tom Trotter
William,
If you are using FLAC, this setting shouldn’t matter as FLAC retains the original bitrate. But just because I’m paranoid, I set it to the maximum value. 320 kbps was the highest and it appears 1024 now is, so put that value in, just in case.
Very informative. Thanx
If you are using FLAC, this setting shouldn’t matter as FLAC retains the original bitrate. But just because I’m paranoid, I set it to the maximum value. 320 kbps was the highest and it appears 1024 now is, so put that value in, just in case.
I want to learn more