Overview:
This page describes the most accurate way I know to extract and preserve the data from an Audio CD (compact disc). Two steps are necessary to get the best possible audio quality:
- Bit-perfect audio extraction from the CD
- Lossless compression of the extracted audio
This 2-step process involves a lot of steps that most people would consider unnecessary. However, if you want to preserve and archive CDs by the most accurate means possible, this may be the page for you.
NOTE: If you are not an audiophile and just want to use a lossless format, you probably will not be able to tell the difference from the method I describe below. If this describes you, it is much easier to simply use a commercial music management program to extract / rip the songs to your computer using a lossless format. For this simplified method, possibilities include:
- Yahoo! Music Engine to extract the files to FLAC format. Can be played around your home by devices such as the Sonos Zone Player and the SlimDevices SlimBox2 and in your car by the PhatNoise PhatBox players.
- Windows Media Player (versions 9 or later) to extract files to the WMA Lossless format. Can be played by home devices such as Roku SoundBridge, Windows Media Center PC, and possibly Windows Media Extenders (untested).
- Apple iTunes to extract to Apple Lossless format. Can be played around your home by the Apple Airport Express and the Apple Airport Extreme.
However, none of the methods above guarantee bit-perfect extraction from the original CD. To get bit-perfect extraction and insure maximum fidelity, look to the methods outlined below.
Step 1: Choosing a Lossless Audio Format (codec)
There are multiple lossless codecs from which to choose, including FLAC, WMA Lossless, Apple Lossless, Shorten (SHN), Real lossless, Monkey’s Audio, OptimFrog, WavePack, etc. For a detailed comparison of lossless formats, check out the HydrogenAudio Lossless Comparison page. I highly recommend the free, open-source FLAC codec as it is widely supported, freely implemented, and full-featured. There is no reason for any device manufacturer to not support FLAC unless they are trying to push their own format. FLAC is the format used for these instructions.
Step 2: What You Will Need
Programs on your computer to Rip CDs:
- Exact Audio Copy – To rip CDs to the hard disk drive
- FLAC Codec – To losslessly compress the extracted audio – Version 1.1.4 or later is required. (This is not required as of Exact Audio Copy version 0.99 prebeta 5 – it includes FLAC files)
Other Programs:
- Media Monkey – Plays FLAC, Edits Tags, Downloads cover art, converts between formats, great all-around program.
- Mp3tag – A great tag editor
- TagScanner – A great tag editor
- Album Cover Art Downloader – The best program for downloading coverart
FYI: Programs that will play FLAC-encoded music: Media Monkey Yahoo! Music Engine DB Power Amp Winamp with FLAC plugin Foobar2000 with fooFLAC plugin See a complete list on the FLAC website
FYI: Audio hardware devices that support FLAC:Sonos Music System PhatNoise PhatBox Auto/Home systems SlimDevices SqueezeBox See a complete list on the FLAC website
Step 3: Install EAC and FLAC
For EAC, I recommend downloading the latest beta release; all of the beta versions I’ve tried have been very stable. There are several variations of each release; I use the installer version that comes without CDRDAO. I use the default installation location (C:Program FilesExact Audio Copy)
Installation is straight-forward for FLAC, I recommend the default installation directory location (C:Program FilesFLAC)
Step 4: Setup the CD Drive for Bit-Perfect Ripping
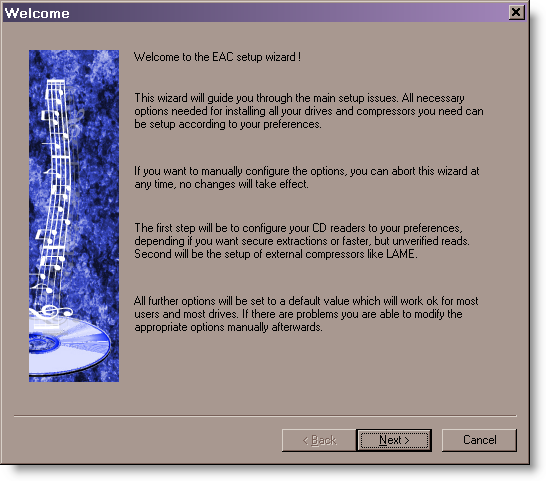
Go through the EAC Setup Wizard, use the settings shown below.
Use the detected settings:
Step 5: Configure Accurate Rip
Before using AccurateRip, it is necessary to determine the read offset for your CD / DVD drive. According the the AccurateRip website: every CD drive has a slight reading offset, this value tends to be fixed for each type of drive and is constant. If the drive does not support AccurateStream, (i.e. it has a varying offset each time a track is read) then AccurateRip cannot be used because it will never be able to configure itself. AccurateRip will find the drive offset by using keydiscs (a disc someone else has previously accurately ripped and added to the AccurateRip disc database). The key disc must have more than 5 tracks of a certain length. To configure AccurateRip, insert known keydiscs into your CD drive; a list of keydiscs is available on the AccurateRip Website. If the disc is recognized, AccurateRip will automatically offer to find the drive offset. Some discs listed in the keydisc database may be from a different pressing than the disc you test, so don’t give up if the first couple of key discs are not recognized.
When an offset has been found for a drive using the first keydisc, it has to match the offset already stored in the AccurateRip drive database. If it does not match, AccurateRip will require 3 keydiscs that give the same offset as the first keydisc.
Step 6: Configure EAC Program Options
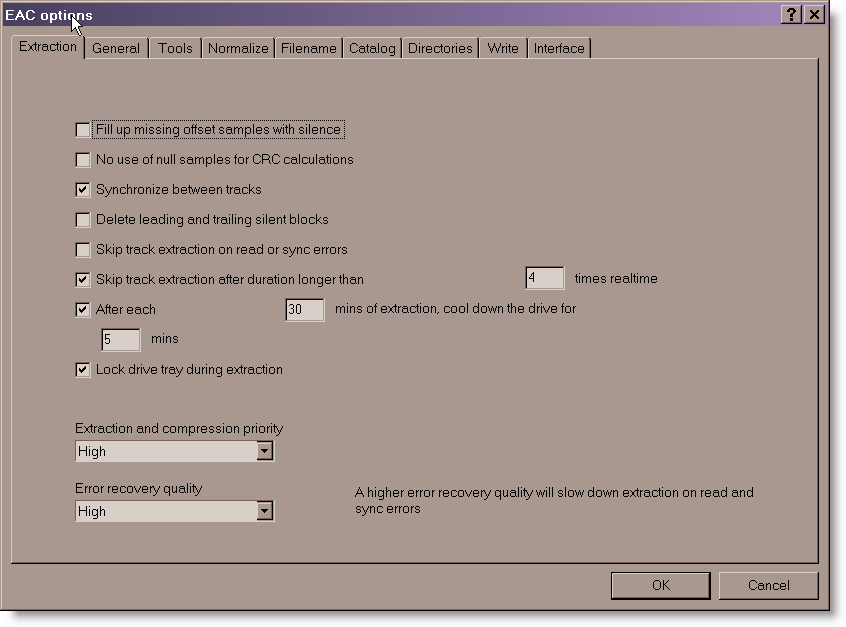
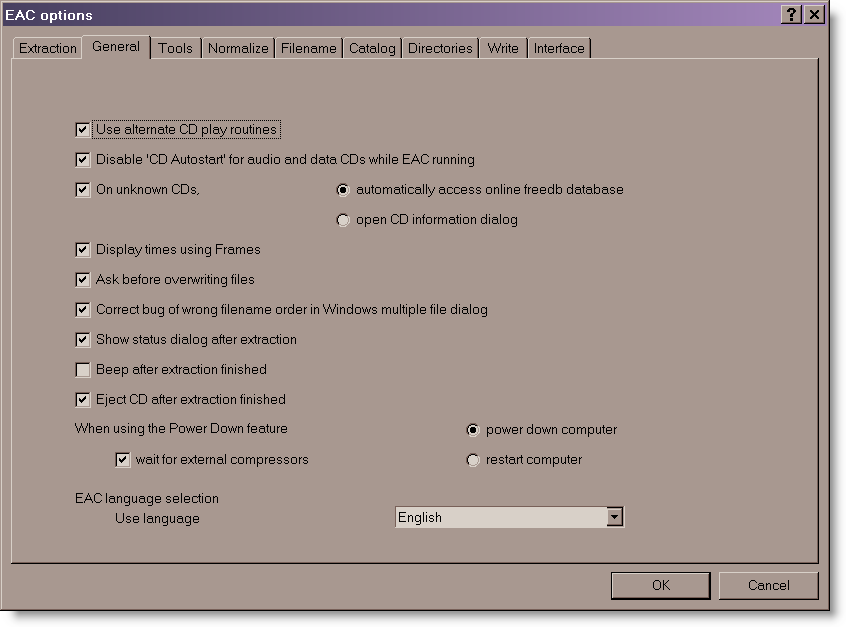
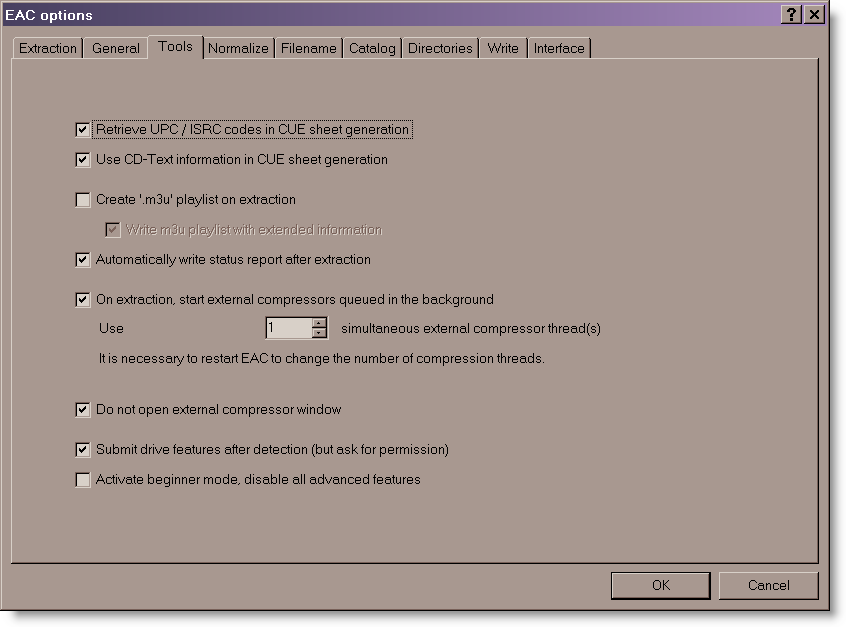
EAC has a ton of configuration options, which is one of the reasons I’ve put this page together. Below is the setup that I’ve found that gives the best quality, most accurate ripping. However, you’ll probably want to change some of the options to suit your needs. Hint: To see what a specific option does, hover your mouse over the feature and a pop-up box describing the option will appear. Go to the EAC -> EAC Options. . . menu (or press F9) and make the following settings:
Do not use normalization! It will change modify the extracted audio. You will want to apply ReplayGain compensation instead, which is described later. 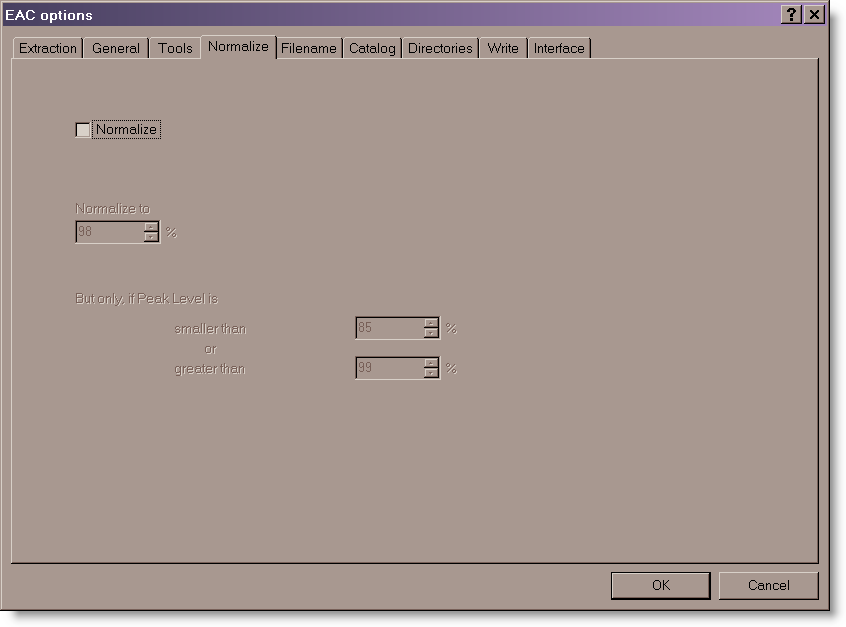
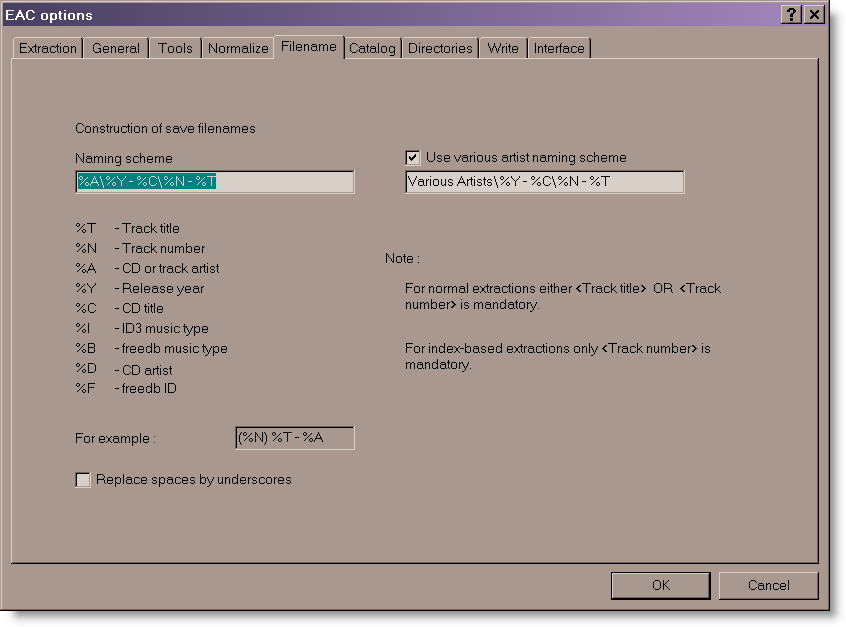
For the track name, you can automatically create folders and sub-folders. The naming scheme below will give the following folder and song name: AlbumYear – Album NameTrack# – Song Name
Naming Scheme: %A%Y – %C%N – %T Various Artists: Various Artists%Y – %C%N – %T
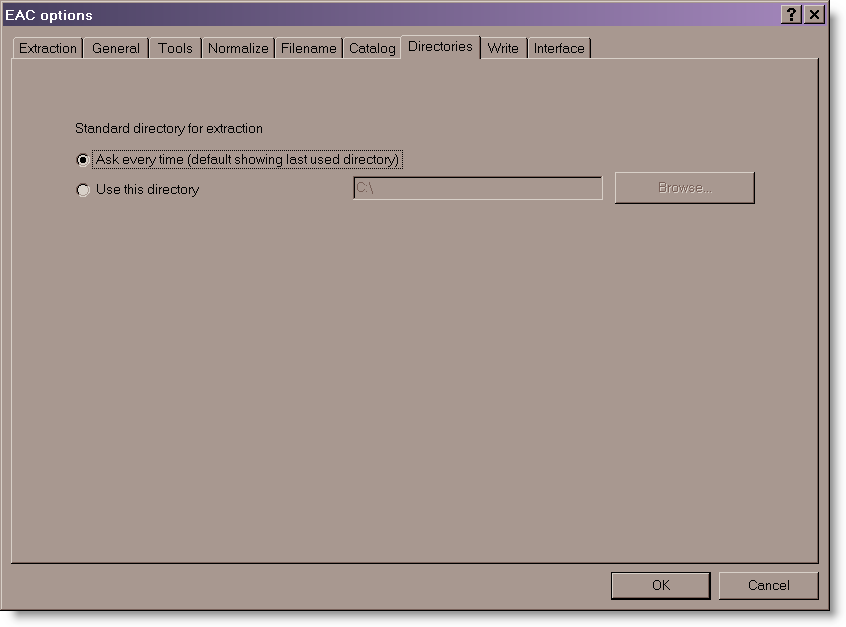
I have it prompt me for the target directory each time, but you can just specify a default directory such as D:Music.
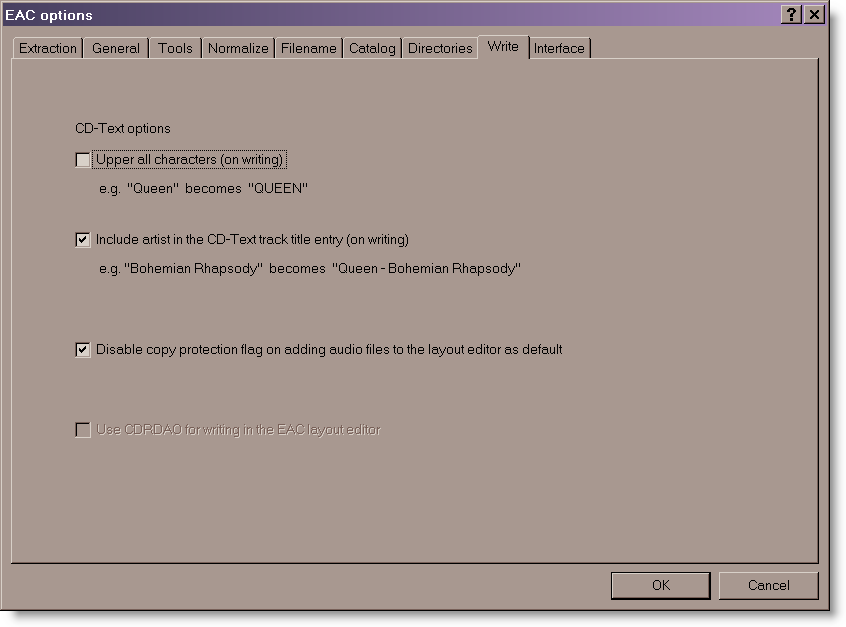
These really aren’t important for ripping.
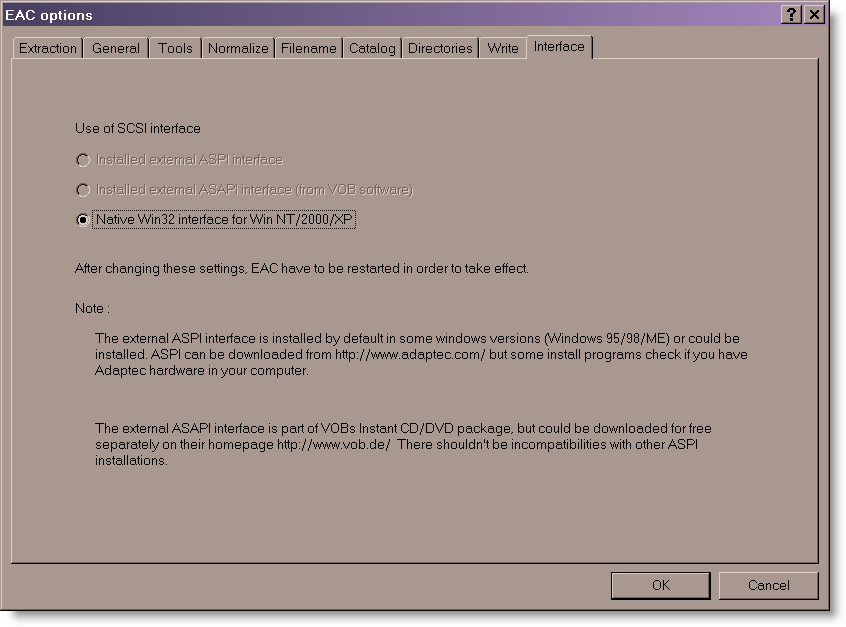
If you are using WinXP / Win200 / Win2003 Server, the following setting should work fine. If you have problems, you may want to download the CDRDAO version of EAC or download the Ataptec ASPI interface. The EAC website can give you more information if you have troubles.
Step 7: Configure EAC Drive Options
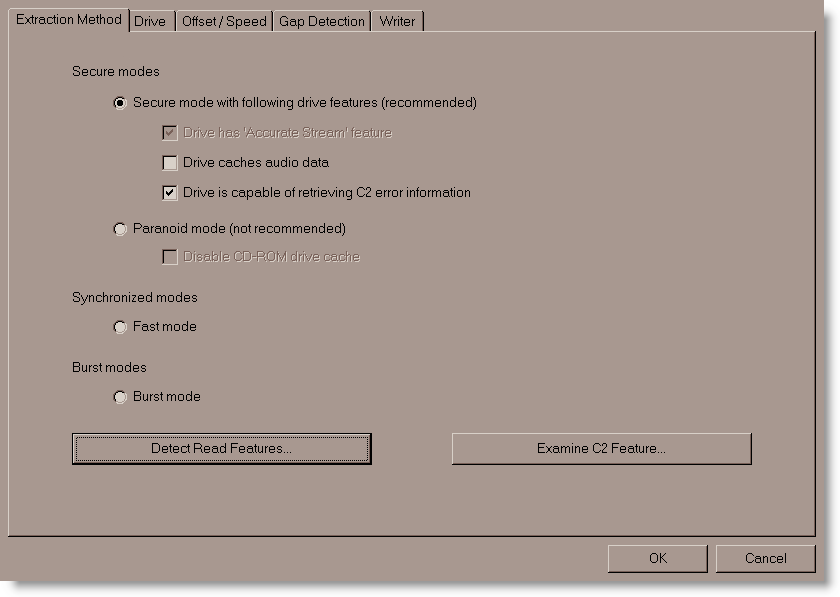
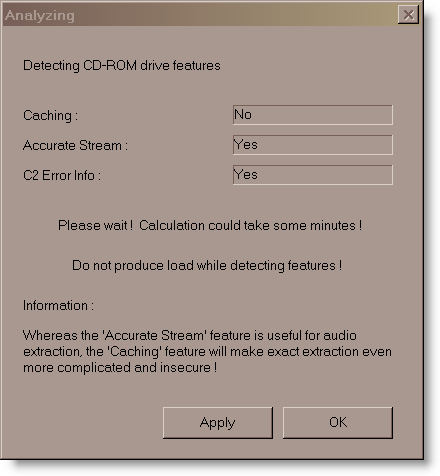
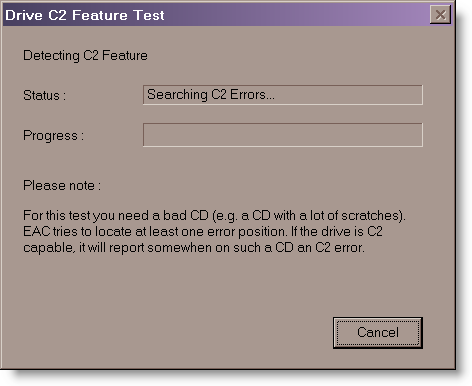
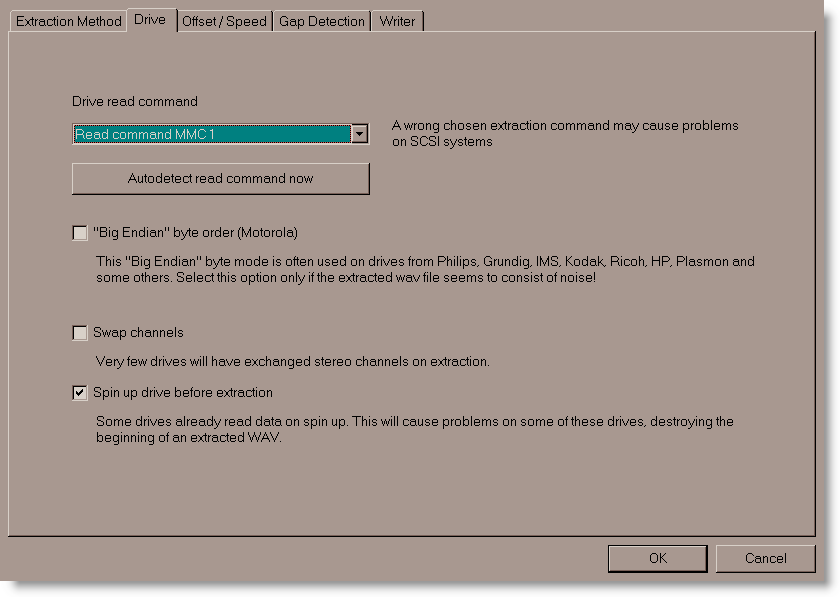
Go to the EAC -> Drive Options. . . menu (or press F10) and make the following settings: Put a new CD in the drive and run the Detect Read Features test. Put a scratched CD in the drive and run the Examine C2 Feature test.
The Detect Read Features test:
The Examine C2 Feature test:
Autodetect the read command:
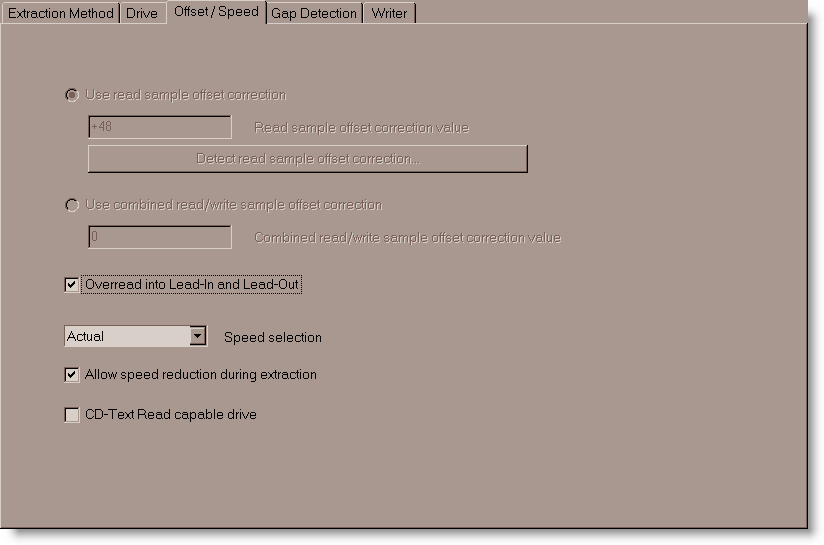
Experiment with the Overread into Lead-in and Lead-out feature if you get read errors at the beginning of the first track or end of the last track.
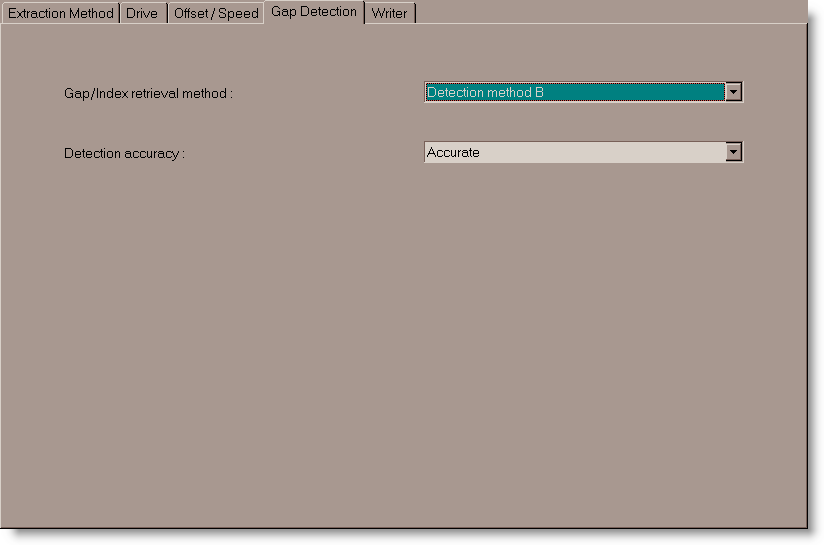
Use the default / detected Gap/Index retrieval method. I set Detection accurate method to Accurate; Secure and Inaccurate are the other options. Accurate and Secure both perform multiple reads, just Secure makes even more re-reads and this causes the ripping process take even longer. Use Secure on if you’re willing to take several hours or more to rip a slightly scratched disc.
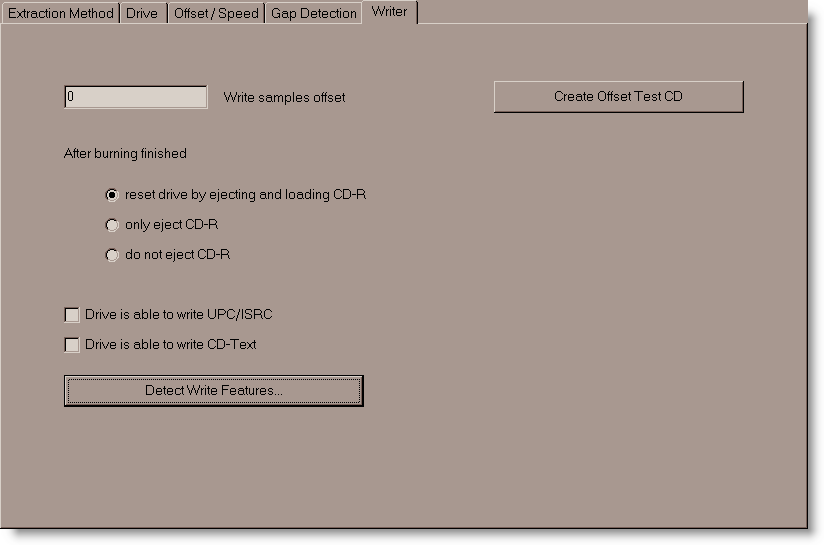
Since this is for writing, the settings are not that important.
Step 8: Configure EAC Compression Options
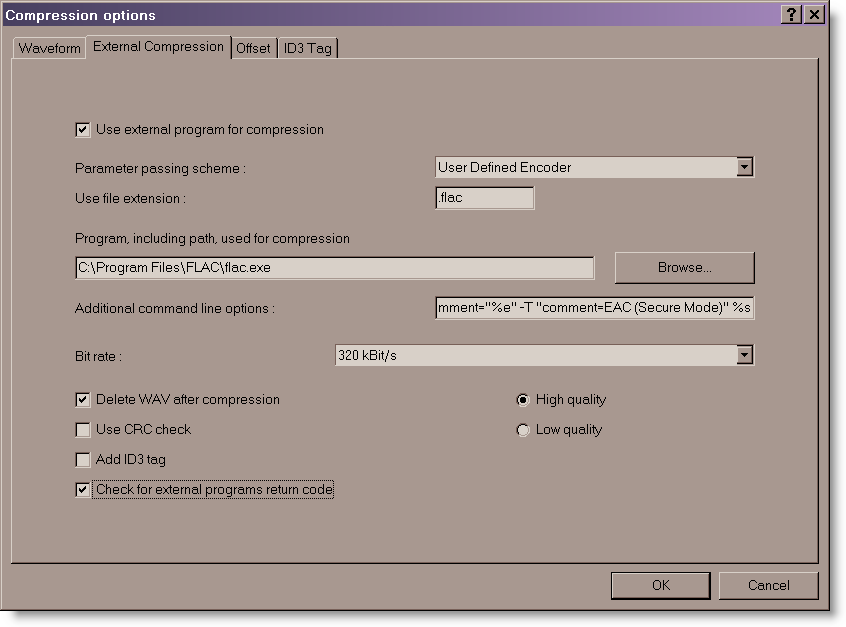
Go to the EAC -> Compression Options. . . menu (or press F11) and make the following settings: The External Compression tab is the only one that needs to be configured; other tabs will be ignored. Set the command line and options as shown below:
(Note: Exact Audio Copy V0.99 prebeta 5 and later includes FLAC as an internal cncoder, so some settings may be slightly different than what is show below.)
For the Additional command line options, use the following. The -8 setting will give maximum compression. If you have a very slow computer, you may want to try -7 or -6. See this page for a complete list of FLAC command line options.
Step 9: Configure EAC freedb Optons
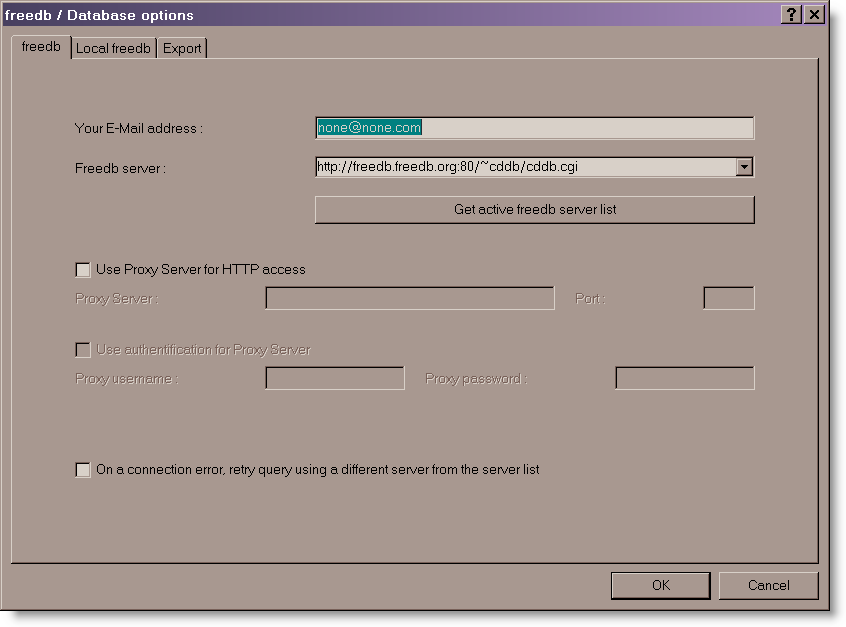
Go to the EAC -> freedb / Database Options. . . menu (or press F12) and make the following settings: These settings were probably already entered during the setup wizard, but just in case:
Step 10: Rip the Music to your PC
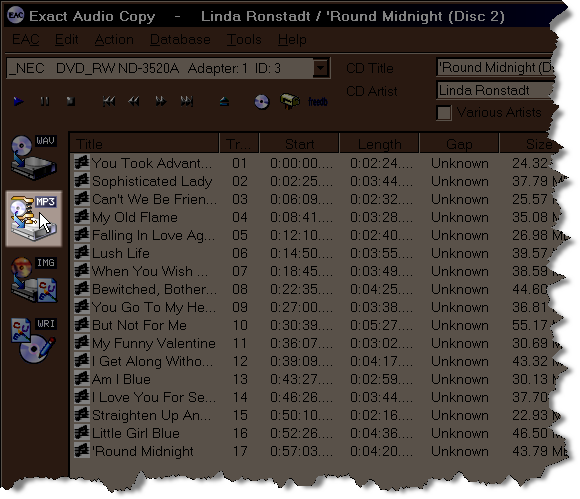
You are now ready to rip CDs to FLAC files! Just click the MP3 button to rip to a compressed file. This will not result in an MP3 being created; the MP3 button should really be called “the external file compression program” button. After making the configuration changes above, clicking the mp3 button will result in a FLAC file being created.
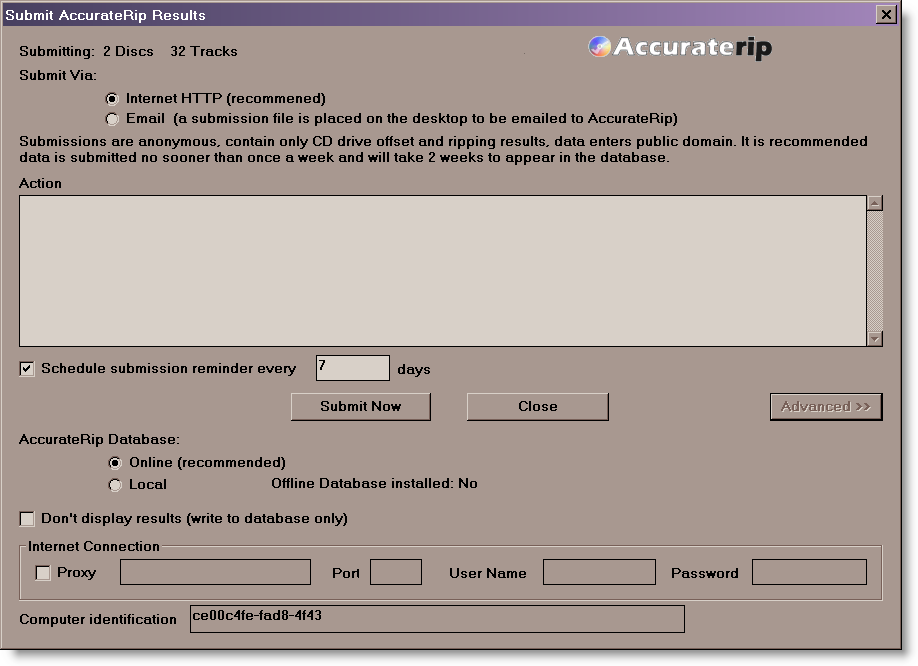
Go to the Database menu and select Send AccurateRip Results…. Make the following Scheduled Submission settings to add results to the AccurateRip disc database. This, in part, helps create more keydiscs.
Step 11: Edit the Tags
You’ll eventually find songs not taggeg properly when ripped and these are the best way to correct that. The tag editors are generally pretty straight-forward to use. The two best editors I’ve found are Mp3tag and TagScanner. These free programs can lookup tag info from the freedb database to retag files. They can also rename files based on the tags or retag songs based on the file name. Media Monkey is a great alternative, all-around app that can edit tags and do about everything else you’d want.
Step 12: Download the Cover Art
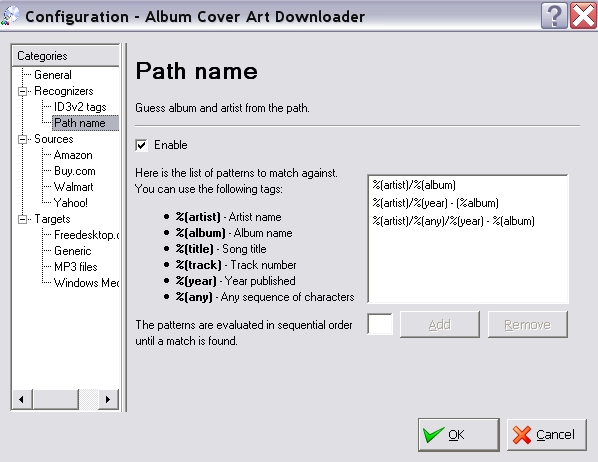
Many music players will display cover art. Album Cover Art Downloader is an app completely dedicated to getting the pictures into your music directories. This program can’t read the tags for FLAC/OGG files (only ID3 tags are recognized), but it can be configured to identify albums based on folder naming. Even with this setup, it still can get the album name wrong, so I have to manually delete the date before clicking “download covers”. Anyway, here is how I have Album Cover Art Downloader configured to identify albums based on folder/sub-folder naming.
Media Monkey is a great all-around program that does album art and also plays FLAC, Edits Tags, converts formats, etc. It will ready the tag info for about every format you can imagine, so it can be useful to modify any titles/folders that Album Cover Art Downloader doesn’t recognize.
Step 13: ReplayGain Volume Normalization
This is complicated enough for a separate explanation, so I won’t go into details here. ReplayGain will analyze and calculate the peak volume level for an entire album or each individual song and write a tag in the header of the file. It does not actually change the audio data within the file but rather give a “volume offset” that the audio player uses to pre-adjust the song to the proper playback level (independent of the player volume setting).
Links and References
This guide would not be possible without the information given in these excellent guides:
- EAC Configuration for Musepack
- HydrogenAudio Forum: EAC+FLAC image, Best way to create a lossless back-ups
- EAC Configuration for WMA9 and WMA Lossless


Any assistance possible for Mac users? Any help would be appreciated.
Incidentally, I have played flac encoded files using Toast Titanium. In addition, I have also used the Cog player to play flac, ape and wavpack files on the Mac.
Paul: XiphQT is under development for allowing playback of OGG and FLAC in iTunes and Quicktime. I haven’t tried it, but I don’t think it works very well.
As I’m sure you know, all lossless formats are roughly equivalent. The output from a FLAC file is the same as the output from a WMA Lossless, Apples Lossless, WAV, SHN, WavePack, etc. They are just different way to package the exact same lossless audio content.
The factor is the getting the audio from a CD into the lossless format. Right now, it’s pretty difficult to get the bit-perfect music off of the CD and into a lossless format; you have to have a PC running Windows and use either EAC or dbPowerAmp Muisc Converter. Unfortunately, I know of no Mac or Linux ripping application that supports AccurateRip. Hopefully support will grow in the near future.
I’m a newbee at ripping FLACs which I intend to do for the purpose fo having my whole collection to be played thru Slim Devices Transporter. I want MAXIMUM fidelity. This manual confuses me a bit since I start getting allergic itches as soon as I read “MP3” and “Compression” which are concepts to be read here.
Should I not push the button “WAV” instead of MP3?
Secondly: Aint ANY form of compression bad?
Excuse me of my probable misconceptions. I’m ignorant to these things but like to do EVERYTHING possible to get the absolute MAXIMUM Q. I have Accuratrip installed – and it works – and I have bought a state of the art driver: Plextor Premium Plus.
Ready to get to work!
Regards!
/J
Jon: Compression is not bad thing, it just depends on how it is used. There are two forms: lossless compression and lossy compression.
With lossless compression, you take a wave file, compress it into something somewhat smaller (50% of the original size), then decompress it and get the exact same file back as the original. This is what FLAC does and there is absolutely zero impact on sound quality. There is no difference between the original because it is not really altered, just temporarily stored in a compressed container that takes up less disk space. This is the type of compression used by FLAC, Apple Lossless, WMA Lossless, SHN, Wavepack, and a few other formats. For audiophiles, lossless compression is essential.
Lossy compression is a different methodology. With it, you take a wave file, compress it into a significantly smaller format (20% of the original size), and then decompress it back to something that closely resembles the original wave file. But it is not identical to the original wave file because it is lossy — some of the original information was lost. This is what MP3, Apple MP4, and most forms of WMA do. Audiophiles want to avoid lossy compression.
There is some confusing with the EAC user interface. The button that is labeled “MP3” should really be labeled as “external compression program”. The “MP3” button can be used to run the external LAME MP3 compression. But, as these instructions show, it can also be configured to run the external FLAC compressor. If you use the “Wave” button, you will get uncompressed WAVE files as the output. But if you use the MP3 button, you will get a compressed output file — just be sure to specify FLAC as the external compressor so that you get lossless compression!!!
1K thanks Carlton (what a great thing the internet community!),
Do you have anything to add to the “Offset” & “ID3 Tag” tabs under “Compression options”?
No, nothing to add for these. These are only of use if you are doing MP3 compression. Since FLAC compression doesn’t use ID3 and is not really configured through EAC, these tabs are of no use (when using FLAC).
Thank you for great information. Do you know if there is a way to use EAC to store to FLAC and to MP3 atthe same time? I’d like to use the FLAC files at home and the mp3 on my portable.
Many, many thanks.
Really useful, simple instructions. Thanks a lot!!
Excellent! Only main mod I saw necessary was, for the FLAC program arguments, to use standard quotes instead of those fancy fashionable ones in your example – makes for easier cut and paste operations. Thanks for spending all the time making this!
Monty: Thanks for the feedback. I redesigned my site a few weeks ago and overlooked this formatting requirement. It’s fixed now; the FLAC command line appears as mono-space code.
Sammy: I know of no way to do this in EAC. dbMusicConverter dMC Audio CD Input. may offer this feature, but that ripping program is lacking a few more important features, so I wouldn’t recommend it. However, I would recommend dbPowerAmp Music Converter to create a MP3 copy of the FLAC files after they are ripped. This makes it a two-step process, but the Music Converter is super-simple to use and is the best solution I have.
Carlton, Excuse me if I ask the obvious but I can’t find an explanation to the concept anywhere: “Command line options” (CLO)? As I face a monstreous job in front of me I’m afraid I might do something stupid to regret too late. When I read the various suggestions on CLO published on the web, CLO seem to derive from the contents of “Naming scheme”?? Thus I’m afraid that if I go for another naming scheme than yours I also have to rewrite CLO?? If that’s the case: how is it related to Naming scheme?
(How come there are so many different settings of this seemingly simple app out there – I’m getting confused). Thanks for any help!
Jon: Command Line Options are how EAC sends instructions to the external compression program (FLAC). The first few portions of what is above are compression instructions; everything else is for tagging. The tag is the tag, you really don’t want to change this. The Artist Name is the Artist Name, the track number is the track number, etc. These tags are embedded in the FLAC file and have nothing to do with file/folder naming.
I think you’re getting confused about the difference between the tags within a file and the folder location and name of the file itself. Pretty much any music player will scan the music files on your computer and create a database of the songs. This database uses the tags of the files and not the file/folder names. File/folder names are generally only important when browsing folder in Windows.
To change how folder are created and files are named, change the settings in EAC Option -> Filename
Thanks Carlton!
I quote from above:
-8 -V -T “artist=%a” -T “title=%t” -T “album=%g” -T “date=%y” -T “tracknumber=%n” -T “genre=%m” -T comment=”%e” -T “comment=EAC (Secure Mode)” %s.
“-8 -V” are the compression options (8 = the highest possible rate of compression)? One other thing that puzzles me is the ending “(Secure mode)” What if you would choose “burst mode”? does this have any relation to the OLC? And what if you don’t write ANYTHING in the OLC text field? (It seems to work just fine when creating FLACs).
Jon, I’d recommend you visit this page to understand the command line options: http://flac.sourceforge.net/documentation_tools_flac.html
The “-8” sets the compression level. “-V” specifies verification of the FLAC file after it is created. The last portion is simply a comment on the settings used to rip the file; you can put anything you want in that comment area and there is no impact on how you rip the files.
While you can leave Command Line Options it blank, you will get default compression level, no verification, and no tags within the files. No tags within the files makes them almost unusable in my opinion; it is impossible to sort through all of the songs because there is no metadata. Anytime you play a song in a media player, the song title, artist, album, year, etc. info comes from the metadata tags. The command line options above result in all of this data being included. I don’t recommend changing it. The only thing you might do differently is lower the compression level if your CPU is too slow at encoding.
Have used above instructions to copy 500+ CDs for use with my sonos system – i now want to take my music with me. There is a dearth of FLAC players out there – but just found the Cowon iaudio 6x player. I was considering buying this until i read it only supported compression levels 1 & 2. I then found a firmware upgrade that supported upto level 5. But am i correct in assuming that the music i have copied (all at compression level 8) will not play on that device?
If i’m correct – do you know of any players that do support compression level 8
Thanks
Russell
Russell: You can check out my Ultimate Technology List. If it were me, I’d load third-party firmware on an Ipod. Both the RockBox firmware and the iPod Linux firmware support FLAC level 8 on most iPod models. The RockBox firmware also runs on other non-Apple products, so you can look at those as well.
Thanks Carlton
Will have a look at your suggestions
Ruusell
In response to Carlton Bale’s comment (#2), I can’t make any claims about the Xiph.org QuickTime Extensions for _Windows_, but I use the Xiph.org QT extensions on my MacBook Pro (OS X 10.4), and iTunes fully catalogs and plays my music collection, which is mostly in Ogg Vorbis format. My only complaint about the extensions right now is that they don’t recognize the TRACKNUMBER Vorbis comment, so that field in the library is blank for my Vorbis tracks. Everything else populates correctly, though.
I was wondering, since the problem with DAE on computers seems to be the drive and related EC, why one could not just use a consumer CD player’s “digital out” to capture an “exact copy” of the CD? Obviously this would have to occur in real time, but that interval seems to be shorter than EAC in Secure mode, at least according to what I’ve read, since I’ve not tried it myself. Will any audio capture programs work with the “digital in” to create tracks, gapless if necessary, album info, tags etc…? I’m not concerned with lossless, lossy, or file formats, since that can always be done as per whim after the fact, but I am concerned with capturing the best copy I can of my original CDs.
I may be missing something really obvious, but this is what occurred to me after reading much about EAC and DAE.
Nick
Nick: I suppose you could capture audio this way, but why? I see several reasons to avoid using a stand-alone CD player and a Digital Input. First of all, if there is a scratch on the CD, it will not exhaustively read that sector trying to figure out the proper bit — the CD player will just dump the best-guess effort out the digital output in real time — because it’s a real-time playback device. Secondly, it would be much, much more work and time. You’d have to record in real-time, which means 70 minutes per CD. It usually takes 10 minutes to rip using EAC. In addition, there would be no track splits — you’d get one 70 minute audio file that you’d have to go back and split into tracks. Also, you’d get no metadata, so you’d manually have to enter the year, artist, album, and track title, and track number information for each and every track after performing the split. Why waste all that time when you can just have EAC apply that info when you rip? If you have thousands of tracks, meta-data is mandatory. Lastly, there could be jitter problems in the digital connection between the player and the sound card and also within the sound card, depending on the quality of the components. No need to risk this when EAC takes care of it. I think it would be a huge waste of time to record from a digital input and it would give no better quality.
Well, I guess I was just thinking out loud and proceeding on some (mis) assumptions. I’d read that EAC can take many hours (10+) in Secure mode. I also assumed that there could be a program that would read the incoming datastream, separate the tracks, and add all the metadata. Obviously it’d be a huge waste of time to do that manually, but proceeding from the “10+ hours with EAC” assumption, it’d still be shorter. The jitter problem I didn’t think about, but yes, that’d be an issue. Also, I’m on a Mac, and although I like the way Max w/cdparanoia rips, d’loads album art, and adds to my iTunes library, I’m not convinced it’s as good a solution as EAC. I have a PC as well, so it’s not that big a deal to just use EAC, but I don’t think EAC will rip to Apple Lossless and add to my iTunes folder in iTunes format, which, btw, is on a NAS. So why Apple Lossless and not FLAC, since my Sonos system will play both? Just because iTunes doesn’t recognize it, and I’d like to manage my collection from the Mac because that’s my main machine. I’ve read about XiphQT, and maybe it works and maybe it doesn’t, but I’m generally not into hacks, because I’ve tried a few and they can range from semi-useful to dreadful, but usually at the expense of some kind of unpredictable, unsupported instability.
Nick: Secure Mode rips can take a very long time if the CD is scratched/damaged. In my opinion, it is overly thorough in trying to verify the scratched/damaged portions. For that reason, I recommend using the Accurate setting instead of Secure. I thinks it’s a better trade-off between time required and results achieved. But both are more thorough than a standard CD player, which reads and outputs the music in real-time with little to no re-read verification.
I don’t think it is possible for EAC to rip to Apple Lossless because there is no command line interface for that compressor. But it should be a pretty simple task to rip to FLAC and then use dbPowerAmp Music Converter to bulk convert them to Apple Lossless – it would take 5 minutes to select the files and start the process, then several hours to convert them all. You could then add them to your iTunes Library and use that to auto-download album art. It’s definitely a lot of steps, but there just aren’t that many programs capable of AccurateRip. dbPowerAmp Music Converter CD Input is the only other one. It can extract directly to Apple Lossless but currently is lacking support for “Various Artists” CD’s and it also does not rip and then extract in the background, so you have to wait for each track to rip and compress before going on to the next one. With EAC, you can just rip CD after CD and it will create a queue to compress the extracted files into FLAC.
I’m a total newbie at this – just doing my research before embarking on a 4,000 CD project. My question is this: If I copy a data CD to my disk, Windows guarantees a bit accurate copy of the files or comes back with a failure – something I can’t ever recall happening. So why all the hocus-pocus with EAC and complex settings just because it’s audio? Since we’re staying in the digital domain, bits are bits, no? Why do I have to worry about offsets and suchlike?
Mike: There are two reasons for this: 1) scratches or any disc anomalies that cause error correction to come into play 2) jitter.
thanks 4 this guide! I really appreciate it.
Hi and thanks for the fantastic guide. I set EAC up on an existing system a while ago. I just built a new system and would like to transfer the settings. I can do that using EAC profiles, but the problem is that the profile includes the drive offset. The new system has a different drive to the existing one. Is there any way I can transfer the settings and then reset the offset (have AccurateRip run again) for the new drive?
Carmel: Sure, just repeat Step 7 to detect the settings of the new drive. I’m not sure, but you may have to insert a key disc again to validate the settings.
I finally got fed up with my Sony PC and bought a Macbook pro. Now the problem is that I have to convert all my music to apple lossless files. I have the dppower amp and converter so I can do this on my PC but I read somewhere that it would be better to convert them on my apple in order to keep the tags. Is this correct? Can you offer some advice?
1. How should I convert the .flac files to AAC? What program and on which computer?
2. What program should I use in the future to burn cds on my Apple?
I plan to use iTunes to listen to music but I don’t know if the iTunes ripper is any good. I also don’t know if I can change the id tags with it like I can with EAC or dbpower amp.
Any help is appreciated. I don’t want to ruin all the hard work getting my music ripped properly the first time with EAC.
Hey Dennis. This plugin might allow you to play FLAC files in iTunes on your Mac: http://www.xiph.org/quicktime/
You should convert from FLAC to Apple Lossless using dBpoweramp Music Converter from http://www.dbpoweramp.com on your PC. It will keep all of the tag. Once it is in Apple Lossless format, you can edit tags in iTunes.
As for ripping on your Mac, you’re out of luck. There are no ripping programs for Mac that support bit-perfect extraction or AccurateRip. Your only option is to use boot camp to dual-boot your Mac (and install Windows and EAC on the Mac.) I’ve understand this can be done, but don’t know any more about it.
Good luck!
With reference to the question in #7 above, and Carton’s response in #8:
“Do you know if there is a way to use EAC to store to FLAC and to MP3 at the same time? I’d like to use the FLAC files at home and the mp3 on my portable.”
I found that dbPowerAmp Music Converter now offers a way to do exactly this via a ‘Multi Encoder utility codec’ that is currently in beta testing, announced on March 13th. Here is the thread:
http://forum.dbpoweramp.com/showthread.php?t=12417
Here’s some info for those looking to play FLAC files on a Macintosh. XLD (X Lossless Decoder) supports:
– Ogg, FLAC (.flac/.ogg)
– Monkey’s Audio (.ape)
– Wavpack (.wv)
– TTA (.tta)
– Apple Lossless (.m4a) [10.4 only]
– AIFF, WAV, etc
http://www.losslessaudioblog.com/2007/04/12/mac-os-x-lossless-decoder/
http://tmkk.hp.infoseek.co.jp/xld/index_e.html
Unfortunately, there is still no way to guarantee bit-perfect extraction of Audio CDs on a Mac. But at least this gives wide-range support for multiple, common formats.
For a portable player that can handle FLAC check out the Rio Karma. It also does gapless playback (as distinct from cross-fade).
Regards, Darren
Hi-
Does anyone know up to date reviews of which CD/DVD rippers are best for audio extraction?
I want to buy the best before I rip my entire collection to hard drive.
Thanks
Danny: See this post. EAC is the best free ripper. dbPowerAmp Music Converter is better if you’re willing to pay for the enhanced version. Both produce great results.
Hi-
Thanks, sorry I wasn’t clear.
I meant best hardware CD/DVD solution for audio extraction. I know about EAC and dbPowerAmp, I’m looking to replace a CD/DVD disk drive in my PC.
Your site is great, thanks alot for the effort involved.
Danny
Danny, as long as you get bit-perfect extraction, it really doesn’t matter which drive you get. I use an inexpensive DVD burner made by NEC.
HI I WANT TO COPY MY CD COLLECTION TO HD AND FROM THERE THROUGH A COAXIAL CONNECTION TO MY HIGH END STREO DAC. I DONT WANT TO LOSE IN QUALITY COMPARED WITH MY CDs. IN WHAT FORMAT SHOULD I RIP THEM AND HOW CAN I PLAY THEM BACK? ANY SUGGESTIONS?
CHRIS: Pick any lossless format; they are all the same. Play them back with any player that supports that format; I prefer MediaMonkey.
Thanks so much for your time and effort in producing this wonderful tutorial. I had found a few flacs on the net and really appreciated their superior quality. I didn’t have a clue how to rip a few of my favorite songs from CD into flac format. You made it easy 🙂 My One-Hit-Wonders are easy to play now! Thanks again.