Overview:
This page describes the most accurate way I know to extract and preserve the data from an Audio CD (compact disc). Two steps are necessary to get the best possible audio quality:
- Bit-perfect audio extraction from the CD
- Lossless compression of the extracted audio
This 2-step process involves a lot of steps that most people would consider unnecessary. However, if you want to preserve and archive CDs by the most accurate means possible, this may be the page for you.
NOTE: If you are not an audiophile and just want to use a lossless format, you probably will not be able to tell the difference from the method I describe below. If this describes you, it is much easier to simply use a commercial music management program to extract / rip the songs to your computer using a lossless format. For this simplified method, possibilities include:
- Yahoo! Music Engine to extract the files to FLAC format. Can be played around your home by devices such as the Sonos Zone Player and the SlimDevices SlimBox2 and in your car by the PhatNoise PhatBox players.
- Windows Media Player (versions 9 or later) to extract files to the WMA Lossless format. Can be played by home devices such as Roku SoundBridge, Windows Media Center PC, and possibly Windows Media Extenders (untested).
- Apple iTunes to extract to Apple Lossless format. Can be played around your home by the Apple Airport Express and the Apple Airport Extreme.
However, none of the methods above guarantee bit-perfect extraction from the original CD. To get bit-perfect extraction and insure maximum fidelity, look to the methods outlined below.
Step 1: Choosing a Lossless Audio Format (codec)
There are multiple lossless codecs from which to choose, including FLAC, WMA Lossless, Apple Lossless, Shorten (SHN), Real lossless, Monkey’s Audio, OptimFrog, WavePack, etc. For a detailed comparison of lossless formats, check out the HydrogenAudio Lossless Comparison page. I highly recommend the free, open-source FLAC codec as it is widely supported, freely implemented, and full-featured. There is no reason for any device manufacturer to not support FLAC unless they are trying to push their own format. FLAC is the format used for these instructions.
Step 2: What You Will Need
Programs on your computer to Rip CDs:
- Exact Audio Copy – To rip CDs to the hard disk drive
- FLAC Codec – To losslessly compress the extracted audio – Version 1.1.4 or later is required. (This is not required as of Exact Audio Copy version 0.99 prebeta 5 – it includes FLAC files)
Other Programs:
- Media Monkey – Plays FLAC, Edits Tags, Downloads cover art, converts between formats, great all-around program.
- Mp3tag – A great tag editor
- TagScanner – A great tag editor
- Album Cover Art Downloader – The best program for downloading coverart
FYI: Programs that will play FLAC-encoded music: Media Monkey Yahoo! Music Engine DB Power Amp Winamp with FLAC plugin Foobar2000 with fooFLAC plugin See a complete list on the FLAC website
FYI: Audio hardware devices that support FLAC:Sonos Music System PhatNoise PhatBox Auto/Home systems SlimDevices SqueezeBox See a complete list on the FLAC website
Step 3: Install EAC and FLAC
For EAC, I recommend downloading the latest beta release; all of the beta versions I’ve tried have been very stable. There are several variations of each release; I use the installer version that comes without CDRDAO. I use the default installation location (C:Program FilesExact Audio Copy)
Installation is straight-forward for FLAC, I recommend the default installation directory location (C:Program FilesFLAC)
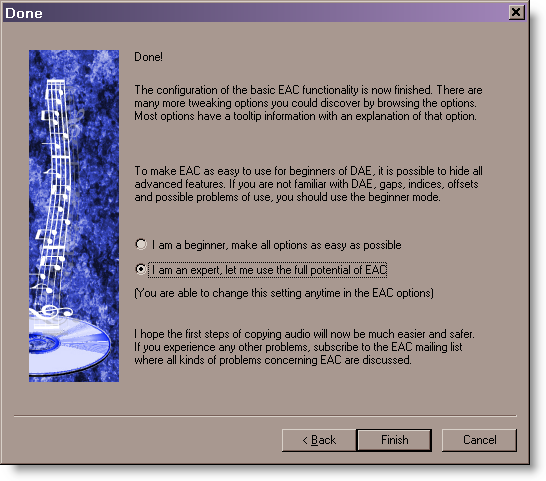
Step 4: Setup the CD Drive for Bit-Perfect Ripping
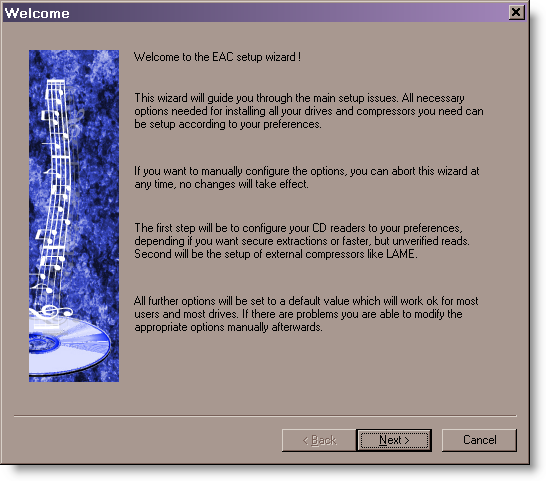
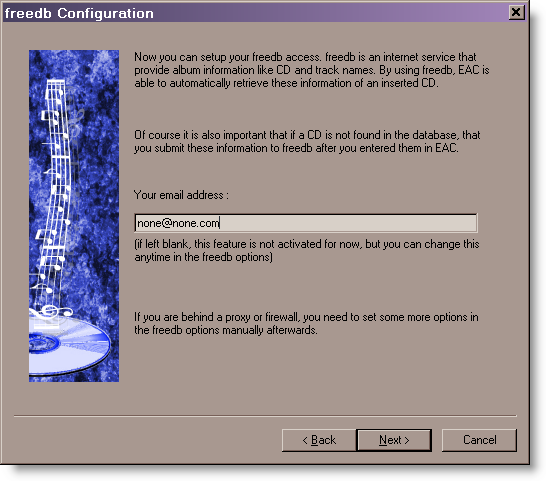
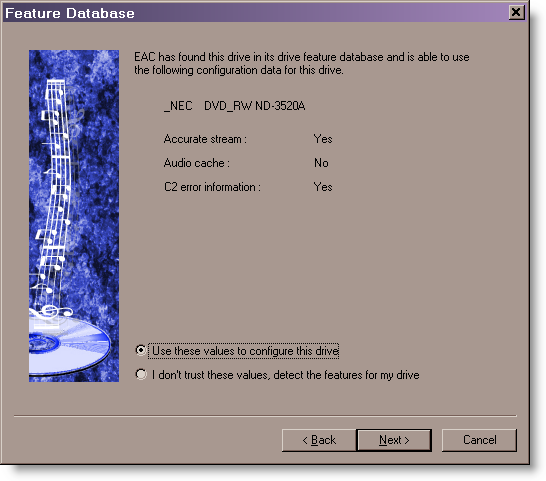
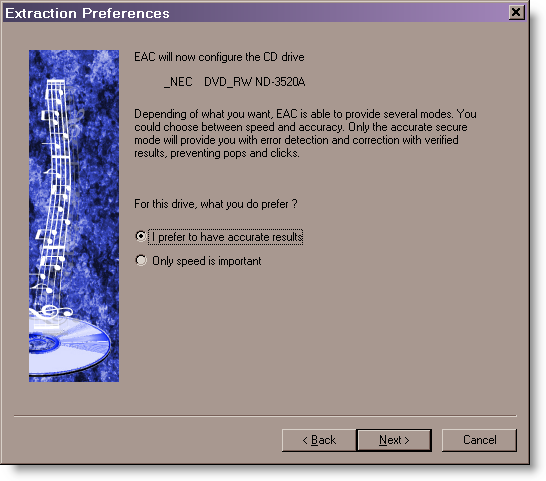
Go through the EAC Setup Wizard, use the settings shown below.
Use the detected settings:
Step 5: Configure Accurate Rip
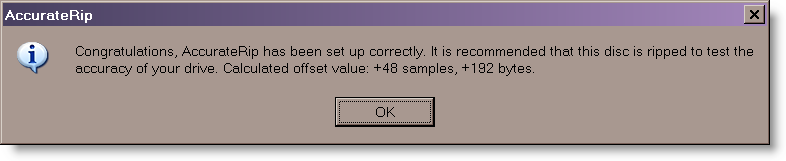
Before using AccurateRip, it is necessary to determine the read offset for your CD / DVD drive. According the the AccurateRip website: every CD drive has a slight reading offset, this value tends to be fixed for each type of drive and is constant. If the drive does not support AccurateStream, (i.e. it has a varying offset each time a track is read) then AccurateRip cannot be used because it will never be able to configure itself. AccurateRip will find the drive offset by using keydiscs (a disc someone else has previously accurately ripped and added to the AccurateRip disc database). The key disc must have more than 5 tracks of a certain length. To configure AccurateRip, insert known keydiscs into your CD drive; a list of keydiscs is available on the AccurateRip Website. If the disc is recognized, AccurateRip will automatically offer to find the drive offset. Some discs listed in the keydisc database may be from a different pressing than the disc you test, so don’t give up if the first couple of key discs are not recognized.
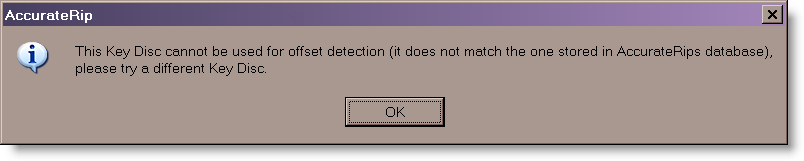
When an offset has been found for a drive using the first keydisc, it has to match the offset already stored in the AccurateRip drive database. If it does not match, AccurateRip will require 3 keydiscs that give the same offset as the first keydisc.
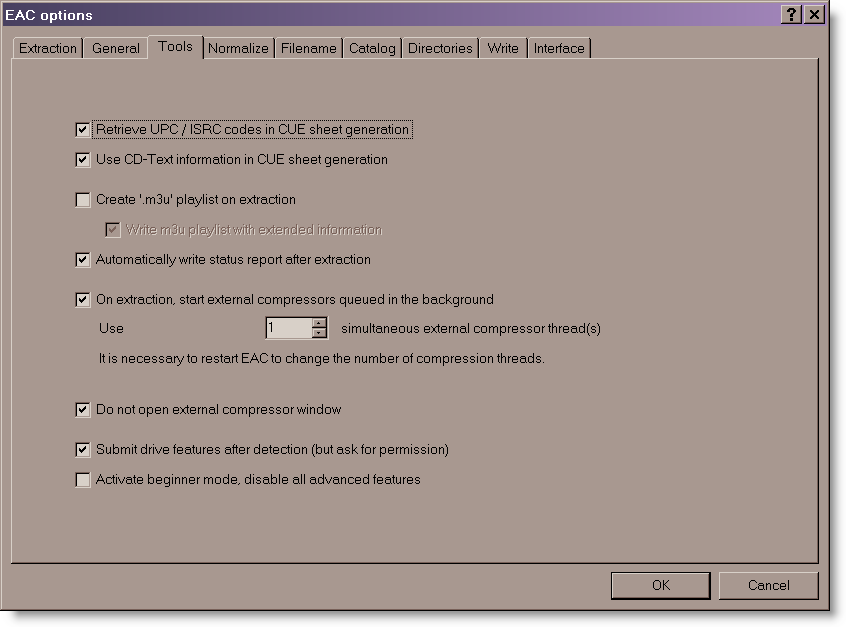
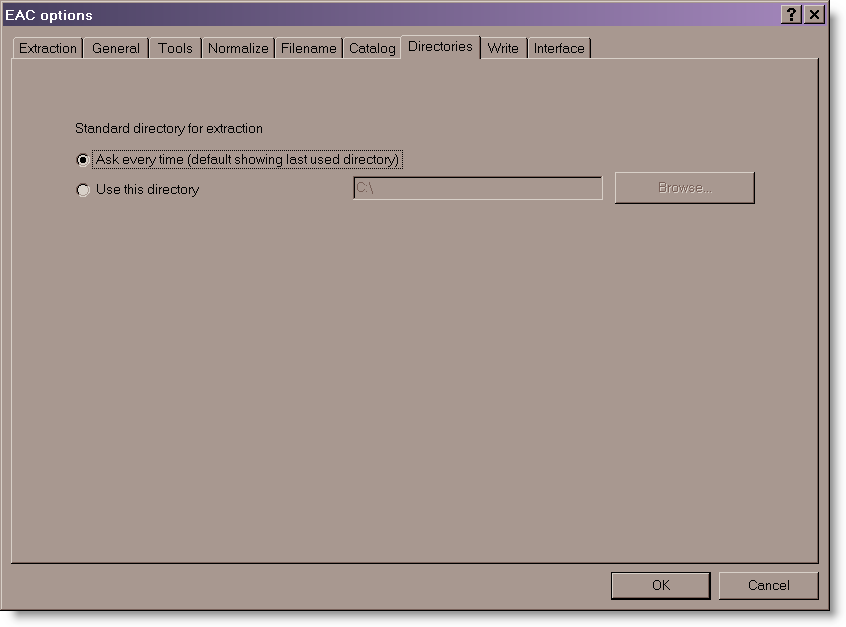
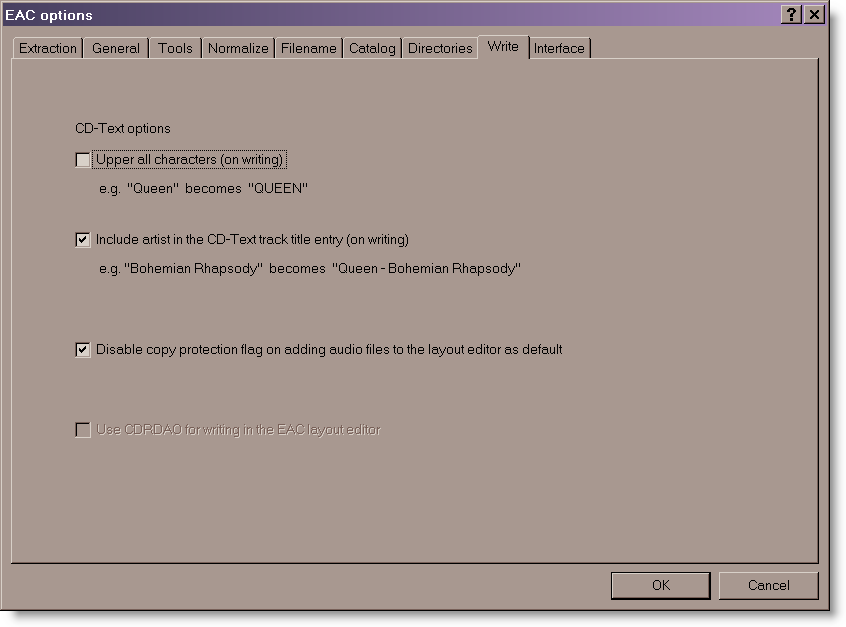
Step 6: Configure EAC Program Options
EAC has a ton of configuration options, which is one of the reasons I’ve put this page together. Below is the setup that I’ve found that gives the best quality, most accurate ripping. However, you’ll probably want to change some of the options to suit your needs. Hint: To see what a specific option does, hover your mouse over the feature and a pop-up box describing the option will appear. Go to the EAC -> EAC Options. . . menu (or press F9) and make the following settings:
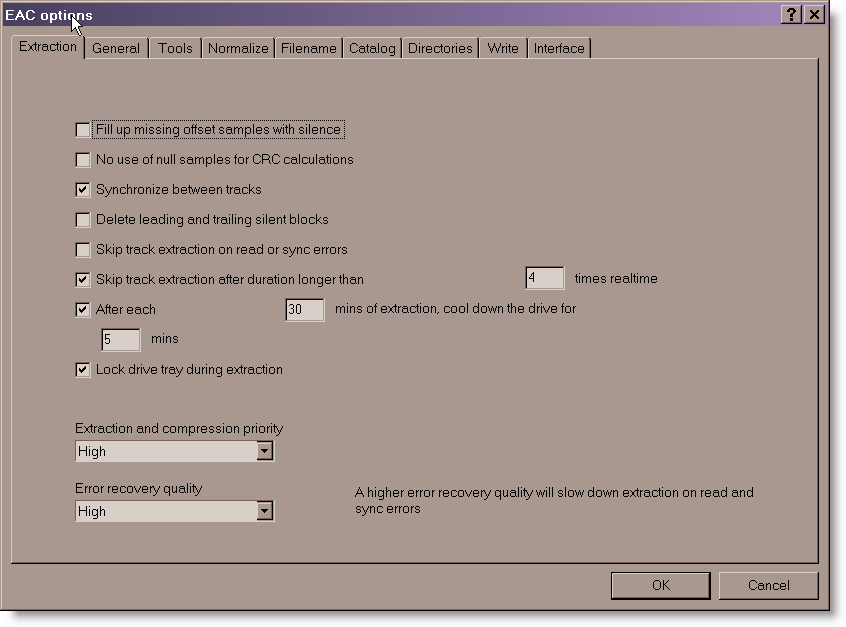

Do not use normalization! It will change modify the extracted audio. You will want to apply ReplayGain compensation instead, which is described later. 
For the track name, you can automatically create folders and sub-folders. The naming scheme below will give the following folder and song name: AlbumYear – Album NameTrack# – Song Name
Naming Scheme: %A%Y – %C%N – %T Various Artists: Various Artists%Y – %C%N – %T
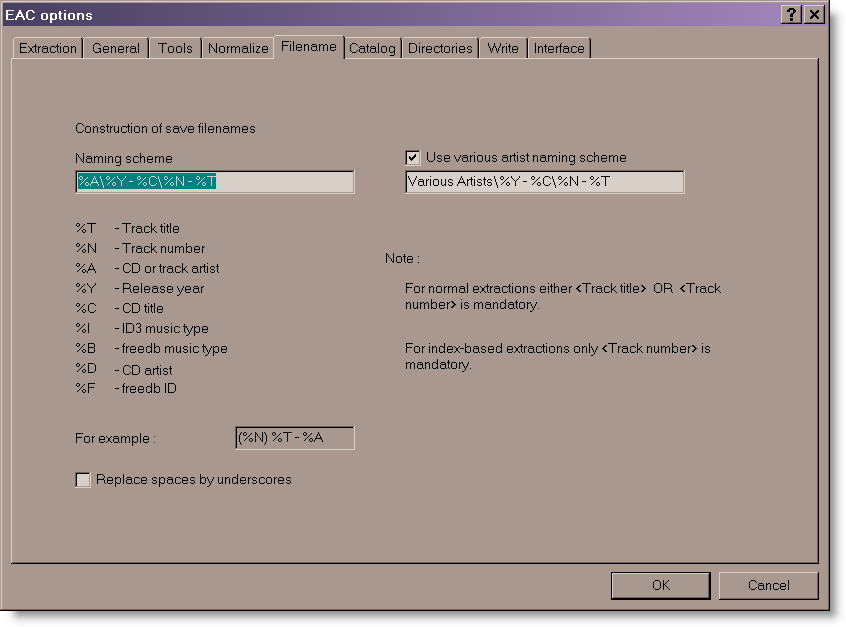
I have it prompt me for the target directory each time, but you can just specify a default directory such as D:Music.
These really aren’t important for ripping.
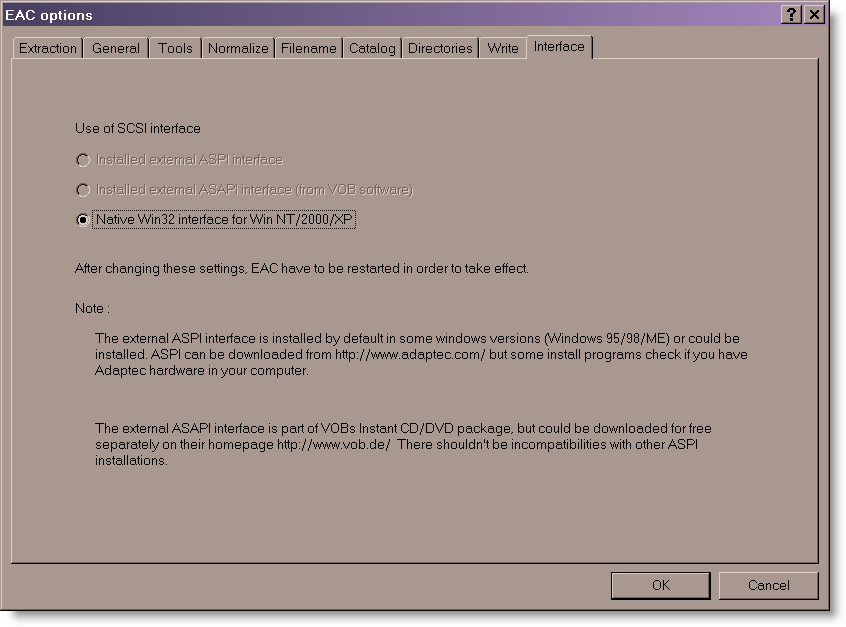
If you are using WinXP / Win200 / Win2003 Server, the following setting should work fine. If you have problems, you may want to download the CDRDAO version of EAC or download the Ataptec ASPI interface. The EAC website can give you more information if you have troubles.
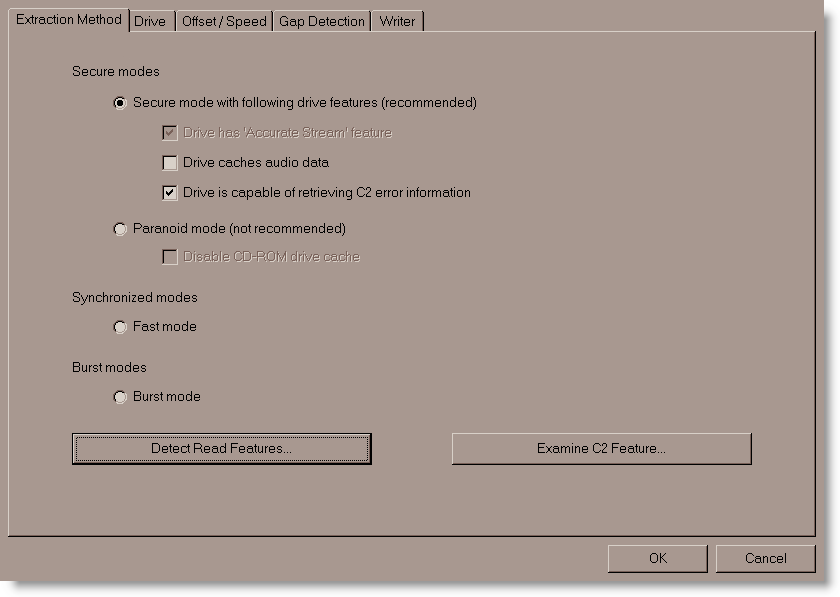
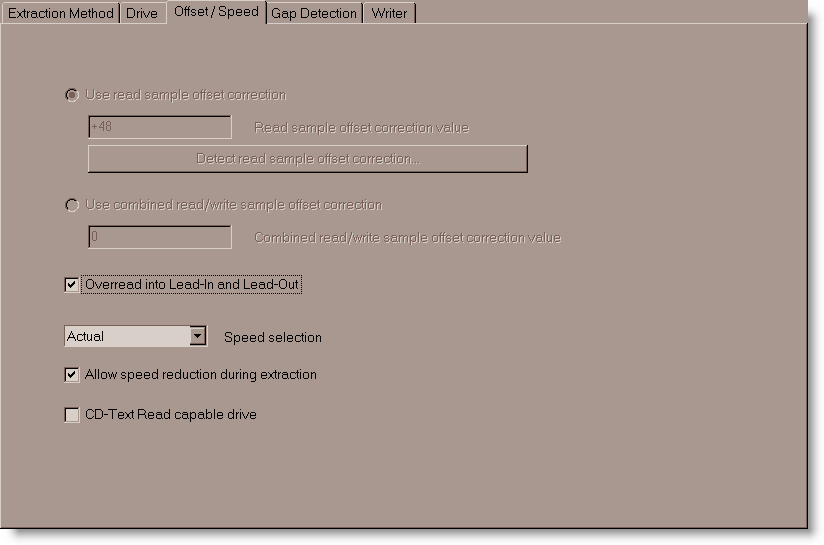
Step 7: Configure EAC Drive Options
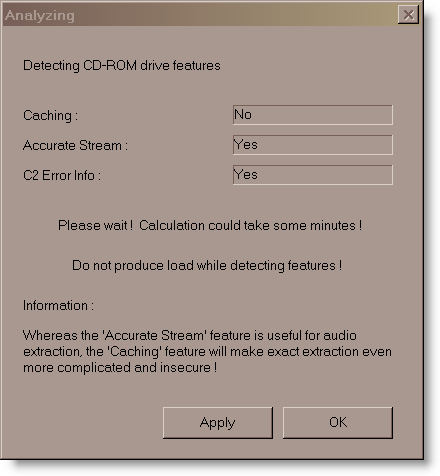
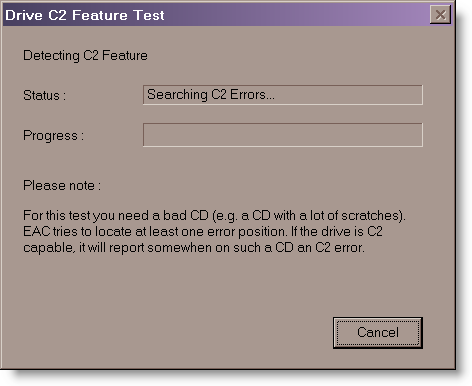
Go to the EAC -> Drive Options. . . menu (or press F10) and make the following settings: Put a new CD in the drive and run the Detect Read Features test. Put a scratched CD in the drive and run the Examine C2 Feature test.
The Detect Read Features test:
The Examine C2 Feature test:
Autodetect the read command:
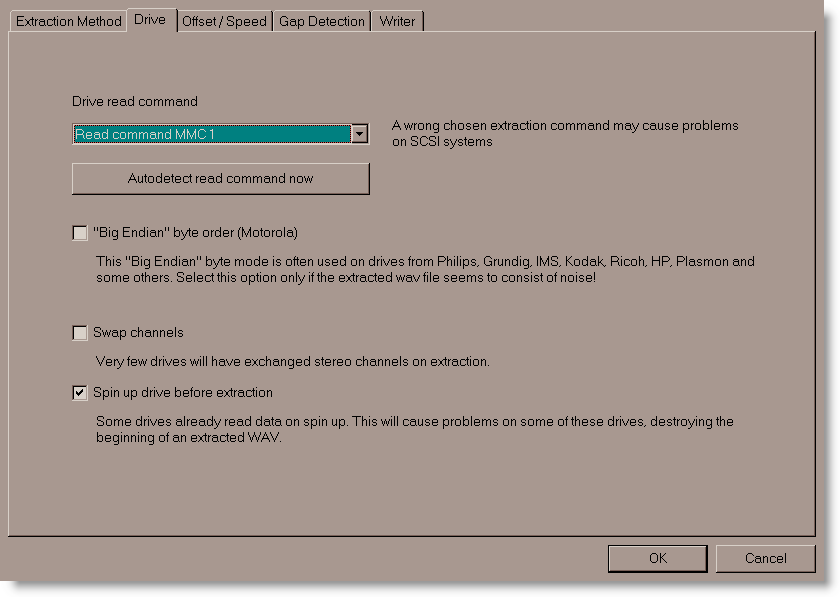
Experiment with the Overread into Lead-in and Lead-out feature if you get read errors at the beginning of the first track or end of the last track.
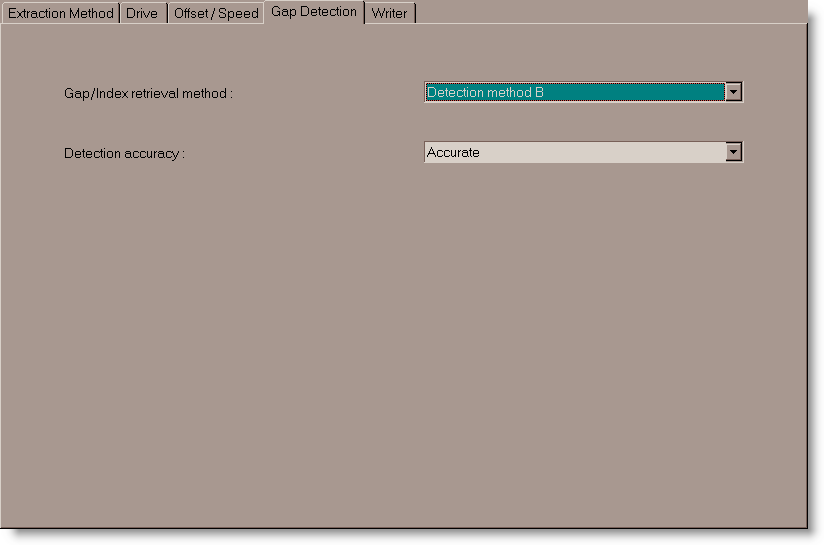
Use the default / detected Gap/Index retrieval method. I set Detection accurate method to Accurate; Secure and Inaccurate are the other options. Accurate and Secure both perform multiple reads, just Secure makes even more re-reads and this causes the ripping process take even longer. Use Secure on if you’re willing to take several hours or more to rip a slightly scratched disc.
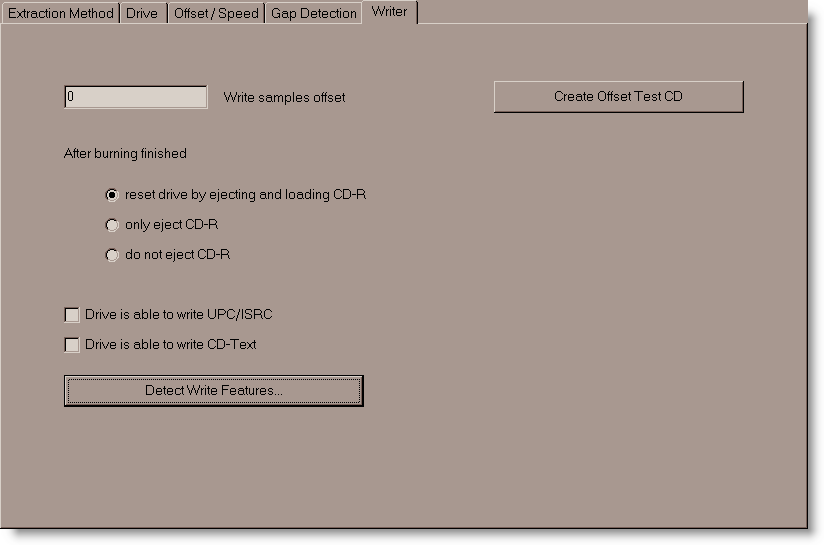
Since this is for writing, the settings are not that important.
Step 8: Configure EAC Compression Options
Go to the EAC -> Compression Options. . . menu (or press F11) and make the following settings: The External Compression tab is the only one that needs to be configured; other tabs will be ignored. Set the command line and options as shown below:
(Note: Exact Audio Copy V0.99 prebeta 5 and later includes FLAC as an internal cncoder, so some settings may be slightly different than what is show below.)
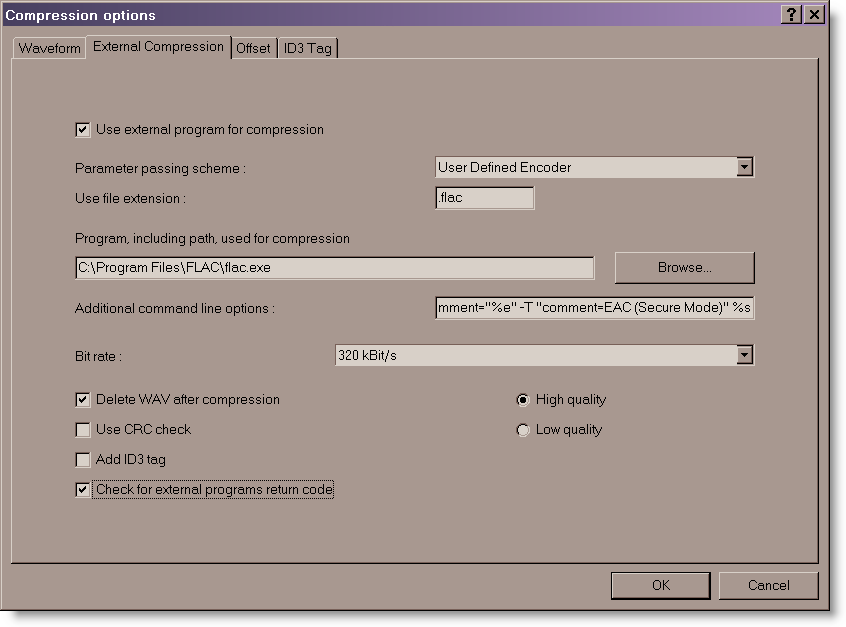
For the Additional command line options, use the following. The -8 setting will give maximum compression. If you have a very slow computer, you may want to try -7 or -6. See this page for a complete list of FLAC command line options.
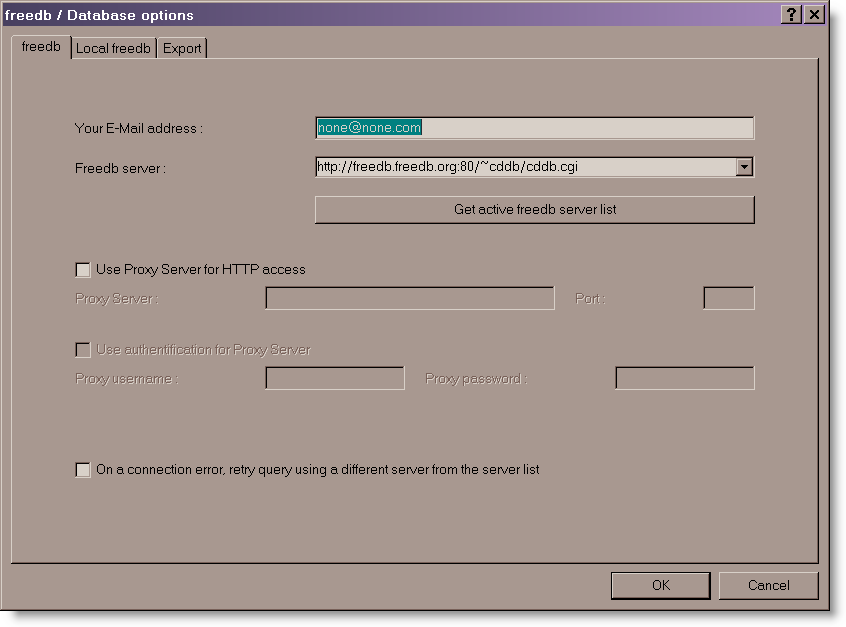
Step 9: Configure EAC freedb Optons
Go to the EAC -> freedb / Database Options. . . menu (or press F12) and make the following settings: These settings were probably already entered during the setup wizard, but just in case:
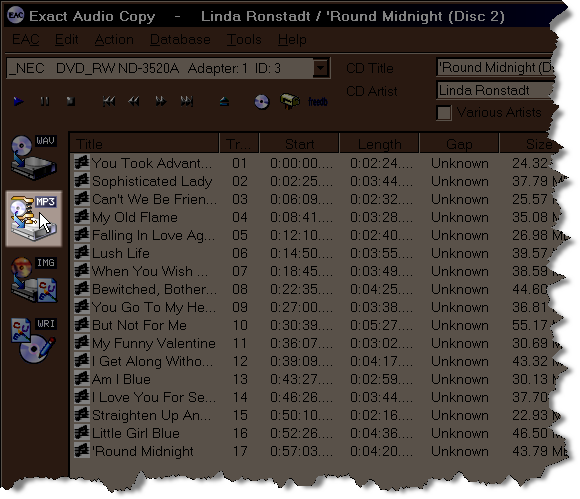
Step 10: Rip the Music to your PC
You are now ready to rip CDs to FLAC files! Just click the MP3 button to rip to a compressed file. This will not result in an MP3 being created; the MP3 button should really be called “the external file compression program” button. After making the configuration changes above, clicking the mp3 button will result in a FLAC file being created.
Go to the Database menu and select Send AccurateRip Results…. Make the following Scheduled Submission settings to add results to the AccurateRip disc database. This, in part, helps create more keydiscs.

Step 11: Edit the Tags
You’ll eventually find songs not taggeg properly when ripped and these are the best way to correct that. The tag editors are generally pretty straight-forward to use. The two best editors I’ve found are Mp3tag and TagScanner. These free programs can lookup tag info from the freedb database to retag files. They can also rename files based on the tags or retag songs based on the file name. Media Monkey is a great alternative, all-around app that can edit tags and do about everything else you’d want.
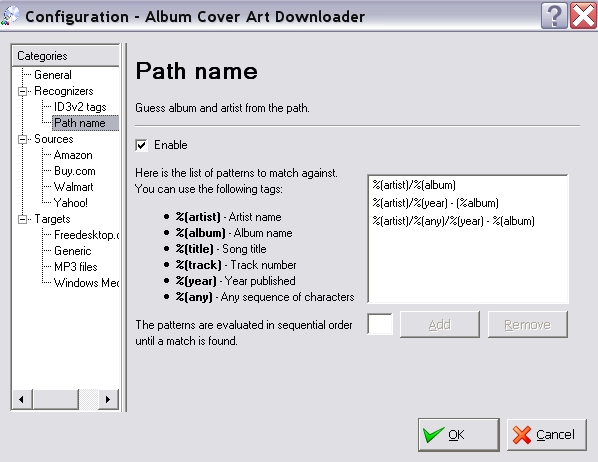
Step 12: Download the Cover Art
Many music players will display cover art. Album Cover Art Downloader is an app completely dedicated to getting the pictures into your music directories. This program can’t read the tags for FLAC/OGG files (only ID3 tags are recognized), but it can be configured to identify albums based on folder naming. Even with this setup, it still can get the album name wrong, so I have to manually delete the date before clicking “download covers”. Anyway, here is how I have Album Cover Art Downloader configured to identify albums based on folder/sub-folder naming.
Media Monkey is a great all-around program that does album art and also plays FLAC, Edits Tags, converts formats, etc. It will ready the tag info for about every format you can imagine, so it can be useful to modify any titles/folders that Album Cover Art Downloader doesn’t recognize.
Step 13: ReplayGain Volume Normalization
This is complicated enough for a separate explanation, so I won’t go into details here. ReplayGain will analyze and calculate the peak volume level for an entire album or each individual song and write a tag in the header of the file. It does not actually change the audio data within the file but rather give a “volume offset” that the audio player uses to pre-adjust the song to the proper playback level (independent of the player volume setting).
Links and References
This guide would not be possible without the information given in these excellent guides:
- EAC Configuration for Musepack
- HydrogenAudio Forum: EAC+FLAC image, Best way to create a lossless back-ups
- EAC Configuration for WMA9 and WMA Lossless
many thanks
Hi,
I am re-ripping every CD again now into FLAC. I had originally done it the first time with EAC (as a rookie) .99 Beta and ripped all 350 of my CDs. Now I am going at this again 4 years later and found your webpage. I see there are more options in the latest 1.0 beta 2 of EAC… would you possibly be able to update your page?
Thanks,
Jake
Sorry, I don’t have a Windows PC to test it on. Most of the settings should carry over to the new version.
Hey Carlton. I have an internal SSHD. Can I safely rip to that drive in my music folder or will that drive be broken sometimes. How many times can I overwrite etc.?
There is nothing different for Solid State Drives vs. conventional spinning disk hard drives. The data integrity is the same…and both can eventually fail, so be sure to keep a separate backup!
This is a commandline for the program. How can I do something in the same way with Cuetools?
-8 -A tukey(0.25) -A gauss(0.1875) -b 4096 -V -T “artist=%a” -T “title=%t” -T “album=%g” -T “date=%y” -T “tracknumber=%n” -T “genre=%m” %s –sector-align
Hi
When I enter the command line …. -8 -V –replay-gain -T “artist=%a” -T “title=%t” -T “album=%g” -T “date=%y” -T “tracknumber=%n” -T “genre=%m” -T comment=”%e” -T “comment=Extracted from CD using EAC” %s … into the additional command line in the external compression tab and then click test button, it tells me ‘an invalid replacement tag found’ What do I do? Thanks
Ian, I’m not sure which of the items is causing the issue. The required items for ripping the file correctly are -8 -V –replay-gain. The others are for tagging the file with the correct metadata. Try removing the tagging options starting with -T one at a time until you find a combination that works.